Camping Cheergerm style

Some may say that our crew ‘glamps’ more than camps. We do have electricity and fridges. I am totally down with that.

South West Rocks, in New South Wales, is a five hour drive from Sydney town. Nestled between the ocean and rivers it is a lush, green paradise. We are camping at the South West Rocks Tourist Park on the side of the beautiful Macleay River.

Eating in the great outdoors is awesome. Our group efforts have left no-one wanting. The children move around in a pack, thong footed and sun kissed. Adults increasingly unwind and shrug off the shackles of everyday life. 

Nothing can take the edge of our relaxed lifestyle. Not a million mozzies, bluebottle stings or numerous visits from the asthma train to Kid 2.

Ocean and river swims. Numerous pool visits leave us happy and weary. I lie in my khaki green tent at night as fruit bats fly overhead and the ocean crashes. Dinners out at night have included visits to the Riverside Tavern and the Smithtown Riverview Hotel. They provide a welcome relief from feeding the hungry hordes and mountains of washing up.

The oceanfront Horseshoe Bay kiosk in town sits under majestic Norfolk pines and serves The Best Potato Cakes In The World (think handmade, salty and crispy). The sproglets devour the $2.50 ice-cream cones that they have been saving up for all year.

Foodie camping delights have included coleslaw, a vibrant broccoli salad, magnificent zebra prawns, corn and zucchini fritters, fattoush and kafta patties, fish straight from the river, and of course, potato salad.

These photos were taken with The Yaks mobile phone. Not half bad.

http://www.southwestrockstourist.com.au

http://publocation.com.au/pubs/nsw/south-west-rocks/the-riverside-tavern

http://www.riverviewhotel.net.au


Millefeuilles aux tomates et lentilles and a lady crush

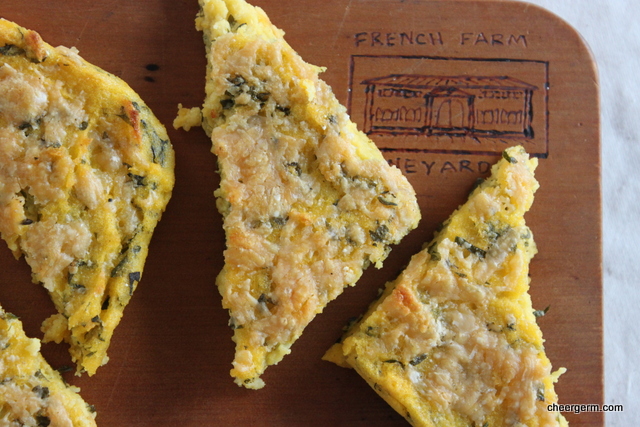
I am putting it out there, Rachel Khoo is a big spunk. Don’t worry Yak, nowt wrong with appreciating beauty from a distance. Not only is this dark haired lass easy on the eye, she also cooks delightful dishes in her teeny tiny Paris kitchen. Her food is inspiring, beautiful and I love how she puts her own personal twist on classic French cooking.

I have been reading her second cookbook, My Little French Kitchen, in which Rachel gets out amongst it and looks at regional food throughout France. Dishes on my ‘to do’ list from this cookbook include a carrot tarte tatin, a walnut and buckwheat caramel tart and this ‘summer on a plate’ dish of a vegetable millefeuilles.

This recipe is from the ‘Brittany’ chapter and this millefeuilles is essentially a multi-layered veggie pie made of Breton buckwheat galettes. Rachel tells us that these savoury pancakes are always made of buckwheat and are best enjoyed with a bottle of the locally produced cider. Good news for Mr Yak who can no longer enjoy beer as he once did.

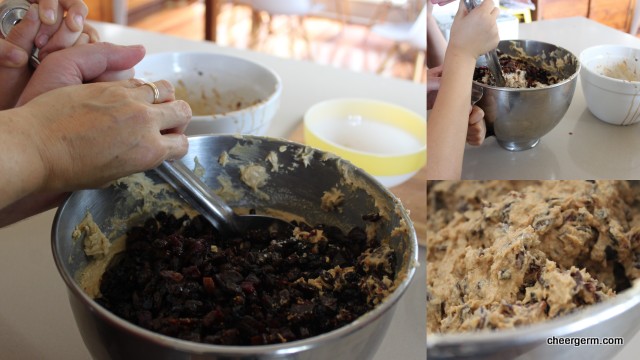
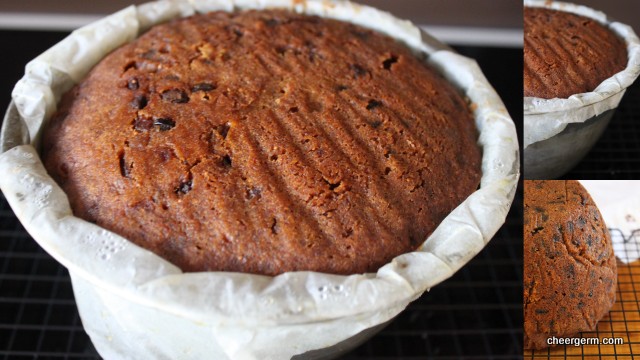
It was New Years Eve and just the Yak, the lads, my sweet self and The Dadmeister aka Mr Bagpipes, were in da house. We began with a delightful cheese moment. A mouth watering squishy Saint from Bruny Island, a fudgy tangy surface ripened cheese. This could be it people, the most awesome cheese I have ever eaten. Ripened just a smidgen past ‘delicate’ it is almost nutty with a back taste of that delicious moldy penicillin flavour. An extra happy note for all you vegetarians, these cheeses are all rennet free! Oh yeah…

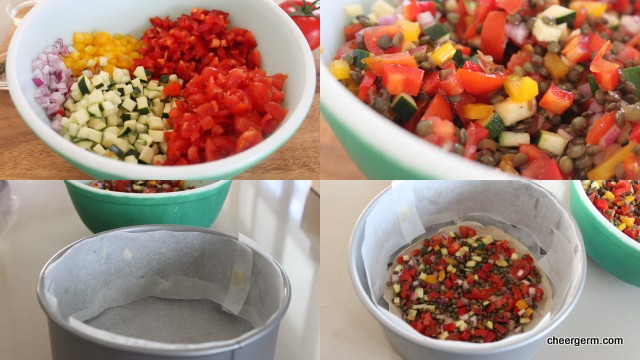
Back to the millefeuille. A great entertaining vegetarian dish. It sings in a soprano voice of all things summer and next time I will be adding a dash of goats or feta cheese to one or two layers. When making your crepes, don’t be pernickety about the size of your frypan, just swirl the mixture around until you have the right size. Lord, making crepes is like watching paint dry. The extremes you will go to when you have a lady crush, (and are also very hungry.)

TOMATO AND LENTIL MILLEFEUILLES
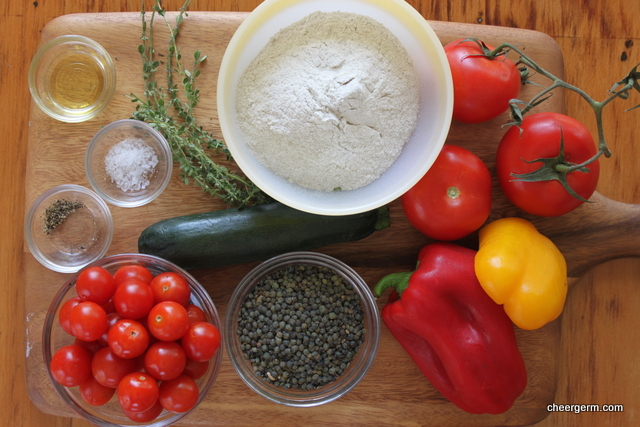
WHAT YOU NEED
200g buckwheat flour
Salt and freshly ground pepper
600ml cold water
Vegetable oil, for frying
100g Puy or beluga lentils (French green lentils)
1 large zucchini, chopped into 3mm cubes
2 red peppers, deseeded and chopped into 3mm cubes (I used one red and one yellow)
200g cherry tomatoes, finely chopped
1 red onion, peeled and finely chopped
1 tbsp olive oil, plus a little extra for drizzling
300g assorted tomatoes (a mix of heirloom green, yellow and red would be great if you can find them)
1 tbsp lemon thyme

HOW YOU DO IT
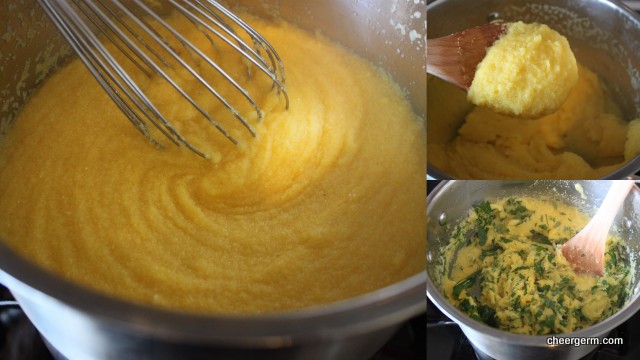
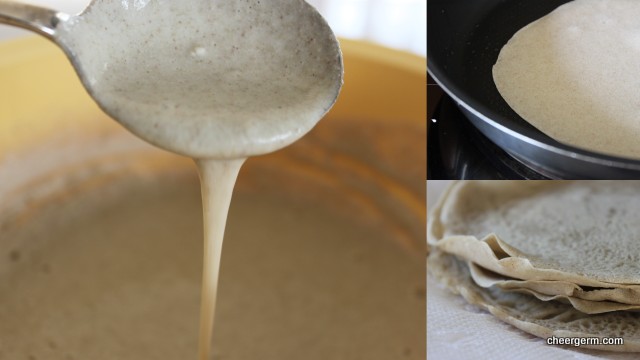
Mix the flour and a pinch of salt in a bowl.
Make a well in the centre and gradually mix in the water, adding just enough for the batter to have the consistency of double cream. Don’t over stir as this will produce rubbery galettes. Cover the batter and chill in the fridge for at least one hour, or overnight. Before using, whisk again and add more water if necessary.
Heat a 15-18 cm non-stick crepe pan or a small frying pan over a medium heat and brush with a little vegetable oil. Pour in a small ladleful of the batter and quickly swirl the pan so that the batter coats the base entirely. Cook for 1-2 minutes, loosen around the edge with a spatula, then turn it over and cook for a further minute.
Slide the galette out of the pan, then repeat to make 12 galettes, greasing the pan with a little oil each time.
Stack the galettes with layers of kitchen towel or baking paper between each one.
Cook the lentils in boiling salted water until just tender.
Drain and mix together with the zucchini, peppers, cherry tomatoes, onion and olive oil. Season to taste with salt and pepper.
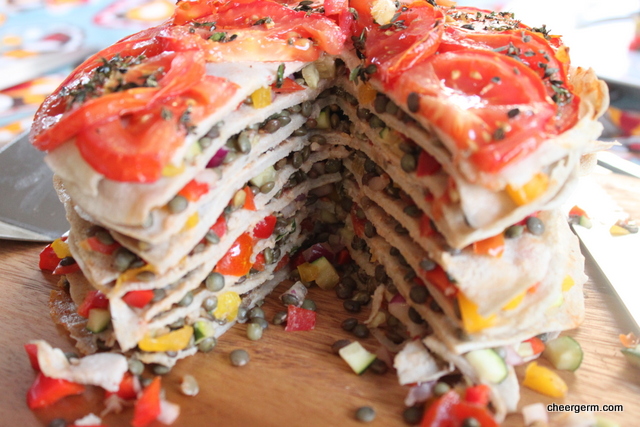
Preheat the oven to 180C. Line a loose-bottom round baking tin (the size of the galettes, my tin was 9cm high with a 19cm base) with baking paper.
Place one galette at the bottom of the tin. Spread with some of the lentil mixture then top with another galette. Repeat until you have used up all the galettes, ensuring you finished with a galette. (My mixture made 11 galettes.)
Slice the mixed tomatoes (in my case I didn’t have a fancy mixture of heirloom tomatoes so made do with the ones I had) and pack them tightly on top of the galettes. Drizzle with a little olive oil and sprinkle with the thyme.
Cook for 20 minutes, carefully remove it from the baking tin, slice and eat hot.

Cooking Notes: My millefeuilles was 9 crepes high and I had a dash of the filling left over.

Recipe from My Little French Kitchen by Rachel Koo, Published by the Penguin Group, 2013

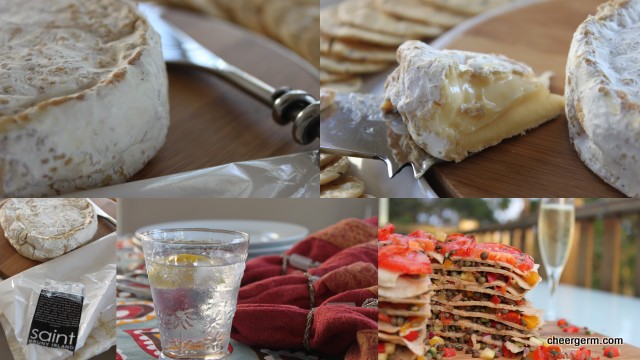
A quick thanks to the following blogs for passing on some very kind awards. It was lovely to be mentioned and thought of. Please go and check out these cool bloggers when you are kicking back this holiday season with a cup of whatever takes your fancy. The Cheergerm and Yak family are off camping for two weeks and Mr Bagpipes is in control of house and dog. We are hoping he doesn’t trash the joint with too many parties while we are gone. (He has said that invitations have already been issued.) Stay tuned for some Camping Cheergerm posts.

A.Prompt Reply
https://apromptreply.wordpress.com/2014/12/

Sarcasima
http://sarcasmica.me

Vegas Hungry Girl
https://vegashungrygirl.wordpress.com

France Says
http://francesays.com

For further information on Bruny Island cheese visit here:

http://www.brunyislandcheese.com.au/

Rachel Khoo blogs at

http://www.rachelkhoo.com/


The Yak can cook

The Yak made a special request that I blog his special Boxing Day potato fry up. I decided to honour this request, despite the fact that he was wearing a child’s Nerf gun in a holster and he had shot foam bullets at me whenever I entered the kitchen.

The Yak Speaks

I’ve always found potatoes to be the elixir of life, us pale skinny English boys love them.

Family tradition dictates that the Yak (me) makes a big fry up for Boxing Day dinner. There are always plenty of leftover potatoes from the Christmas evening dinner feast, as we cook enough to attempt to feed a small army. These leftover spuds are the base for this fry up.

Slicing the potatoes, put them into a well oiled pan and fry for 15 or so minutes, turning them over once they are golden brown. Use the leftover butter that’s set at the bottom of the bowl where the leftover potatoes were sitting and put it on top of the potatoes for extra buttery goodness.

As there’s so many (family and potatoes) I usually have two frypans going at once. Potatoes that are fried to perfection are placed in an ovenproof dish and kept warm in the oven until all the potatoes are fried. Whilst the fried potato treasure is keeping hot in the oven, fry as many eggs as you possibly can.

Thanks Mr Yak for sharing your culinary glory. We leave you with a few images from our Christmas and Boxing Day festivities.

Happy New Year.


Gluten free rumpled plum pudding and a scary Christmas tin

The tins sat nestled amidst a cacophony of ancient kitchenware in an inner west secondhand shop. The search for some vintage tins had been going for months. These, in my opinion, fitted the criteria. A bit worse for wear and a tad unusual. One had tiny Christmas bells adorning the sides with an image of a child in a blue head scarf on the lid. A small concern lurked in the far reaches of my brainbox and I said to the proprietor ‘Do you think the girl child on this tin is a little bit, well, scary looking?’

He agreed, but also stated that he didn’t mind vintage objects that had images of creepy children on them. I concurred, purchased the tin and proudly raced back to the car. When I showed the tin to the Yak and lads, they screamed in horror and ran crying in t’other direction.

Here it is. The jury is out. (Actually, the jury has voted and decided this is the kind of tin that should probably be in a horror movie….)

On to the cooking bit.

The Yak, being of the English variety, loves a spot of plum pudding. So a gluten free version was required. When a mere youngling, this Cheergerm loathed fruitcake and plum pudding type desserts. As an older cheery person, I have discovered that I quite enjoy a small piece of these fruity offerings. The key to success has been in only utilising fruits that I actually like and leaving out the dreaded dried peel, shudder. It is also important when choosing the alcohol to macerate the fruit in, that you use booze you like the taste of. In this case, I went for a luscious liqueur Muscat. On Christmas day, this dessert will be accompanying Sister No 2’s light, fruity Chrissy pudding ice-cream delight. The best of both worlds.

My plum pudding tin was looking slightly worse for wear so I had to line it with baking paper. This gave my finished product the slightly rumpled ‘I been sleeping too heavily on my pillow crease lines’ look. For quality control purposes, I took my trusty apple corer and snarfled a sample. It was bloody delicious. The smell of macerated fruit was intoxicating. It is moist, rich, not too sweet and you don’t miss the gluten at all. The pudding itself is now resting in stately grandeur. All tucked in, preparing itself for Christmas day scoffing.

The Cheergerm, the rumpled pudding and the little girl on the creepy tin wish all of you a very Merry Christmas.

GLUTEN FREE RUMPLED PLUM PUDDING

WHAT YOU NEED
4 cups of dried fruit in total, this is what I used:
1 cup dried figs, chopped finely
3/4 cup cranberries, roughly chopped
3/4 cup sultannas
3/4 cup currants
3/4 cup raisins, roughly chopped (if large, mine weren’t so I left them)
1/2 cup of the booze of your choice, I used a liqueur Muscat
1/4 cup orange juice
1 tbl orange zest
250g unsalted butter, room temperature
1 cup brown sugar
4 eggs
2 cups gluten free breadcrumbs
1 cup almond meal
1/2 cup gluten free self-raising flour
1 tsp mixed spice
1/2 tsp cinnamon
1/2 tsp nutmeg
1/4 tsp cloves

HOW YOU DO IT
Combine all of the fruits, alcohol, orange zest and orange juice in a medium sized bowl. Cover and stand overnight.
Grease and line a 6 cup pudding basin or tin. Using a mixer, beat the butter and sugar until pale and creamy.
Add the eggs one at a time, beating well after each addition.
Stir in the dried fruit mixture, breadcrumbs, almond meal, gluten free self-raising flour and spices. At this point, every member in our family had a stir of the bowl and made a Christmas wish. If you really want to be traditional, it is here that you would place a silver coin in the mixture. I am not sure I would want icky money in my food, so we chose to leave that bit out.
Spoon the mixture in to the prepared pudding tin and cover with greased baking paper and foil. Tie around the rim of the basin with kitchen string, securing tightly.
Stand the pudding on a trivet (or saucer in my case) and place in a deep saucepan or stockpot. Fill with enough water to come halfway up the sides.
Cover and cook for 5 hours over a medium heat, topping up with water as needed.
Serve immediately or if you are making your pudding ahead, cool down completely before wrapping well and storing in the refrigerator until needed.
Pudding can be reheated by returning to basin, covering and steaming again for approximately 1 hour. It can also be microwaved for about 12-15 minutes.
Flame the pudding and serve with custard. (Flaming means to pour brandy over the top of the pudding and setting alight. Let the most sober person in the room perform this ritual and try not to burn your house down.)

A slight Cheergerm adaptation of a Coles online recipe

</a

http://recipes.coles.com.au/recipes/917/gluten-free-pudding


Christmas advent calendars and cranberry chocolate pistachio shortbread

It has become apparent to me recently why ‘child friendly Advent calendars’ were invented. It was to assist parent conversations with time conscious, anxious seven year olds. In a Christmas nutshell; it was to avoid the parent in question, doing their nut and rocking in a corner with their thumb tucked safely in their mouth.

Kid 2, in his hyper awareness of the universe and it’s going ons, likes to know exactly what we are doing and when, what time it is, how many days until…..I mean it folks. He wants to know the answer to these questions, more than once a day.

Kid 2, to me, for the zillionth third time: ‘Mum, how many more days until Christmas?’
Me: (Imagine a sweet mummy voice here full of patience and infinite love.) ‘I don’t know darling, go and count the days on the Advent calendar.’

It is because of this calendar that, when faced with a constant barrage of Christmas time questions, I can present a patient, non-yelling like a deranged banshee parental face. This mummy can now rest safely at night, knowing that the authorities will not be knocking on the door anytime soon.

I blathered on about what shortbread means to me last year. In short, Christmas is shortbread and shortbread is Christmas. Up to today, this Cheergerm has baked good old fashioned shortbread, gluten free shortbread and chocolate ginger shortbread. (Hmm, I see a pattern.) Now I present to you a very grown up chocolate, pistachio and cranberry shortbread.

The buttery goodness of this biscuit mixed with tart berries, rich dark chocolate and a nutty crunch, is a festive delight and a wonderful Christmas edible gift. To top it off, this recipe can easily be made gluten free or not. The flour is a straight swap, just make sure you use a good quality gluten free flour blend.

It’s not so bad being a grown up if you get to eat biscuits such as these. Even if you do get asked the time and date more than one very human being ever should be.

CRANBERRY, CHOCOLATE PISTACHIO SHORTBREAD, GLUTEN FREE OR NOT

WHAT YOU NEED
250g unsalted butter, room temperature
1/2 cup caster sugar
2 3/4 cups of gluten free plain flour or regular plain flour (I use a good quality gluten free flour such as White Wings.)
1/4 cup rice flour
1/2 cup lightly toasted pistachios, finely chopped
1/2 cup dark chocolate, finely chopped
1/2 cup dried cranberries, finely chopped

HOW YOU DO IT
Preheat oven to 180C.
Line 2 baking trays with baking paper and sift the flours together into a bowl.
Cream the butter and add the sugar gradually (I used a mixer), beating until the mixture is light and fluffy.
Work in the flour gradually until the mixture is just combined.
Add the pistachios, cranberries and chocolate and knead lightly to bring together to a dough. (I do this in the bowl.) Knead a little longer for a regular version.
Divide the dough in half, roll each half out to a 3-4 cm log. Wrap in clingwrap and refrigerate for half an hour to an hour.
Slice the logs into 1-2 cm thickness, depending on your fancy, place 10mm apart on a baking tray and prick each piece all over with a fork. This mixture was a bugger to cut due to the chocolate and nuts, so the colder the better. Some shortbread may go out of shape but just form it back into a similar shape using your hands.
Bake for 20-25 minutes until crisp and straw-coloured. (Regular shortbread will be quicker to bake, probably only 15-20 minutes.)
Cool down on wire racks.
Makes about 20-25 pieces.

Cooking Notes: When adding the flour to the mixture, I pop a teatowel over the mixer to stop the flour ‘floofling’ (an exact culinary term) all over the joint.

A Cheergerm adaptation of a Margaret Fulton recipe from The Margaret Fulton Cookbook

Old school shortbread:
https://cheergerm.wordpress.com/2013/12/13/shortbread-for-christmas/

Gluten free shortbread
https://cheergerm.wordpress.com/2013/12/18/shortbread-for-a-hungry-silly-yak/

Chocolate, ginger and spelt shortbread
https://cheergerm.wordpress.com/2014/06/01/chocolate-ginger-spelt-shortbread


Another bloody gluten free chocolate cake

Me: Hey, Kid 1, do you want to come and watch Deep Purple play Smoke on the Water?
Kid 1: What does that even mean?
Me: You know, the very first riff you ever learnt on your guitar? It’s a video of the band playing the actual song.

Total silence from Kid 1. He didn’t even give me the courtesy of an answer.

It’s official folks.

I am old.

Speaking of age, WordPress kindly informed me the other day that this blog had turned one. My, it seems like only yesterday that I gave birth. How time flies when you are having fun.

To celebrate, here is the gluten-free chocolate cake baked for the Yak’s birthday a few weeks ago. Whilst stealing someone else’s birthday cake could be seen as a cruel injustice, I am really only stealing the idea of a birthday cake. First things first. To the man who actually ate this cake, Happy Birthday Mr Yak; you totally fabulous, dry witted, old before your time in a totally ironic way, Northern English bloke.

Secondly, Happy Birthday to this blog. It’s been a big ball of fun and I wish I could send all of you a piece of this light, fluffy chocolate cake action. As that is impossible, I will send you the idea of this old school chockie cake. The buttermilk gives the crumb a lovely moistness and as it’s not too rich, people usually come back for seconds. (Or thirds, hey, back off…leave some for me.) A dear friend has been making this cake for a few years and she changed it to a gluten free version when the Yak become a Coeliac.

Thanks for reading folks and enjoy your cake.

ANOTHER BLOODY GLUTEN FREE CHOCOLATE CAKE

WHAT YOU NEED
1 1/2 cups gf plain flour (220g)
2 tbl almond meal
1/2 cup cocoa powder
1 1/2 tsps bicarb soda
1 cup caster sugar, raw or regular
1/2 tsp vanilla bean powder (or 2 tsp vanilla essence or 1 tsp vanilla bean paste)
1 cup buttermilk
185g butter, melted and cooled
2 eggs, lightly beaten

HOW YOU DO IT
Preheat oven to 160C and line a 22cm non stick springform pan or grease a non-stick bundt tin.
Sift flour, almond meal, cocoa, bi-carb soda, sugar and vanilla bean powder in a large bowl or a mixer bowl.
Add 1/2 the buttermilk and cooled butter and beat at a medium speed until combined.
Gradually add the rest of the buttermik, egg and the rest of the butter (and vanilla essence if you are using a liquid form).
Beat on medium to high speed for around 2 minutes until the mixture is thick and creamy. Don’t overbeat!
Cook for 50 minutes to one hour. Test with a skewer. Leave in tin for 5 minutes then turn out and cool complete on a cooling rack.
Dust with icing sugar. We ate it with strawberries and creme fraiche.

A recipe from a great friend and I have no idea where she originally got it from

333

3

999


Ice-cream pants and an asparagus radish salad

Of late, there seems to have been much just cause and reason for celebratory eating. A good portion of this happy eating has included the devouring of some excellent ice-cream and gelato.

So much so, that this Cheergerm has been forced to coin the phrase ‘ice-cream pants’.

Definition: when ones trousers/waistbands/knickers/undies/jeans/skirts have become ‘ever so uncomfortably tight’ due to the over indulgence of delicious ice-cream. An example sentence would be:

‘Oh dear, I have ice-cream pants.’

One could be forgiven in thinking that you had spilt ice-cream on your pants. (Whilst this has been known to happen, it is a rare occurrence for the true connoisseur of ice-cream.)

In essence, when you experience the state of ‘ice-cream pants’, it simply means you have been eating a bit too much of the good stuff. It is an indication that you need to reign it in, just a tad.

To counter ice-cream pants, salads such as these will be thrown down my gob on a regular basis. I will also be exercising more and am about to set off on a walk, it will be a long one. A few days or so.

The Hornsby Market had the most divine bunches of Prince like purple asparagus and rosy red radishes. A brand new packet of lemony sumac spice was sitting in the pantry, crying out in its little sumac voice ‘eat me, eat me’. The crunchy, spicy radish goes beautifully with the earthy delicate asparagus and this zingy, sweet dressing. The purple asparagus loses a tad of it’s vibrancy when cooked but still tastes delicious.

ASPARAGUS AND RADISH SALAD

WHAT YOU NEED
2 bunches asparagus (I used purple), woody ends removed and trimmed into 5 cm pieces
4 medium radishes, sliced finely. (I did mine on a mandolin.)
Vinaigrette
2 tbl extra virgin olive oil
1 tbl white wine vinegar
1 tsp Dijon mustard
2 tsps honey
1 tsp sumac
1/4 tsp salt
Zest of one small lemon
Black pepper to taste

HOW YOU DO IT
Boil the asparagus in salted water for two minutes until just tender then immediately refresh the asparagus in cold iced water. Once the asparagus has cooled, drain well and pat dry.
Place asparagus and radish on a shallow platter or in a salad bowl.
Place the vinaigrette ingredients into a small bowl, whisk until combined and pour the mixture over the radish and asparagus. Toss the salad gently.
We ate this with the most awesome bowl of monster cold king prawns (well, the lads and I did) and a scrumptious potato salad.

Cooking Note: Sumac is a deep red, purple spice used mostly in Middle Eastern and Greek cooking. It has a tangy, lemony flavour. It is wonderful sprinkled over a plate of tomatoes or sliced avocado. It can also be used in a marinade or in a dressing, as is done here.

A slight Cheergerm adaptation of a recipe from the Taste of Home website. Link follows the photos.

http://www.tasteofhome.com/recipes/radish-asparagus-salad#.

https://www.facebook.com/pages/Hornsby-Market/151427154911192?ref=ts&fref=ts


Pavlova zen and my hive

With a trio of family birthdays to celebrate, the house was packed to the rafters. Fizzy wine bottles were popping and we all talked over each other (nothing new there). We began the evening by chowing down on a selection of Bruny Island Cheese Co cheeses and some fat, salty olives.

At one point I was in another room in the house, collecting something or other.
I managed to stop and still myself (not an easy task) and listen to the hubbub. It was a loud and happy buzz, which made me think. This is my hive, my source of happiness. It’s not always harmonious (we ain’t a cult for goodness sakes) but even when our voices are raised in gleeful disagreement, there is no better sound.

To help celebrate three birthdays there were fittingly, three desserts. The pavlova, Sister 2’s amazeballs baked cheesecake and some decadently iced chocolate cupcakes.

The Yak adores pavlova and it is a super gluten free dessert. This rather large version is as light as a unicorns tinkle and as fluffy as a fairy tutu. It has a crisp outer shell and a marshmallow interior that is synonymous with a good pavlova. (Well, that’s how we like them here, feel free to disagree.) My very favourite fruit to accompany this dessert is that somewhat saucy, acidic passionfruit. This crazy fruit brings a wonderful acidic zing that perfectly counterbalances the sugary hit of the pav.

I pride myself on my meringue skill. (This is up there with my other useful talent of attracting the attention of random crazy strangers in the street.) You may have heard this all before but for what it’s worth, here are my top meringue tips.

1. Don’t use new eggs, older egg white works better.
2. Bring the eggs to room temperature.
3. Make sure your bowl (stainless steel or glass) is very clean and totally dry. Water is your enemy at this point.
4. No egg yolk in your whites.
5. Beat your eggs to a stiff peak before adding the sugar, always add that pinch of salt first.
6. Add your sugar slowly, then beat until the sugar is dissolved and no longer gritty. Do not rush this process. You will not regret this, this is the Zen of Pavlova. Patience is a virtue when it comes to meringue. This is not a job you can rush if you want to achieve that stiff, white glossy goop that is synonymous with this much beloved dessert.

PAVLOVA

WHAT YOU NEED
6 egg whites, room temperature
Pinch of salt
2 cups caster sugar, sifted
1/4 tsp vanilla bean powder or 1/2 tsp vanilla paste or essence
1 tbl cornflour
2 tsp vinegar

HOW YOU DO IT
Heat the oven to 180C.
Place baking paper on a large tray and draw a 22 cm circle for a flatter pavlova or a 20cm circle for a taller version. (It will spread a little.) Turn the paper pencil side down on the baking tray.
Beat the egg whites and pinch of salt with an electric beater on low until they stand in firm peaks.
Keep beating the egg white on low adding the sugar a tablespoon at a time.
Once all of the sugar is added, continue beating on a medium speed until the meringue is no longer gritty to the touch. This takes about 5 minutes or so.
Fold through the vanilla, cornflour and vinegar.
Spread the mixture with a large spoon onto the prepared tray and place in the oven. Drop temperature down to 130 (120 fan forced) and bake for one hour. Rotate every 20 minutes to ensure even baking and colouring.
Turn off the oven, leave the door ajar and let the pavlova cool down in the oven.
Expect cracks on the surface and the pavlova may collapse a little as it cools, don’t panic, this is all ok.
Topped with whipped cream and your favourite fruit. Think passionfruit, strawberries, mangoes, nectarines, peaches and kiwi fruit. Use one fruit or make it a fruity salad.

A Cheergerm adaptation based on a crazy New Zealand teatowel recipe, a Margaret Fulton recipe and an online Annabel Langbein recipe

IMG_4816


http://www.annabel-langbein.com/recipes/fantasy-pavlova/62/

http://www.brunyislandcheese.com.au/


A side of herb polenta bake and an aside

Yak: You are a good lad, will you look after me when I am old?
Kid 2: Probably, but I might be somewhere else.
Me: Kid 2, if I were you, I would start running now. Unfortunately, I have nowhere left to run.

This hearty side of polenta is magnificent Yak food. It helps trick convince The Yak into feeling like he is not ‘missing out’. There is very little that this side dish doesn’t go with. We have scoffed it down with a ratatouille like vegetarian sauce as well as a creamy braised mushroom dish. It goes beautifully with a myriad of casseroles or good piece of meat or fish. Breakfast for dinner? Try it with a fried or poached egg and some steamed asparagus.

Chuck in whatever herb combination tickles your fancy. No fresh herbs? Then throw in a teaspoon of dried Italian herbs and let them steep in the stock whilst it comes to the boil. This version has parsley, thyme and a smidgen of sage. In the time it took me to prepare the thyme (boom tish) for this dish, my lads had gone to high school, got degrees, travelled the world and started families. Picking the leaves off thyme is one of the worst kitchen jobs. I would love to say I find it meditative but I don’t.

Take note if you will, of the beautiful wooden board that this polenta sits upon. Uncle R, a veritable goldmine of funny and punny one liners and the master of the ‘aside’ made this for me back in 1993. Whilst staying in Christchurch, NZ, with the always hospitable Uncle R and Aunty L, we took a day trip to Akaroa and stopped in at French Farm winery for a snack with flavour. Some of the food was served upon divine wooden boards that were labelled ‘French Farm Vineyards’. I admired them greatly and Uncle R, a collector of bits of wood (as well as of puns) said ‘Don’t worry niece, I shall make you a board just as nice as this one.’ (He would have said this in a silly voice, cause that’s how he rolls.)

Back at their house, he whipped up a piece of kauri (wood) into this gorgeous wee board, copying the details from the one back at the vineyard. It is exactly the same as the original version I had coveted. Bar one thing. It’s made with the love, care and thoughtful detail of my uncle, and it is far better than anything I could have ever purchased for myself. And that my friends, is something that you just don’t get bored of.

GARLIC AND HERB POLENTA BAKE

WHAT YOU NEED
1 cup gluten free veggie stock and 2 cups water (the original recipe calls for 3 cups of stock but I find it too salty for my taste.)
1 cup instant polenta
2 cloves garlic, crushed
1 cup chopped fresh herbs (such as parsley, sage, thyme, oregano) this is a bit flexible I have also used 1-2 to 1 cup with great results.
3 tbl grated Parmesan
30g butter
Salt to taste
3 tbl grated Parmesan extra for topping

HOW YOU DO IT
Preheat the oven to 180C and line a 15cm x 15cm baking dish with baking paper. I use a larger one and it makes a wedge of polenta that is about 22cm x 18cm and 3cm high.)
Bring the stock and water to the boil in a medium saucepan.
Pour in the polenta and cook over a medium heat for 3-5 minutes, stirring constantly, the mixture should be very thick.
Stir in the garlic, chopped herbs, parmesan and butter and taste for seasoning.
Pour/spread the mixture into the baking dish. Smooth the surface and sprinkle with the extra Parmesan.
Bake for 20-30 minutes until the cheese is melted and golden brown.
Cut into triangles, squares or into whatever damn crazy shape you wish.
Serves 8 with one piece each.

Recipe from The Gluten-free Kitchen by Sue Shepherd

http://frenchfarm.co.nz/wordpress/


Teeny weeny gluten free blinis and a fancypants morning tea

Sometimes when there is a significant birthday, (you know, we all just turned 21 recently), our mothers group have been known to celebrate by putting on a fancypants morning tea.

We figure we can do a bloody nice job without forking out the big bucks elsewhere. It’s also a great excuse to use some of the lubbly jubbly old plateware that this Cheergerm voraciously crazily sensibly collects.

My food contribution to this delectable spread was a gaggle of gluten free blinis topped with silky smoked salmon, a burble of sour cream and and a dash of dill.

Other goodies included squares of a moreish gluten free chocolate cake, a beautiful Tasmanian squodge of Brie and chockie dipped strawberries. One of our number has discovered a gluten intolerance, hence we rolled ‘mostly GF’ so she could enjoy this slap-up feast.

A traditional Russian blini is a yeast raised buckwheat pancake that symbolised the sun. They had pride of place in a festival called ‘maslenitsa’ that marked the end of winter and the start of spring. How totally appropriate I thought (in complete research hindsight).

These nutty tasting, light gluten free beauties do not contain yeast, instead, I separated the egg whites and beat them into peaks before folding through the batter. They are best eaten on the day you make them. If that isn’t possible, I suggest warming them slightly before devouring them with whatever topping you so desire. On saying that, I have had them without being heated the next day and they were still delicious.

GLUTEN FREE BLINIS

WHAT YOU NEED
1 cup plain gf flour
1 cup buckwheat flour
1 tsp baking powder
1/2 tsp baking soda
1/4 tsp salt
1 tsp sugar
2 eggs, separated
1 cup of milk
1/2 tsp white vinegar
1 tbl neutral oil
Extra pinch of salt
Little bit of butter or oil for the non-stick pan frying pan.

HOW YOU DO IT
Sift flours, baking powder, baking soda, salt and sugar into a large bowl.
In a jug or small bowl, beat the milk, egg yolks, vinegar and oil together.
Pour the milk mixture into the flour mixture and stir to combine.
In a separate clean bowl, whisk the egg whites with the extra pinch of salt iuntil stiff peaks are formed.
Fold the egg white mixture into the combined flour and milk mixture.
Let the batter rest for about 30 minutes.
Heat the non stick pan to a medium heat, brush with a little butter or oil. Place teaspoons sizes if you want really weeny blinis or a dessertpoon full for a small blini, into the pan. Cook for around 2 minutes until bubbles start to form on the surface of the blini. Flip and cook for another 45 seconds or so on the second size. (My first batch is never the best, as the pan heats up the blinis tend to cook faster. )
Remove to a teatowel and cover. This keeps the blinis soft and nice like a snuggly blanket.
Keep cooking until all the batter is used up.
Makes about 30 small blinis. In this case I topped them with finely diced smoked salmon tossed in a big squeeze of lemon juice, a wee blob of sour cream and a sprig of dill. They are lovely with jam and cream as well.

Cooking note: variations in this batter may occur due to the size of the eggs used and the type of GF flour blend. Add a bit of extra buckwheat flour if the mixture isn’t as thick as a pikelet batter should be or a dash of milk if it’s too thick. The batter should be almost spongy, the photo below may give you an indication of the required texture.

A Cheergerm adaptation of a recipe from The Weiser Kitchen website. Link follows after photos.

http://theweiserkitchen.com/recipe/gluten-free-buckwheat-blini/