A little bit of what you fancy and gluten free banana bread

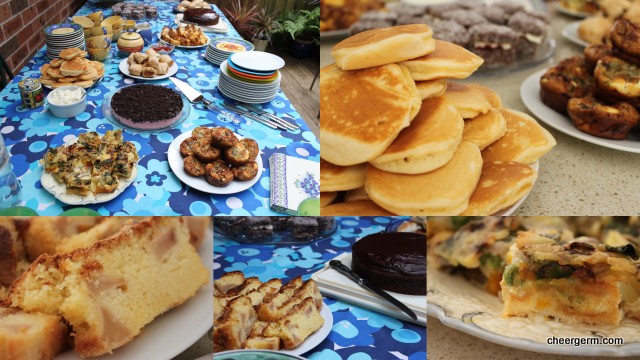
A particular comment on a television show we were watching recently has stuck in my mind. It was made by a British woman who had reached the magnificent age of 101. She was in remarkable good nick and during the interview had said ‘People always ask me, what is the secret to your longevity? And I always say, a little bit of what you fancy does you good but don’t make a pig of yourself.’

In this age of don’t eat this, eat more of that, eat less of that, eat only that; her view resonated with my food philosophy. Which would probably be ‘a little bit of this and a little bit of that, just don’t go nuts’. I will clarify this by saying that I do sometimes go overboard, being the happily imperfect human being I am.

Fanaticism and radicalism have never sat well with me. Sometimes it feels that my attempt at viewing food in a well balanced manner is under attack, albeit, by a well meaning barrage of good intentions. (It’s ok, no paranoia here, it is completely understood that it’s not directed purely at me.)

The issue is, as a devourer of new food information and being an open minded wee Cheergerm, it floats my boat to learn new things and experiment with different ingredients and recipes. It’s all about keeping it in perspective. Continuing to still enjoy what is loved as well as opening my mind up to new ideas. So the mantra of ‘a little bit of what you fancy’ is compelling in whatever direction that may take me.

Teresa Cutter, aka ‘The Healthy Chef’ has some great recipes. What I love about her is the many alternatives she provides in her recipes and so far, they have all worked. Three out of four CheergermYakatarians adore her nutritious (read low fat, low refined sugar) version of banana bread. I made a little adjustment and replaced some of the almond meal with sorghum flour to attain a lighter texture. Try using a stick blender to zshoosh the mixture as it really keeps the texture nice and light. The ground flaxseed acts as a fantastic natural binder in lieu of gluten.

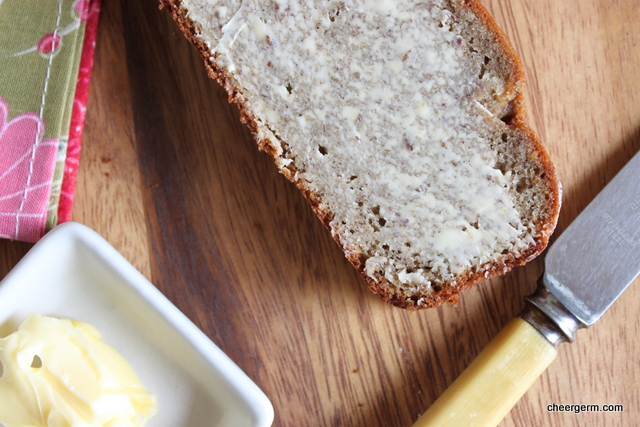
This loaf is subtly bananaish, light and moist without too much squelchy almond meal texture. A hint of vanilla and cinnamon. Not sweet, at all…I mean, really not sweet but quite delicious with a smear of the good stuff, yeah, we are talking about butter. Give it a try, you might just fancy it.

GLUTEN FREE BANANA BREAD

WHAT YOU NEED
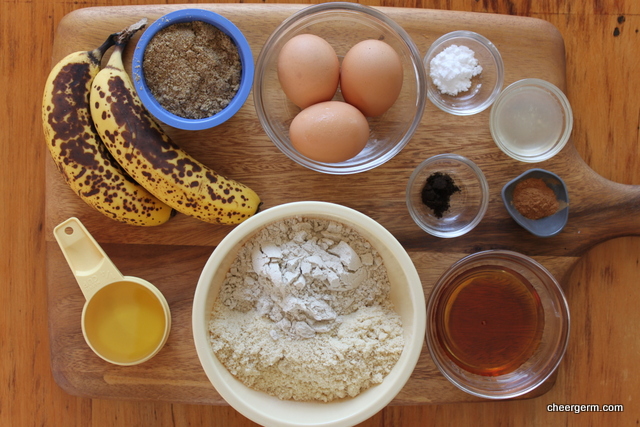
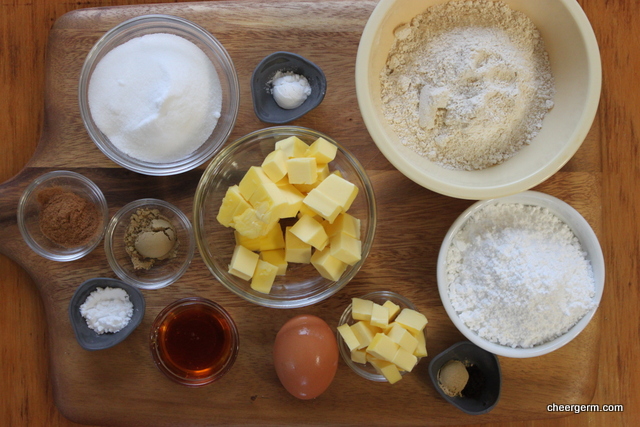
300g ripe, smashed banana (I only had 240g but it turned out fine)
3 eggs
60g/2 tbl maple syrup or honey
1/4 tsp vanilla powder or 1 tsp vanilla
60g or 1/4 cup grapeseed oil, macadamia nut oil or cold pressed olive oil
1/2 tsp cinnamon
1/2 tsp bicarb soda/baking soda and 1 tbsp lemon juice
1 cup almond meal (120g)
3/4 cup sorghum flour (80g)
1/4 cup ground flaxseed

HOW YOU DO IT
Preheat oven to 160C.
Oil a loaf tin and line the bottom with baking paper. The size I used was 13cm x 22cm. The original recipe used 10 1/2 cm wide by 26cm long.
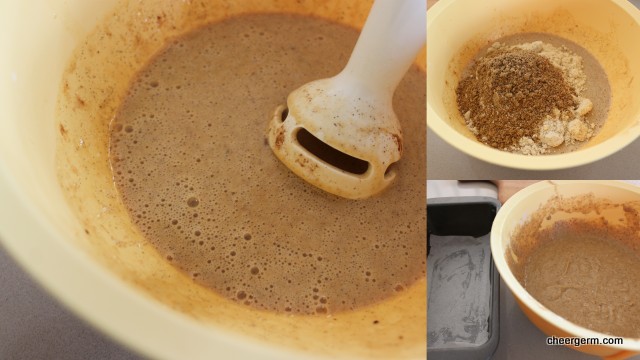
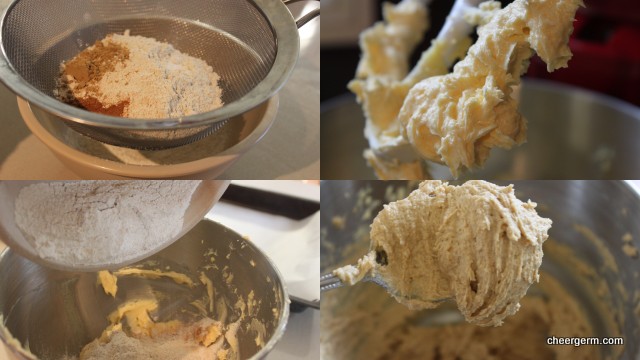
Combine smashed banana, eggs, honey, vanilla, oil, cinnamon, bicarb soda and lemon juice (the lemon juice activates the bicarb) into a large bowl and mix by hand or better still, use a stick blender or big blender of some kind.
Add the almond meal, sorghum flour and flaxseed and mix thoroughly.
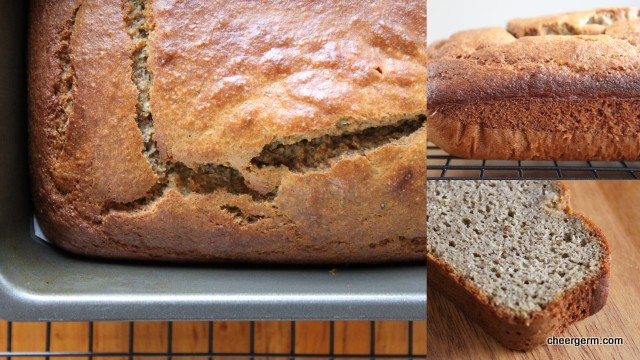
Spoon batter into the tin and bake for 45 minutes to 1 hour or until a skewer inserted into the centre comes out clean.
Cover the top with foil if it starts to overbrown. I covered my loaf at 40 minutes and it was ready at 55 minutes.
Remove from the oven and allow to cool before turning out.
Slice and serve with a creamy smear of butter.

A slight adaptation from Teresa Cutter
https://www.thehealthychef.com/2013/01/gluten-free-banana-bread/


The Way of the Pierogi

IMG_7782

Before the Lovely R departed back to Poland, I was lucky enough to experience a hands on pierogi lesson. Pierogi is a Polish style dough dumpling stuffed with various fillings. R’s English is pretty darned good, despite her insistence that it isn’t. It is miles better than my Polish. (Ummm, non-existent.) As our lesson progressed, I tried to ask if she ever eats the pierogi straight after being boiled or does she always let it sit, then pan-fry and eat it. As we did on our lovely Polish picnic day.

Using her English/Polish dictionary, I found the word ‘boil’ and pointed at the translation. Horrified, the Lovely R vehemently shook her head and exclaimed ‘No, no!’ We spent a good few minutes, toing and froing, trying to understand what the other was saying. I showed her the dictionary again, this time, my finger was no long blocking the second meaning of the word ‘boil.’ It turns out that the first meaning had been an actual ‘boil’ that appears on the skin, a somewhat unsavoury medical condition.

Much laughter ensued.

This is one picture heavy post. I really tried to capture the intricacies of this process and I hope I have done the Lovely R justice. You can make the dough first then prepare the filling whilst the dough rests. R will often make the filling the night before then make the dough the next day. The dough also freezes well. She works fast. It is harder than it looks to make the dough stick, you must use all of your finger strength. No namby pamby weak fingers please. (Which obviously mine are.) The lovely R’s advice. ‘Practice will make you a master and Be Strong.’

For that is The Way of the Pierogi.

PIEROGI

WHAT YOU NEED
Pierogi Dough
1 kilo plain flour
400ml boiling water and extra ready if needed
1/3 cup Olive oil
1 tsp Salt

HOW YOU DO IT
Add oil to the flour then add the water gradually, you may not need all the water, or you may need a dash more. We used all 400ml and added another 3 tbl boiling water.
Bring the mixture together in the bowl then turn out onto a floured bench or board and knead until the gluten is activated, approximately 5 minutes.
Cover the dough in clingfilm and rest for half an hour minimum, up to one hour maximum at room temperature .
Flour a tray to place the pierogi on, and flour your workspace.
When the dough is soft and springy it is ready. Take a large ball of dough, around the size of a large orange.
Using a rolling pin, roll the dough, moving the dough regularly to avoid sticking, R worked it quite hard and it is quite elastic. Roll to approx 1mm thickness.
Using a glass or cutter about 8cm to cut out the pierogi shapes.
Use the scraps and add back into the dough.
Place a large teaspoon of filling onto each round of dough. (R works quickly.)
To shape the pierogi, pick up one pierogi and fold in into a crescent shape, press filling into the dough all the way and start to crimp around the edges.
As R says, Be Strong! Then turn over and crimp the other side. If there is too much filling, press it in with your index finger before crimping.
Don’t be afraid to pull the dough out as you crimp, you must have a good space between the filling and the dough so the two sides stick together without filling getting in the way. Again, Be Strong!
This filling used up about half of the dough made, we rolled out another batch once the first dough was used up. You can freeze leftover dough.

Filling
WHAT YOU NEED
3 potatoes, cooked and mashed
1 tbl oil and 1 tbl butter
1 medium onion, finely diced
300g-350g farm style cottage cheese, similar to Polish cheese. (Approximately the same weight of potatoes as cheese, with a tad extra cheese. Cheese must be slightly sour.
1 tbl Veggie stock powder (this is not mandatory)
1 1/2 tsp dried marjoram
Salt to taste, (more if not using vegetable stock)
Pepper to taste

HOW YOU DO IT
Cook onion in oil and butter until golden brown. Cool slightly.
Grate the cheese then add the cheese, stock powder (if using), marjoram, salt and pepper to the potato mixture.
Add half of the onion mixture to the cheese and potato mixture and mix well. R used her clean hands. The other half of the onion mixture is sprinkled on top of the cooked pierogi.
R usually makes the filling the day before or makes the filling whilst the dough is resting.

To cook pierogi
1 tsp salt
2 tbl oil
Fill a large saucepan over half way and bring to the boil.
Add about 8-10 pierogi at a time. When they float to the surface and have cooked for about 3-4 minutes, and feel tender, they are ready.
Meat pierogi take a bit longer, about 4-5 minutes.
You can eat them straight away topped with fried onion or refrigerate and pan fry on each side later in butter and oil, then top with the onion. (Which answered the infamous ‘boiling’ question, you can eat them straight away or wait and pan-fry them later. I have even re-poached them to keep them as softer type dumplings. It’s up to you!)

COOKING NOTES
If you are not cooking the pierogi straight away, cover the tray with a tea towel until ready to boil. It is ok if they get a bit drier and with a bit of air, it means they are less likely to stick.

Different filling ideas include a sweet variation of fresh blueberries. Do not add any sugar as it will bring out the juices and the pierogi will collapse. Serve them with a a sugar and butter sauce and sweet whipped cream.

Another popular vegetarian filling is finely chopped sauerkraut, dried mushrooms and onion. Meat fillings include ground lamb, pork and beef variations. When making meat pierogi, make the crescent shape then bring it around to the corners and squeeze into a tortellini shape. (See the photos at the very end. )

We did experiment with a gluten free version which was pretty darned tasty, however, it requires a tad more refining, so stay tuned.

Cheergerm Feb 1510

IMG_7792


A farewell afternoon tea with mini mushroom and feta frittatas

Last Sunday, The Mothership and Mr Polish hosted a family farewell afternoon tea for the Lovely R and Gorgeous A before they headed back to Poland. In direct hospitable response to the Lovely R’s Polish picnic generosity, the pressure was on to reciprocate. (In all reality, most of our get together’s involve some fairly tasty food due to a general love of eating, and eating well.)

The Cheergerm contribution to this slap up were dainty little mushroom and feta frittatas. Puffy, light and earthy from the thyme and mushroom; they were a nice addition to a motza of delicious afternoon tea delights.

This was the kind of spread from an Enid Blyton storybook. I half expected old Moonface himself to pop his head in and say ‘Hullo, oh, what have we here? What a top drawer afternoon tea. May I have a piece of cake?’ (To which the answer would have been a resounding, why yes Moonface, help yourself!) There was a pumpkin and veggie frittata, crispy homemade sausage rolls, dreamy gluten free lamingtons, fluffy pikelets, a gorgeous rich missisippi mud cake and spanokopita. The Polish contingent provided a delicious apple cake and peach cake (that had also been freed of gluten) and a vibrant marshmallow and Oreo cheesecake.

We sat in the sun, ate, talked and laughed, then ate some more. These beautiful people left a little bit of Poland behind and we hope that a little bit of Australia is forever tucked away in a corner of their hearts.

MINI MUSHROOM AND FETA FRITTATAS

WHAT YOU NEED
1 tbl olive oil
1 small onion, finely chopped
1 small zucchini, finely diced
200g mushrooms, finely chopped
6 eggs
100ml cream
1 tbl thyme
200g soft Danish style feta, crumbled
1/2 tsp salt
Pepper to taste

HOW YOU DO IT
Lightly oil a 12 pan non-stick muffin tin.
Heat olive oil in a frypan and cook onions over a medium heat for a few minutes.
Add the zucchini and cook until they start to soften.
Add the mushrooms and cook the mixture until any liquid from the mushrooms is reduced. Season lightly and allow to this mixture to cool.
Preheat oven to 180C or 170C fan-forced.
Beat the eggs and cream together in a medium sized bowl.
Stir in the mushroom mixture, thyme and gently fold in the feta. Check for salt and pepper, add more to taste.
Spoon the mixture evenly into the prepared tin and cook for 20-25 minutes, until puffy and golden. They will deflate as they cool, so don’t freak out.
Serve warm or cold, they would also be great for a picnic.

A Cheergerm creation


Ginger Kisses and 80’s Rock Stars

80’s rock stars, how I loved your imperfect teeth, your curly hair, your baggy pants and billowing white pirate shirts. Your castaway on a desert island looks, your exuberance and subtle sexuality.

No overt flaunting of your nibbles and nobbles, be you lady or man. Just a luscious and gorgeous sensuality in the way you moved and dressed.

I am talking about you; David Bowie, Michael Hutchence and all of INXS. Yes, you Sting, the strangely sexy Prince, The Police, U2, The Church and The Cure. Yes; you Split Enz, Crowded House, Pat Benatar, Blondie and Siouxsie and the Banshees. Don’t worry, I haven’t forgotten Duran Duran, Tears For Fears, Icehouse, Depeche Mode and New Order.

If I could, I would give you all a big Ginger Kiss. Rest assured, I am not smothering my lips in ginger sauce and going in for the pash. (Not that I wouldn’t mind giving a few of the above a smooch or two.) I am talking about that delightful New Zealand cake like biscuit, sandwiched with a buttery, mock cream type icing.

My childhood is embedded with memories of my paternal grandmother Nana J opening a packet of these wee puffy clouds from heaven. The spicy smell of them would waft towards you and your mouth watered with great expectation. Mr Bagpipes has memories of his mum baking them from scratch back in the day but by the time us grandkids had come along, Nana was busy running the business side of things for their trucking business. So, opening a packet of these ginger kisses was quicker by far. Nana still baked and cooked, her pavlova roll was legendary.

Baking these has been on the old ‘to do’ list for a while and I was very happy with the result. Warming, gingery and sweet. They were a real treat. Sure they weren’t quite as puffy as the store purchased ones, as I used a wholemeal flour but they had more substance. Try using the same amount of plain flour if you want an even lighter result.

GINGER KISSES

WHAT YOU NEED
115g butter, softened
85g caster sugar
1 egg, room temperature
2 tsp golden syrup, placed in a small dish and warmed slightly
125g/1 cup wholemeal flour
1/2 tsp baking powder
1 tsp ginger
1 tsp cinnamon
1/2 tsp baking soda
1 tbsp hot water

Filling
30g butter
120g icing sugar, sifted
1/2 tsp vanilla essence or 1/4 tsp vanilla powder
2 tbsp boiling water
1 tsp ginger or 1 tbsp preserved ginger

HOW YOU DO IT
Preheat oven to 180C or 170C non-fan forced oven, line two baking trays with baking paper.
Cream the butter and sugar until light and fluffy, then beat in the egg, followed by the golden syrup.
Sift together the flour, baking powder and spices.
Fold the sifted dry ingredients into the butter mixture and lastly, stir in the baking soda, dissolved in the hot water.
Put the mixture in small teaspoonfuls (I did large teaspoonfuls and they spread quite a bit) on the trays, or use a piping bag with a 1cm/1/2 inch opening. (I am not a fan of the intricate art of piping so I didn’t.)
Bake for about ten minutes, then remove to a cooling rack.

Finishing
Making the filling by beating the butter, icing sugar and vanilla together. Slowly add the boiling water a little at a time and continue to beat until the mixture is very light and creamy. Once the icing looks light and fluffy enough, stop adding the water as you may not need all of it. (I added too much water too quickly and had to add extra icing sugar, so my filling was a little heavier than it should have been.)
Pair up the Ginger Kisses, matching the sizes, smear a small amount of filling on each lower half and stick them together.
Store airtight, this made about 12 very large Ginger Kisses, next time I will make them a tad smaller.

Recipe from Ladies A Plate, Traditional Home Baking by Alexa Johnston. Published by Penguin Books 2008