Chocolate ginger spelt shortbread

Kid 2: I am bad at smelling things but really good at hearing.
Kid 1: I am good at everything except doing the splits and things like that.

Me, I am good at baking shortbread at Christmas time. (I am not good at the splits and things like that either.) The kids had been asking for shortbread a lot lately. Being the kind and doting parent I am, I acquiesced and thought I would bake them some.

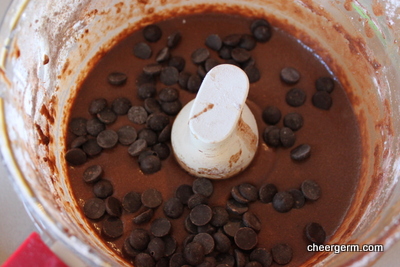
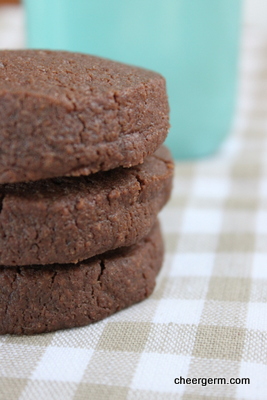
The idea of spelt shortbread has been creeping and a crawlin around the deep dark recesses of my brain box for quite a while now. A little flavour experimentation was in order. (Cue mad scientist laughter.) Then it dawns on me. Chocolate and ginger. A culinary match made in heaven. (They got married quite a while ago but nobody asked me to the wedding.)

These biccies give you a punch of bitter chocolate with a peppery ginger hum in the background. Kid 2 loved them, Kid 1 wasn’t a fan. All other grown up human beans who consumed them were enamoured. You be the judge.

Chocolate and ginger spelt shortbread
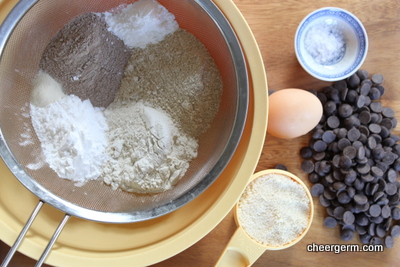
WHAT YOU NEED
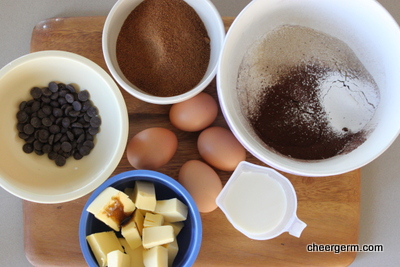
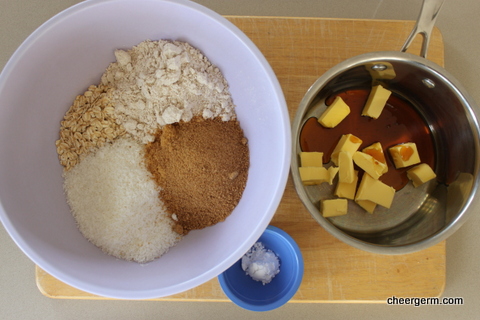
1 cup spelt white flour (I use an organic brand of spelt flour)
1 1/2 cups wholemeal spelt flour
1/4 cup rice flour
1/4 cup cocoa powder
3 tsps ground ginger (seems like a lot but you need it to get past the chocolate)
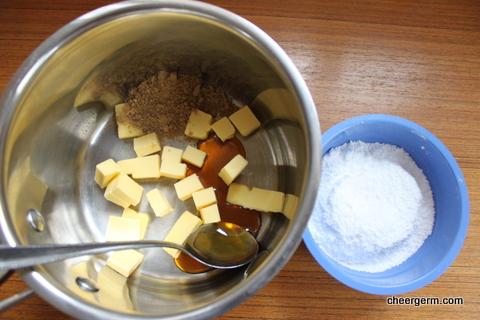
250g butter, room temperature (but not too soft)
1/2 cup raw caster sugar

HOW YOU DO IT
Preheat oven to 180C.
Line 2 baking trays with baking paper.
Sift the spelt flours, rice flour, cocoa powder and ginger into a large bowl.
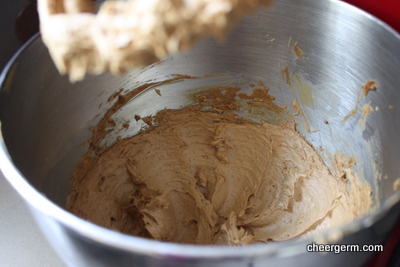
Cream the butter and add the sugar gradually, beating until the mixture is light and fluffy.
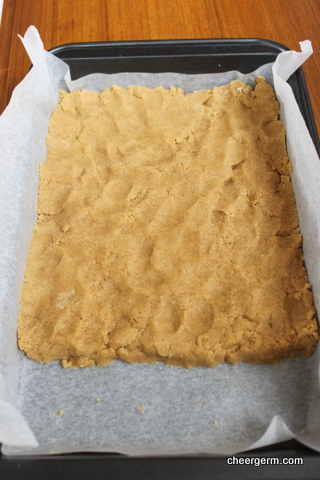
Work in the flour gradually and with a light hand, knead to form a dough. (I do this in the bowl.)
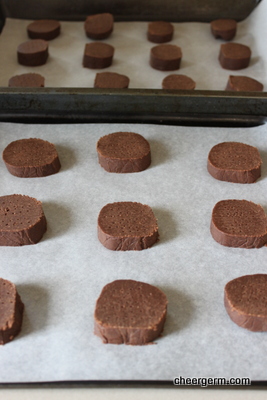
Divide the dough in half, roll each half out to a 3-4 cm log. Wrap in clingwrap and refrigerate for half an hour.
Slice the logs into 1-2 cm thickness, depending on your fancy, place 10mm apart on a baking tray and prick each piece all over with a fork.
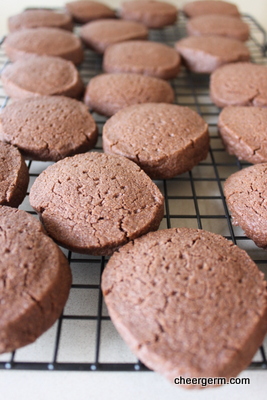
Bake for 15-20 minutes until crisp. It is a bit tricky telling when chocolate shortbread is ready. Also, because of the wholemeal spelt, hese little beauties needed a little more time in the oven than regular Joe shortbread.
Cool on a wire rack.

Makes about 20-25 pieces.

A cheergerm adaptation from a Margaret Fulton shortbread recipe


99


Gluten free chocolate chip biscuits

Kid 1: ‘Feed us or we will eat you’.

The natural world provides many totally understandable hideous examples of mothers eating their young. After some paltry research, I was unable to find examples of offspring devouring their devoted parentals.

I do not want to be the first. So, thus far, I have continued to feed my little darlings. Of course, when Kid 1 makes this proclamation, he usually wants something sweet.

Most of us who enjoy baking, have a standard ‘go to’ choc chip biscuit recipe. Me included, and the lads love them. Once they are baked, the Yak will stand there, all sad eyed and ask in a teeny tiny hopeful voice ‘Are they perhaps gluten free?’ The answer is usually no and the poor wee coeliac walks morosely away, leaving a trail of glistening gluten free tears behind him.

These biccies have been a work in progress for a little while now. There are no promises, that in my quest for perfection, they will not change again. Previous incarnations have had that slightly too sandy, gritty texture that gluten free baking can easily end up with. I wanted to make a flour blend that had some wholefood benefits. The addition of almond meal has given them that sought after softer bite. The end result is very similar to my standard choc chip biscuits.

Not everyone will have these flours so feel free to experiment. If you don’t have any sorghum or teff, try 3/4 cup brown rice flour instead.

Gluten free chocolate chip biscuits

WHAT YOU NEED
1/2 cup sorghum flour
1/4 cup teff flour
1/4 cup tapioca flour
1/4 cup buckwheat flour
3 tsps baking powder
1/2 tsp xanthum gum
Big Pinch of salt
1/2 cup almond meal
125g butter, chopped and at room temperature
2/3 cup coconut sugar (or rapadura or 1/3 cup soft brown sugar combined with 1/3 cup white caster sugar)
1/2 tsp vanilla bean paste (1 tsp vanilla essence)
1 egg at room temperature
100g dark chocolate chips (I used Callebaut or 100g dark chocolate chopped)
Sea salt flakes to sprinkle

HOW YOU DO IT
Preheat oven to 180C and line two baking trays with baking paper.
Sift together the sorghum, teff, tapioca, buckwheat, baking powder, Xanthum gum and salt.
Stir through the almond meal.
Cream together butter, sugars and vanilla. (I used my KitchenAid mixer.)
Add the egg gradually to the butter mixure. This will sometimes looks like it’s split, (think this is the coconut sugar) but it all comes out right in the wash.
Stir in the flour mixture.
Stir in chocolate chips.
Refrigerate for 20 minutes to make the dough easier to work. (Equally if you don’t have time for this step, omit it. They will just be a bit soft to work with.)
Shape teaspoons of mixture into small balls, place on greased baking trays, allow room for spreading,
Indent each biscuit lightly and sprinkle a few flakes of sea salt on each biscuit.
Cook 8-10 minutes, or until golden brown. Don’t let them get too dark.
Sit on trays for a few minutes before removing to cooling tray.
Makes 20 biscuits.

A cheergerm recipe


Rhubarb rhubarb rhubarb and chocolate pudding, gluten free.

Pretty pink stems of rhubarb inspiration whacked me aside the head the other day at the growers market. (Not figuratively, that would have hurt.) This purchase, coupled with a recent winning deconstructed rhubarb and chocolate tart on MKR (My Kitchen Rules, an Aussie TV cooking competition), had the old brain cogs a whirring. The thinking was…how can I enjoy these flavours without going to a whole lot of bother/trouble/effort and time?

Pudding was the natural answer. (It often is.) A popular dessert in this here household is a rhubarb and gingerbread pudding, so why not look for a similar recipe using chocolate? Naturally, it had to be gluten free.

This cooky person did hold a little bit of hesitancy regarding the marriage of chocolate and rhubarb, but the way the judges on MKR oohed and threw compliments around the room like small boys with a new handball, meant it had to be tried.

My gluten free adaptation has a lot less sugar than the original recipe, the sourness of rhubarb is a fave in our family and we don’t like it too sweet, man. (The butter has been knocked back a bit too.) It does use a food processor so it is super easy and quick.

To really ensure it’s validity, a poll was taken from those who shovelled this pud into their fizzogs for dessert.

The Verdict

Kid 1: ‘It’s nice but not a winning combination, I much prefer rhubarb bumble (crumble.)’
Mr Bagpipes visiting from Big Sky Land: ‘Mmmmm, we can have more of that lass, somewhat down the track.’
The Yak: ‘Yummy, I love it.’
Cheergerm: I like the cray cray (what all the hip young thangs say for ‘crazy’) combo of bitter dark chocolate and slightly sour rhubarb. It’s nuts but it works.

What do 10 years old know anyway?

GLUTEN FREE RHUBARB AND CHOCOLATE PUDDING

WHAT YOU NEED

Fruit

700 g trimmed weight rhubarb (recipe said 600 but I had a big bunch)
Cut into 2cm sizes
50 g coconut sugar (or raw, brown, rapadura)

Sponge

150 g self raising gluten free flour
50 g sorghum flour (or buckwheat or teff flour)
25 g cocoa powder
2 1/2 tsp baking powder
150g butter, room temperature and diced
150 g coconut sugar (raw caster sugar, rapadura)
4 eggs, room temperature
1/2 tsp vanilla bean paste or 1 tsp vanilla extract
50g dark chocolate chips (I used the good stuff baby…Callebaut callet, oh, fancy Belgian chocolate)

WHAT YOU DO

Preheat the oven to 200C/180C fan/gas mark 6.
Cut the rhubarb into 2 – 3 cm lengths and toss with the sugar in a bowl.
Spread evenly over the base of a buttered 30cm/2 litre capacity ovenproof dish (or equivalent size.)
Sift the flours, cocoa powder and baking powder in a separate bowl.
Reserving 2 tablespoons of the sugar, place the butter, eggs, vanilla and sifted mixture into a food processor and cream together. (No food processor? Try beating butter, vanilla and sugar, add eggs gradually then the sifted ingredients.)
Stir in the chocolate chips with a spoon.
Spread the mixture over the rhubarb and sprinkle on the reserved sugar.
Bake for 50 minutes or until a skewer comes out clean. (Remember if you hit a choc chip it will come out looking like it isn’t cooked but it probably is).
This is great hot out of the oven, or warm.
We snarfled it with ice cream but it would be delicious with yoghurt, custard or cream.

A cheergerm adaptation from the daily mail uk website

Pop here for my gluten free rhubarb crumble recipe:

https://cheergerm.wordpress.com/2014/02/03/gluten-free-rhubarb-and-berry-bumble/

Go here for the original non-gluten free rhubarb and chocolate pudding recipe. You could still knock back the sugar and butter quantities as per this recipe and keep the rest the same.

http://www.dailymail.co.uk/home/you/article-1272877/Recipe-Chocolate-rhubarb-sponge-pudding.html

Other websites that you may be interested in:

http://www.callebaut.com

https://au.tv.yahoo.com/my-kitchen-rules/recipe/23057262/deconstructed-chocolate


Spelt Anzac Biscuits

With Easter a not so distant chocolatey memory, those of us in Australia and New Zealand, turn our attention to Anzac Day this coming Friday. Anzac stands for ‘Australia and New Zealand Army Corp’ and this important national holiday marks the anniversary of the first military action fought by Australian and New Zealand forces in World War I.

Anzac Day has become a day to commemorate those brave soldiers who fought in the battle of Gallipoli in 1915 and also serves as a way of remembering all of our soldiers who lost their lives in World Wars I, II and and all military operations since then.

This brief description fails to convey the intangible ‘spirit of Anzac’ that is ingrained in the psyche of both our nations. It speaks of courage, humility, humour, mateship, understatement and facing unbeatable odds. The humble Anzac biscuit imbues this spirit and is a much loved biscuit, especially on Anzac Day.

A little bit of Anzac bikkie history, according to Alexa Johnston’s ‘Ladies: a Plate’. This biscuit wasn’t actually sent to New Zealand soldiers at Gallipolli as popular legend has it, at least, not under this name. Professor Helen Leach of Otago University researched the history of this biscuit and discovered that is wasn’t named until the year after World War I ended.

My adapted version is a little more like the recipe published in the 1933 Ideal Cookery Book, published by the Plunket Society. A Mrs Wyvern Wilson (strangely my mothers maiden name but no relation, I think!) used a well known formula of wholemeal flour and walnuts without oats. She also used much less sugar than today’s regular recipes. I do use oats and avoid nuts so they can be sent to school. If you have no spelt flour, it is just as good using wholemeal plain flour.

Not overly sweet, these biscuits have caramel undertones. The initial bite is crunchy but morphs into a delicious chewiness as you munch your way through it. The smell of them baking cries ‘childhood’ and ‘eat me now!’

Even though I consider myself somewhat of a pacifist, I am thankful for the sacrifices these brave men made to ensure the freedom of many. There exists a photograph of my maternal grandfather from World War II. He is on a horse, in Egypt. A young, handsome New Zealand soldier version of Lawrence Olivier. My other Pop worked on the railways back in New Zealand as he was unable to enlist due to health reasons.

Both of these men contributed to the war effort, as did all those left at home who assisted in other meaningful and valued ways. How lucky we were that our Pop came back. (Well, otherwise, I wouldn’t be here and that would really suck.)

Lest we forget.

Spelt Anzac biscuits

YOU NEED
1 cup rolled oats
1 cup desiccated coconut
3/4 cup wholemeal spelt flour (or wholemeal plain flour)
2/3 cup coconut sugar (or raw caster sugar, rapadura sugar)
115g butter
2 tbsp golden syrup
1 tsp baking soda
2 tbsp boiling water

WHAT YOU DO
Preheat oven to 180C (350F) and line two baking trays with non-stick baking paper. If you like, pop the trays into the fridge to get them cold, this does help the biscuit (somehow!) but I don’t always do it.
In a large bowl, combine the rolled oats, coconut, flour and sugar.
Place butter and golden syrup in a small saucepan and stir with a wooden spoon until they have melted together.
Put the baking soda in a cup, add the boiling water and mix to dissolve the soda before pouring it into the mixture in the saucepan.
Stir with a wooden spoon then tip it into the dry ingredients and mixture to a crumbly mixture.
Drop heaped teaspoonfuls on the trays, or roll into balls for a more even shape, leaving 3cm of space around each biscuit as they do spread.
Bake for 10-15 minutes until they have spread out and are a dark golden colour. I like to give them 8 minutes then turn the trays around to ensure even baking.
Cool on a rack, Make sure they are fully cooled before storing as this helps to keep them crisp. Store in an airtight container.
Makes 18 biscuits.

A cheergerm adaptation from ‘Ladies, A Plate. Traditional home baking’ by Alexa Johnston


Hot cross buns, a love letter to mum

Growing up, our mum baked bread. The aromas of rising yeast and mouthwatering smells of fresh loaves, speak to me of childhood. The warm crust slathered with butter and homemade jam was the best bit. These memories transport me back to our paddock surrounded ‘Billenya’ house in Holloway Road.

Of course, the bread was mostly wholemeal. My plea of ‘Mum, can’t I just have store bought white bread?’, must have driven her nuts. Rarely do my own sproglets have white bread. My, we really do turn into our mothers.

Mum also made her own hot cross buns. Having children of my own, helped me to truly appreciate what our own mother did for us. Not everyone is lucky enough to have mothers as emotionally and physically present as she was. (Even when things were less than idyllic.) As time has passed, some friends have sadly lost their mums. I am feeling very thankful for mum today.

Apart from pizza, yeast based products have never been my forte. That is about to change. On this slightly cloudy and drizzly day, with Easter on the horizon, something in me longs for the aromas of mums kitchen. These hot cross buns are a homage to her. In every knead of the dough, I pour in gratitude for all of her hard work, commitment and for always feeding her four girls so well and healthily.

No matter how much we may have moaned about it.

Hot cross buns

Light, airy with a lovely warmth from the spices, these were absolutely delicious, scoffed down with a cup of tea. Ambrosia.

I have slightly adapted an SBS website recipe by halving it, adding a touch of spelt flour and using less fruit. I have also provided the full recipe quantities if you would like to make about 20 buns. (See after the recipe.) I made 9 out of this quantity.

I only added sultanas as the kidlets don’t like a lot of dried fruit, but feel free to add some chopped apricots and currants if you like. (Maybe 50g or so.) Keep in mind the 1 hour and 45 minutes resting time.

YOU NEED
200 ml milk
60g butter
2 cups bread (high protein ) flour
1/2 cup wholemeal spelt flour
40g raw caster sugar (or regular)
1 x 7g yeast sachet
120g sultanas
2 tsps cinnamon
1 tsp mixed spice
1/2 tsp salt
Zest one lemon
1/2 beaten egg

Cross paste (this makes too much for 9, its the full amount for 20 buns)
1/2 cup plain flour
75 ml sunflower oil (I used rice bran oil)
65ml water

Spice glaze
1/4 tsp mixed spice
70g raw caster sugar
50ml water

HOW YOU DO IT
Place the milk and butter in a small saucepan over low to medium heat and stir until combined. Let cool slightly.
Place the sugar, yeast, flours, sultanas, cinnamon, mixed spice, salt and lemon zest into the bowl of an electric mixer fitted with a dough hook. Stir to combine.
Stir in the egg, then the milk mixture.
Knead for 9 minutes or until the mixture is smooth and elastic.
Turn the dough into an oiled bowl, cover with clingfilm and please in a warm and draught free spot for 1 hour or until doubled in size. (This process is called ‘proving’.)
Knock back the dough and divide into 9 or 10 equal pieces. Knead each piece for 1 minute until it is a smooth ball.
Place in rows on an oven tray lined with baking paper. Cover with a tea towel and place in a warm, draught free spot for 45 minutes or until dough doubles in size.

Preheat oven to 220C (conventional, 200C fan forced)
To make paste for the cross, place flour, oil and water in a bowl and stir to a smooth paste. Place into a piping bag with a small nozzle (or a small ziplock plastic bag with the tip cut off) and pipe a cross shape onto each dough ball.
Bake for 10 minutes at 220C (conventional, or 200C fan forced) for 10 minutes, reduce heat to 200C (or 180C fan forced) and bake for a further 9 minutes or until golden.

Make spice glaze while buns are baking, put mixed spice, sugar and water in a small saucepan over medium heat and bring to a simmer, dissolving sugar. Remove from heat and cool slightly.
Brush buns generously with glaze. Serve warm or at room temperature with butter.

A tip from one of my lovely sissies: If your house is draughty, try proving in the microwave! (Just don’t turn it on).

To make 20 buns:
400 ml milk, 120g butter, 4 cups bread (high protein ) flour, 1 cup wholemeal spelt flour, 75g raw caster sugar (or regular), 2 x 7g yeast sachet, 240g sultannas, 3 1/2 tsps cinnamon, 1 tsp mixed spice, 1 tsp salt, zest one lemon, 1 beaten egg.
The paste recipe is the same, for the glaze, use 1/2 tsp mixed spice and 125 g caster sugar.

Go here for the original recipe: http://www.sbs.com.au/food/recipes/hot-cross-buns-0


Ginger cat crunch

Kid 2: In the olden days did they use to eat ginger cats?
Me: Ummm no, dear, why?
Kid 2: Oh, what about when they needed ginger?
Me: Well, ummm, actually, ginger is from a plant.

His relief is palpable. For those of you who were also concerned as to the true origin of ginger, you can all breathe a sigh of relief.

The lads adore this Ginger Crunch. A crisp and crunchy biscuity slice topped off with a spicy thin layer of icing. I have made two small changes to a recipe from a beloved cookbook that the mothership once gave me. The book, ‘Ladies: A Plate’ is a gorgeous conglomeration of classic New Zealand baking recipes.

Ginger Cat Crunch

WHAT YOU NEED
The Base
80g coconut sugar (or raw caster sugar, rapadura)
200g wholemeal flour
1 tsp ground ginger
1/2 tsp baking powder
115 g butter

Icing
55g butter
1 tbsp golden syrup
2 tsp ground ginger
55 g icing sugar, sifted

HOW YOU DO IT
Base
Preheat oven to 180C and line a shallow 30 x 21 cm tin with baking paper.
Put all the dry ingredients into a food processor and pulse briefly to combine them. Drop in the butter and process just until the mixture forms fine crumbs. (You can do all this by hand, rubbing the butter into the flour but this is easier!)
Pour the crumbs into the tin, spread them out evenly and press down firmly using your fingers to compact them slightly. They will stick together properly as they bake.
Bake for 20 – 25 minutes until the mixture is a pale golden brown.

Icing
While the base is cooking, put the butter, golden syrup and ginger into a saucepan and heat gently, stirring. When they are melted and combined, tip in the icing sugar mixture and mix to a fairly runny consistency.
Remove the base from the oven and immediately pour on the icing. Spread it evenly over the surface with a spatula.
Cut the mixture into fingers or squares, leave to cool then break it apart along the cuts and store in an airtight container.
Makes 12 squares or about 16-20 fingers.

Note, to make it really crunchy you can make it thinner than I did. My mixture didn’t quite fill the whole pan so the slice was more, ummm, slicey than super crunchy.

Recipe slightly adapted from ‘Ladies: A Plate. Traditional home baking.’ By Alexa Johnston

Please note, no ginger cats were harmed in this recipe


Cinnamon tea cake

Whilst reading a lovely blog the other day, I was reminded of a wee poem I used to have attached to my fridge. It was a cartoon accompanied by the saying:

‘I don’t think I shall ever see, a poem as beautiful as a cup of tea.’

The cartoon has long since been lost but still I carry that saying in my heart. This wee cake is a smashing accompanient to a good, strong cuppa. As a young lass, I remember happily scoffing down hot toast slathered with butter and liberally sprinkled with cinnamon and sugar. This tea cake replicates the aromas and tastes of that very same warming little snackle.

This recipe was passed on by a friend and I have tinkered with it (just a little) to provide a gluten free version for the good ole Yak.

Why use sorghum flour? Firstly, it is gluten free and my brief research shows it is high in protein, iron and dietary fibre. The starch and protein in sorghum take longer than other similar products to digest. Unlike rice flours, it isn’t gritty and helps to add a smoother texture to baked goods. This is always a wondrous thing when baking GF. I used the Bob’s Red Mill ‘sweet’ white sorghum flour but I also read that it can be purchased from Indian stores labelled as Jawar Atta. Just make sure it’s truly gluten free before purchasing it.

A quick mention of Xanthum gum, a product made from fermented corn sugar. I generally don’t use it a lot but it’s used in GF cooking as an emulsifier and thickener. You don’t need much, just a tad. I trialled the first recipe without it then used it on the 2nd attempt. It did make for a more spongy and cake like consistency.

For those of you who would like to use regular flour, I have provided the ingredients (see below). The method is still the same.

Cinnamon tea cake, gluten free

YOU NEED
60g butter, softened
1/2 tsp vanilla bean paste or 1 tsp vanilla
1/2 cup caster sugar (I used white to give it a light texture)
1 egg
1 cup gf plain flour
1/4 cup ‘sweet’ white sorghum flour
2 tsps baking powder
1/4 tsp xanthum gum (if you don’t have it, try without!)
Pinch of salt
1/3 cup milk

Topping
10g butter, extra melted (once cake is baked)
1 tsp cinnamon
1 tbl caster sugar

HOW YOU DO IT
Preheat oven to 180C.
Grease and line a 20cm round cake pan.
Sift the plain flour, sorghum flour, baking powder, xanthum gum and salt into a bowl.
Beat the butter, extract, sugar and egg in a bowl until light and fluffy.
Stir in flour and milk.
Spread mixture into tin (it’s quite thick) and bake for 25-30 minutes until it springs back to the touch.
Stand 5 minutes in tin, turn onto rack.
Brush cake with melted butter sprinkle with cinnamon and sugar mixture.

A cheergerm adaptation from a recipe a friend gave me

In case you were wondering, take a peek at the blog I was referring to
http://peakperspective.wordpress.com

Old school cinnamon tea cake

YOU NEED
60g butter, softened
1/2 tsp vanilla bean paste or 1 tsp vanilla
1/2 cup caster sugar
1 egg
1 cup self raising flour
Pinch of salt
1/3 cup milk

The topping and method is exactly the same as the gluten free version. Enjoy!


Healthy err gluten free brownies

First things first. Today marks the start of Coeliac Awareness Week in this vast land of thongs and Vegemite.  I for one, am very aware. The Silly Yak seemed to lack some awareness yesterday, when he ordered some salads for his lunch and one of them was couscous. (He has made a mental note to himself, couscous contains gluten, I must not eat gluten). Have a happy coeliac kind of week! 

Back to the healthy err brownie. Don’t get me wrong, I love a decadent chocolate brownie. Loads of butter, unctuous dark melted chocolate, a caramel swirl, a sprinkle of sea salt…burble…stay tuned for that recipe folks.

However, sometimes the inner health food hippy wins out. (That hippy would also like me to dress in long tie-dyed swirling skirts, multiple jangly bangles and a braided leather head band but I keep a sartorial lid on her, mostly.) 

These brownies are dialed back in the fat and sugar content and the addition of dates adds some texture and natural sweetness. It is a gluten free adaptation of a fave little Bill Granger recipe I have been using for a few years. No nuts have been used so the Kidlets can still take them to school. Try changing the dates to apricots or figs if you are not a fan of the date. (Don’t blame yourself if you aren’t, we all have our little oddities). 

They are actually better the next day, you know, a little more moist and all that.
 
Healthy err chocolate brownies

YOU NEED
60g (1/2) cup cocoa powder
1/2 cup gluten free plain flour
1/4 cup buckwheat flour
1tsp baking powder
1/4 tsp xanthum gum
50g (1/3) cup coconut sugar or brown sugar
100g (2/3 cup) chopped dried dates
90g unsalted butter, melted
80ml (1/3 cup) low fat milk (or whatever milk you got)
2 eggs
1/2 tsp vanilla paste (1 tsp vanilla extract)

METHOD
Preheat oven to 160C
Lightly grease and line the base of a 20cm square non stick baking pan.
Sift the cocoa powder, gluten free and buckwheat flours, baking powder and xanthum gum into a large mixing bowl.
Whisk together the butter, milk, eggs and vanilla.
Add the wet ingredients to the dry ingredients and stir until just combined.
Spread the mixture (it’s quite thick) into the tin and bake for 15 minutes or until just set.
Cool in the tin before cutting into squares. Dust with icing sugar (or don’t). (I did).

Adapted from Bill Grangers Healthy Chocolate Brownie recipe


Goodbye Ruby Tuesday

So, we just finished watching the Rolling Stones Sweet Summer Sun Live Hyde Park concert on the tele. Filmed in 2013, it commemorated 44 years after their legendary free concert in July 1969. The Stones song, Goodbye Ruby Tuesday was written in 1966. A fitting musical backdrop to an era of free love and bell bottomed trousers.

I try not to roll in the field of regrets overly much. However, some small sorrow exists at never having seeing the Stones live on stage. This ‘once upon a time almost rock chick’, can only imagine how it must have felt to play in front of a crowd of that magnitude.

One of the highlights of my own rock n roll past, was keeping a close eye on drunk 20 something’s swaying dangerously close to the sound equipment with beer in hand. Death by electrocution was bound to be my somewhat ignominious end.

Having made it through those dark rock n roll days, I dedicate this ruby red studded plum cake to the Rolling Stones. Super inspired by the amazing Sierra plums at our local Growers Market, I felt the need to bake something sweet. Gluten free of course, gotta keep The Yak in cake.

This recipe is based on the wonderful Smitten Kitchen version. (You can see the link below for the full story). This cheergerm adaptation uses gluten free flours (as well as a few other minor changes.)

Like many gluten free baked goodies, this cake is extremely delicate so be careful when moving and cutting it. Tart and toffeeish with an almost pudding like texture, it would be ace served as a dessert at your next dinner party.

I am sure that if Mr Mick Jagger ever came for round for tea, he would totally enjoy a slice.

Gluten Free Plum Cake

1/2 cup gf plain flour
1/4 cup teff flour
1/4 cup almond meal (if wanting nut free substitute with 1/4 cup of extra gf plain flour)
1 1/2 tsp baking powder
1/4 tsp Xanthum gum
Pinch of salt
115 g unsalted butter, softened
1/4 tsp vanilla paste
1 cup coconut sugar (or rapadura, or raw caster sugar)
2 large eggs
8 Sierra plums, cut in half and destoned

1 tsp cinnamon
1 tbl coconut sugar

Preheat oven to 175C.
Grease and line with baking paper a 23 cm springform tin.
Sift gf plain flour, teff flour, baking powder, xanthum gum and salt into a bowl. Stir in the almond meal.
In a separate bowl or stand mixer, beat the butter, vanilla paste and sugar until fluffy and light in colour.
Add the eggs one at a time, scraping down the bowl.
Add the flour mixture and mix until just combined.
Spread the batter into the prepared cake tin and gently press the plum halves, cut-side up into the batter.
Sprinkle with the sugar and cinnamon mixture.
Bake for 45 to 50 minutes, until golden brown. Cake is cooked when a skewer comes out clean. (You may have to cover it with foil towards the end if it starts to get too brown.)
Let cool in the tin before removal. Smitten Kitchen recommends leaving overnight to let the plum juice soak in, a grand idea but The Yak needed cake, and it was good.

Go here for original Smitten Kitchen recipe, I warn you, this glorious website is addictive.

http://smittenkitchen.com/blog/2013/10/purple-plum-torte/


Something yummy for a post school tummy

My memories of growing up in the outskirts of Melbourne invariably included weather extremes. 40 degree hot days that turned your eyeballs inside out and icy cold wind that made you question which hemisphere you actually lived in.

No matter what the weather, one consistent memory was coming home to Mum’s pikelets. Light, airy and always delicious.

These are not those pikelets.

No matter what I do, whenever I tried to replicate her recipe, they never quite tasted the same. Only bitterness and self loathing ensued.

A few months ago, whilst perusing the internet, I found a neat wee recipe on a blog called Cupcakes and Cauldrons. I have tinkered with it a tad (yes, I am on a buckwheat spree) and these pikelets now pop up on the afternoon tea menu at least once a week. The lads scoff them down every time they are placed before them. A tad of butter and a smear of jam and all is once again, right with the world.

The ulimate praise from The Kids has been ‘They are almost as good as Nana’s.’

I can live with that.

WHOLEMEAL AND BUCKWHEAT PIKELETS

YOU NEED
1 1/4 cup wholemeal flour
3/4 cup buckwheat flour
3 tsps baking powder
1/4 tsp salt
3/4 cup buttermilk
1/4 cup milk
2 eggs
1 tbl coconut sugar (or raw, rapadura, caster)
2 tbl butter, melted

METHOD
Beat eggs, buttermilk and milk.
Sift flours, sugar, baking powder and salt.
Make a well in the middle of the flour and gradually add the milk mixture. (I sometimes use an electric hand beater to do this.)
Add the melted butter. (If the mixture is a little stiff, add a tad more milk.)
Let the batter rest for 30 minutes to an hour.
Heat a non-stick pan, grease lightly.
Place spoonfuls of the batter on the pan. When bubbles begin to form on the surface, turn over and cook on the other side.

Go here for the original recipe: http://cauldronsandcupcakes.com/2012/09/22/nanas-pikelet-recipe-and-a-few-good-yarns/