There is a raging battle of supremacy in our family for the grand title of ‘Queen of the Veggie Lasagna.’ It’s not as if we have any other ruling status to aspire to, unless of course it was The Precious Princess of Dunny Cleaning or The Lady of the Laundry. Perhaps we should aspire to the title of The Duchess of Finding Lost Shoes and Spare Socks?
Battles aside, all of our vegetable lasagna versions have a different twist and they are all scrumptious. A lasagna is such a practical ‘big gathering’ dish as you are able to prepare it the day before you need it. Come the day of the party, you can smugly swan around the house preening and cleaning. Safe in the knowledge that the lasagna resides in stately grace, awaiting to be baked. In this case, we were enjoying a joint birthday celebration for Kid 2’s eighth birthday, as well as my birthday. (Thanks, turning 21 was tonnes of fun.) As such, I had prepared my Cheergerm veggie lasagna the day before.
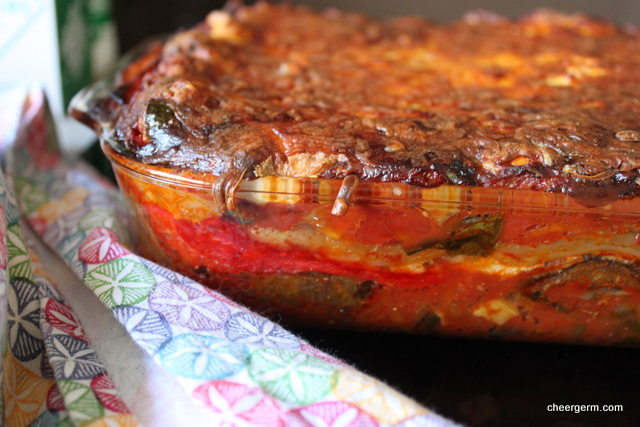
It ain’t traditional Italian, more a mixed breed of an old school lasagna and a hippy vegetarian version. I know that the grated apple and carrot in the tomato sauce is based on a vague memory I have of a Julie Stafford recipe from the healthy eating cookbook, The Taste of Life. This was a 1980’s cookbook that was well used by Mum back in ‘the day’. This lasagna is unctuous and hearty. The use of the ricotta in the white sauce gives it a lighter taste. Yes, it does contain a shedload of veggies and whilst it looks overwhelming, it really isn’t as much work is it at first appears. ( Ah, who I am kidding but it’s worth it!) There are a lot of photos in the post, I took the ‘step-by-step’ approach quite figuratively. Go figure.
CHEERGERM GLUTEN FREE ROASTED VEGETARIAN LASAGNA
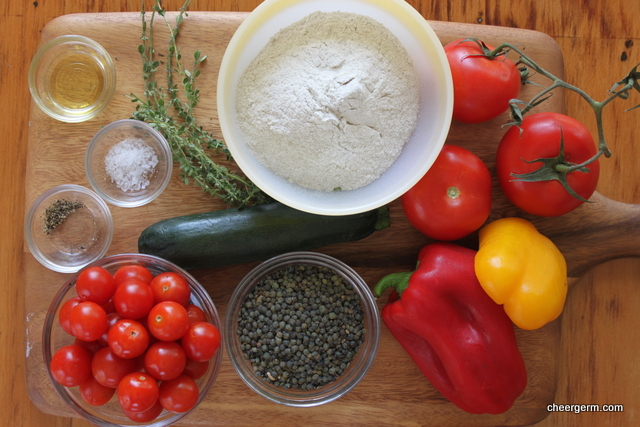
WHAT YOU NEED
Roasted vegetables
2 medium eggplants
1 large sweet potato
4 medium zucchini
1 red pepper
1 head garlic
Tomato sauce
1 onion, diced
400 g mushrooms, diced
700g bottle sugo (or passata, which is basically a tomatoey sauce)
1 tin chopped tomatoes
1 large carrot, grated
1 green apple, grated
Fresh basil, a big handful, torn
Ricotta sauce
2 tbl Butter
2 tbl gluten free plain flour
1 1/2 cups milk
400g Ricotta
Other
1 box 200g gluten free instant lasagna sheets
Grated mozzarella (2 cups, 200g)
40g Parmesan, grated
Lots of Olive oil
Salt and pepper
HOW YOU DO IT
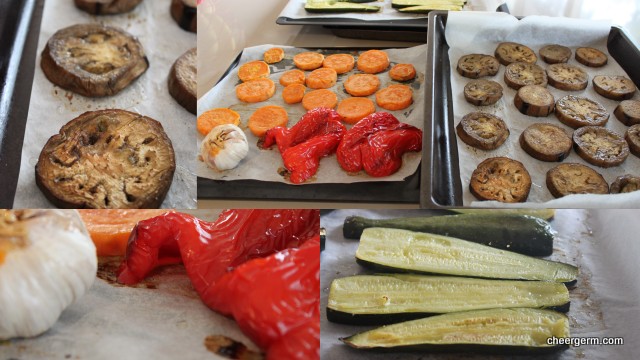
Roast Vegetables
Preheat the oven to 200C (180 fan forced).
Cut the eggplants (I peel mine), sweet potato (peeled) and zucchini into one cm thicknesses. Place on trays lined with baking paper, oil both sides of the vegetables and season with salt and pepper lightly.
Place halved red pepper and head of garlic onto a tray and drizzle with olive oil.
Put the trays into the oven, turn the veggies over after 15 minutes, cook for another 10 minutes until the veggies are tender. You may have to leave the head of garlic in for another five minutes.
Allow the vegetables to cool.
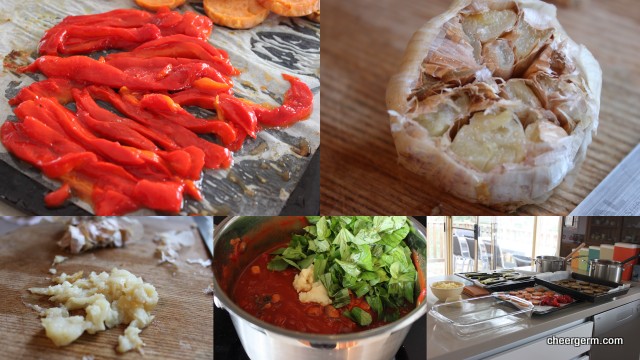
Once the capsicum has cooled down, peel and cut into thin strips.
Take the head of roasted garlic, peel and squash up the peeled cloves. (This is to add to the red sauce.)
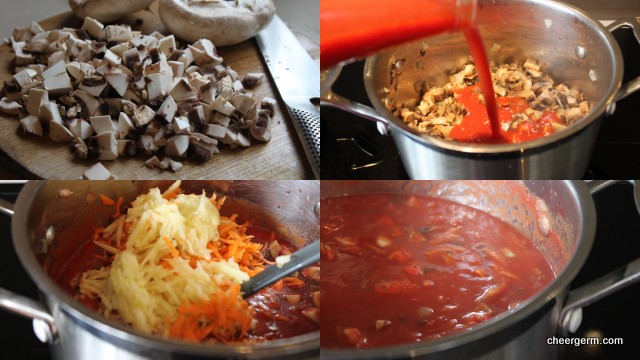
The tomato sauce
Sauté onion in 2 tbl olive oil over medium heat until they start to soften, add the mushrooms and fry them until most of the moisture is evaporated.
Add the sugo, tin of tomatoes, grated apple and carrot. Season with 1 tsp salt and some generous grinds of black pepper.
Cook for about 45 minutes until the mixture has thickened and reduced. Check again for salt, it may need more.
Take off the heat, add the torn basil and squashed up roasted garlic, stir gently.
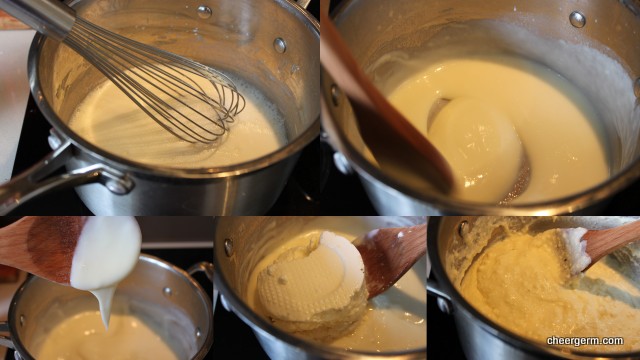
Ricotta Sauce
Melt the butter in a medium size saucepan over a low to medium heat.
Add the flour and cook for 3 -4 minutes until the mixture (roux) starts to bubble.
Take off the heat and whisk in the cold milk. (This method of adding cold liquid to a hot roux helps to reduce the risk of a lumpy sauce.)
Put the sauce back on the heat and stir constantly with a wooden spoon until the mixture starts to thicken. Cook the white sauce for a few minutes, continuing to stir constantly.
Add the ricotta cheese, pepper and taste for salt before adding any.
Take off the heat.
Assembling the lasagna
Oil your lasagna dish. I use a Pyrex, 3 litre dish.
Place approximately five big spoons (a serving spoon size) of sauce on the bottom of the dish.
Place 4 lasagna sheets on top and spoon on more tomato sauce, about 4 spoonfuls.
Put all the eggplant in a single layer, place the red pepper strips on top then layer on half of the ricotta sauce. Smooth it out.
Place 4 more lasagna sheets on top of the ricotta sauce, you will probably need to snap one sheet in half to add as well. (Press down gently.)
Place another layer of tomato sauce, around 4 spoonfuls.
Add the sweet potato and zucchini. (It’s looking full by this point.)
Place a few more spoons of tomato sauce and spread it out. (I usually have some left, which I freeze.)
Spread the remaining ricotta sauce on top, then sprinkle with the combined mozarella and grated Parmesan.
At this point you can place the lasagna in the fridge and cook later that day or the next. (When doing this, make sure you bring the uncooked lasagna out of the fridge for an hour before cooking, so it isn’t stone cold going into the oven.) If you are eating straight away, place in a 180C oven for approximately 45 min to one hour until golden brown and bubbling.
Let stand for 20 minutes before serving. This helps the lasagna to re-solidify a bit and will be easier to portion and serve.
Now you can lie down and rest for a day or two.
It really is worth the effort.
Truly.
Serving Notes: Serves 12. Best served with a simple green salad and crusty bread of some kind.
A Cheergerm creation.
http://www.juliestafford.com.au/about-julie.php