King of the vegetables and a potato and Comte galette

The Yak was crapping on orating upon the delight of the humble potato, his favourite vegetable over all others. We could say in fact, that in his view, it is The King of the Vegetables. As he plainly stated, there isn’t much that you cannot do with the tatie. Bake it, boil it, steam it, mash it, grate it, fry it, smash it, dumpling it. Perhaps The Yak has a point? What he was really trying to say was, could we please have potatoes for dinner?

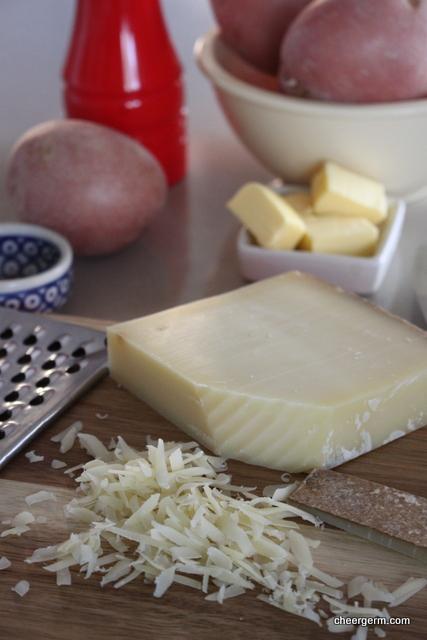
The pantry was laden with potatoes, I also had some delicious looking Comte cheese that I had purchased at the cheese shop. I suffer from an insidious illness that I would not wish upon anyone, it is called ‘Cheeseyearningitis’. It entails standing in front of a cheese counter, looking longingly at cheeses that one wishes to try but one also knows, that one is of an age where one can no longer eat every cheese that ones hankers after. This is due to a waistline thickening on a daily basis and a propensity towards high cholesterol. ‘Cheeseyearningitis’. Look it up, it really exists.

Comte is a semi-hard French cheese made from unpasteurised milk obtained from cows that have only been freshly and naturally fed. It is very similar to Gruyere but a Comte cheese can only be called thus if it adheres to a whole bunch of strict Frenchy regulations. God Bless the French.

I was thinking of a good old potato bake but a googlebumble led me to this delightful concoction, a Comte and potato galette. (Galette meaning a flat pancake and this dish is intrinsically that, a pancake like concoction of cheese and potato.)

The smell of this simple dish baking caused dribble to surreptitiously slide out of the corners of my mouth. Luckily, no one was watching. How best to explain the odour of this cheese baking? I imagine that it is the smell of the meadows in the French alps, of the sweet grass and alpine flowers that blissfully happy European cows chow down upon.

This cheese and potato dish was nutty, sharp, crunchy and almost caramelised around the edges. Unfortunately, all the children present loved it so there were barely any leftovers. Which really sucked. As a French cow would say, ‘Le Moo, Le Sucky.’

POTATO AND COMTE GALETTE

2 tbl unsalted butter (30g)
1 kilo potatoes, peeled and coarsely shredded. I used Desiree because it’s all I had, the recipe called for Yukon Gold. I shredded them in my food processor, oh yeah. Squeeze the potatoes well to get rid of as much liquid as you can.
200g Comte cheese, grated
1 1/2 tsps sea salt
1/4 tsp ground nutmeg
Black pepper

Preheat oven to 180C.
Preheat a medium size frypan, add half the butter and melt it.
Place 1/3 of the shredded potatoes into the frypan, sprinkle half a teaspoon of salt, some grinds of black pepper and sprinkle some nutmeg evenly across.
Sprinkle 1/3 of the cheese over the potato.
Place another 1/3 of the potatoes on top, season with salt, pepper and nutmeg and add another 1/3 of the cheese.
Add the last 1/3 of potatoes, drizzle the remaining butter on top then press the mixture down with the back of a spatula. Season with salt, pepper and nutmeg then sprinkle the remaining cheese on top.
Over a medium heat, cook the potatoes for about 10-15 minutes until the potato on the bottom starts to sizzle.
Transfer the frying pan into the oven and cook for about 25-35 minutes until golden brown and the potatoes pierce easily with a knife. (Meaning they are cooked.)
Eat it down quickly before the children do.

Recipe knicked from the website listed below, only a minor change was made to it.

http://www.oliversmarket.com/index.php/413

http://en.m.wikipedia.org/wiki/Comté_cheese


Minecraft and a gluten free lemon drizzle cake

When my two lads talk to me about Minecraft, the computer game, this is what I hear:

Minecraft blah blah blah

Enderman blah blah blah

Diamonds, pigs, blah blah blah

Villagers blah blah blah

Me: Oh really, That’s great!

I could feel really bad but then I remember that this is what they hear when I speak to them:

What did you do today blah blah blah

Homework blah blah blah

Shut the door blah blah blah

Wash your hands blah blah blah

Tidy your room blah blah blah

So we are even.

Parenting can be a battlefield but we all need to eat. Every living creature in our house loves this cake. I mean, they really love it. Gluten is not missed and every bite is moist, sweet, tangy and tender. Just like life itself.

GLUTEN FREE LEMON DRIZZLE CAKE

WHAT YOU NEED
125g butter, room temperature
130g caster sugar
Zest of one large or two small lemons
2 large eggs
65 ml milk
1/4 tsp vanilla bean powder (or 1/4 tsp vanilla bean paste or essence)
100g gluten free self-raising flour
50g sorghum flour
30g almond meal
2 tsps gf baking powder
1/4 tsp salt

Lemon Syrup
2 tbl sugar
Juice of the zested lemon

HOW YOU DO IT
Preheat the oven 180 degrees or 170 fan forced, then prepare and line a loaf tin.
Cream the butter and sugar in the food processor.
Add the lemon rind and pulse.
Add the rest of the ingredients and blend until nice and smooth.
(If you do not have a food processor, use a stand mixer, electric hand beater or go old school and use a hand whisk!)
Bake the cake for about 40 minutes or until a skewer comes out clean.
For the lemon syrup, whilst the cake is baking, heat the sugar and juice of the lemon until the sugar has dissolved. Set it aside until you need it.
Whilst the cake is still in the tin, place it on a cooling rack.
Pierce the cake all over with a skewer then spoon over the lemon syrup. Use it all, the cake will soak up the syrup as it cools.
Let the cake cool completely in the tin before serving.
Slice and eat it. We did.

A Cheergerm adaptation from the UK Telegraph website. The link is provided below.


http://www.telegraph.co.uk/foodanddrink/recipes/8059974/Classic-lemon-drizzle-cake-recipe.html

A wee thanks for the ‘Sunshine’ blog award nomination to Windy Mama who blogs at Wuthering Bites. Go and have a read of her clever award acceptance post.

https://wutherornot.wordpress.com/2015/05/28/the-plays-the-thing/comment-page-1/#comment-575


Gluten free chocolate fudge biscuits and bringing glad back

Yes, it may be a bit Pollyanna of me (for those of you who remember the book and movie) but I am single-handedly bringing back the word ‘glad’.

Somewhere along the way, the word ‘grateful’ has become incredibly popular. Leaving it’s less glamorous cousin ‘glad’ sitting sadly against the wall, not unlike an unwanted wallflower at a school dance.

Considering myself a champion for the unpopular, daggy and less than glamorous; I have popped ‘glad ‘ into my handbag of current and favourite words. It somehow speaks of a more refined time. It is not effusive, nor is it ‘in yo face’.

Intrinsically, both words have similar dictionary meanings.

glad: feeling pleasure or happiness, grateful, willing
grateful: thankful, feeling or showing appreciation

To be grateful or show gratitude is a little bit Hollywood. To be glad sounds more London Westend musical. The understated vibe of the word ‘glad’ brings to mind adorable pastel coloured 1950’s hats adorned with fake flowers. It harks back to a time when lads and lasses dressed impeccably in pinstriped boating attire and daintily nibbled on teensy weensy cucumber sandwiches. I will leave ‘grateful’ to the gushing vocabulary of actors swathed in sequinned gowns and pretending to chow down on miniature sushi handrolls topped with beluga caviar.

All in all, I am glad that I found this lovely biscuit recipe on the web. (Not a spiders web but the world wide version.) It didn’t turn out as I had thought. In my minds eye, I envisaged that these cookies would be crunchy but then I went and changed the recipe. (Only because I lacked some of the necessary ingredients.) Ordinarily, I would not post a recipe that could be deemed a failure but to us they were chewy, richly chocolate and unctuous. Less biscuit, more like a brownie or cake.

Strangely enough, our cornflake biscuit eschewing lads, adored these. Go figure.

GLUTEN FREE CHOCOLATE FUDGE BISCUITS

WHAT YOU NEED
2 tbl grapeseed oil
1/2 cup maple syrup
1 egg
1/2 tsp vanilla extract (I used vanilla bean powder and added it in with the dry ingredients.)
2 tbl golden syrup
1 1/2 cups almond meal
1/4 cup plus 1 tbl Cocoa powder
1 1/2 tsps baking powder
3 tbl cornflour
A pinch of salt
1 tbl milk

HOW YOU DO IT
Place all the wet ingredients except for the milk into a food processor or blender and mix until combined.
Add in all the dry ingredients and mix until combined.
Add the milk and pulse until mixed through.
Place the mixture into a bowl and place into the fridge for a minimum of 30 minutes. (Mine was in there for 2 hours.)
Preheat the oven to 170C/350F and line two trays with baking paper.
Place large tablespoons of the mixture onto the trays leaving a gap of at least 3 cm /1 inch as they will spread. Place the trays back in the fridge for 15 minutes.
Remove the trays and place in the oven for 16-18 minutes, they will be slightly cracked on top. (Just like me…)
Cool on the tray for 5 minutes then remove to a wire rack for cooling. They will harden up a little as they cool.
Made 19 biscuits.

Very lightly adapted from a recipe from the Mummy Made blog. The link to the original recipe is provided after the photos.

http://mummymade.it/2014/01/chocolate-ripple-bisuits.html


Gluten free cornflake biscuits and Box Boy

Here in New South Wales, Australia, we have been recovering from devastating storms and torrential rain. Outside play has been at a minimum. Finally, the sun was shining and I screamed at politely asked my children to go outside and play. They ignored me. During my rant soliloquy on the benefits of outdoor playing Kid 2 came up to me, wearing a cardboard box. He had become Box Boy, reminiscent of The Boy in the Bubble but less circular.

Kid 2: Hug me.

Not particularly wanting to hug him at that moment, I decided to take this as an opportunity to think outside the box. I wrapped my arms around my cardboard enclosed child and squeezed. For the record, it was odd and rather scratchy.

The gluten free cornflakes used in the recipe also came out of a box. Having known and adored similar styles of biscuits in my cheery childhood, I assumed the sproglets would devour them immediately. Incorrect. The little buggers sweethearts wouldn’t even try them. ‘Go on, eat one,’ said I. ‘No’, said they, resolutely and determinedly.

The adults who got a look in loved every one of these crunchy, vanilla studded, buttery biscuits. To say they pair well with a good cup of cha (tea) is an understatement. For fans of secondhand goodness, please note the adorable Swedish mug rescued from an op shop for the ripe price of a dollar. Got to love a bargain.

GLUTEN FREE CORNFLAKE BISCUITS

WHAT YOU NEED
125g butter
1/2 cup caster sugar (I used raw)
1/4 tsp vanilla bean powder, or 1/2 tsp vanilla bean paste or vanilla essence
180g gluten free self-raising flour, sifted
1 tbl milk
1 1/2 cups gluten free cornflakes
1/2 cup sultanas

HOW YOU DO IT
Preheat oven to 180C and line two baking trays with baking paper.
Cream the butter, sugar and vanilla in a mixing bowl until light and creamy. I usually scrape the bowl down using a spatula at least once during this process.
Add the flour and mix on a low speed to incorporate.
Add the milk and mix until the dough comes together.
Use a wooden spoon to mix the cornflakes and sultanas in, stir until well combined.
Use a heaped teaspoon per biscuit and roll into a ball. Place onto the trays, allowing room for spreading, slightly flatten each biscuit with a spatula.
Cook for 12-15 minutes or until lightly golden. I often turn the trays halfway through cooking to allow for even cooking.
Remove trays from oven and let cool for five minutes before transferring to a wire rack.
Made 22 biscuits.

A Cheergerm adaptation of a recipe from the Taste website. The link to the original recipe is provided below the photos.

</a

http://www.taste.com.au/recipes/13559/sultana+cornflake+cookies


Gluten free silverbeet, herb and polenta pie for Easter

Sending the Yak to the superdoopermarket/green grocers is a hit and miss thing. He is very good at buying utilitarian dried goods (think loo paper, environmentally friendly toilet cleaner in the shape of a duck or gluten free taco shells) but one has to be extremely specific when it comes to fruit and vegetables.

Point in case….I once asked for some green beans. He came back with eight, yes eight, (count them people) individual green beans. I could have created an art installation from them but finding a way to incorporate eight beans into a recipe was a tad beyond my imagination.

When pondering a vegetarian gluten free recipe as part of a shared Easter celebration, I lovingly reminisced upon the traditional spanokopita. That wonderful Greek pie consisting of silverbeet or spinach, ricotta, feta, herbs and flaky layers of pastry. Pastry that The Yak can no longer partake of. Thinking cap placed firmly atop of my noggin, I thunked. Perhaps a polenta crust atop a semi-traditional spinach pie would be quite the treat? (Or a total disaster.)

Curiosity led me to pondering the Greek connection between ground corn and food. Googlebumbling revealed that ground corn has indeed been used in Greek cooking in various ways for several hundred years. It possibly arrived in Greece, courtesy of the Turkish Ottoman Empire by way of Africa. Amongst other uses, it is sprinkled atop leafy green pies or placed underneath to soak up the juices. I have added the link to the very interesting article, after the photos in this post.

Once upon a time, I used to favour a spanokopita recipe by Matthew Evans (a former chef and food critic, now television host). It contained an abundance of herbs, leafy greens and cheese. Having lost this recipe, I now make it merely from memory. (Not the most reliable of sources.) Do not freak out at the amount of herbs in this recipe. It seems a lot but it works. Need it be said, The Yak did not do the shopping for this dish.

This pie is audaciously herbaceous. The salty hits of feta and kefalograviera (a salty Greek hard sheeps milk cheese), combined with the slightly sweet corn polenta, balance the meadowy punch in the face. But this is the kind of face punch that you happily go back for.

Sadly I missed out on the actual abundant Easter feast itself due to Kid 2 and a tummy bug. However, I did get to eat leftovers of this pie. I poured myself a glass of vino, tucked in and pretended I was on a Greek island somewhere. (In a place where stomach viruses did not exist.)

SILVERBEET, HERB AND POLENTA PIE

WHAT YOU NEED
2 tbl olive oil
1 onion, finely chopped
1/2 bunch spring onion, finely chopped
1 big bunch chopped silverbeet, trim the woody ends and use the leafy greens and some of the softer stem. (I had roughly 700g once trimmed of stalks.)
1/4 tsp nutmeg
6 Eggs, beaten
300g Ricotta
200g Feta, crumbled
1 bunch mint, chopped
1 bunch parsley, chopped
1 bunch dill, chopped
Zest of one lemon and juice for the silverbeet
1 tsp Salt
Pepper

Polenta Crust
1.5 cups instant polenta
5 cups water
1 1/2 tbl butter
120g kefalograviera cheese (Use 1/4 cup to add to the polenta and the rest to sprinkle on top of the pie.)

HOW YOU DO IT
In a large frypan, sauté the chopped onion for a few minutes until they start to become translucent, add the chopped spring onions, sauté for one minute.
Remove the mixture from the pan into a large mixing bowl and allow to cool.
Re-heat the pan to a medium heat, add the chopped silverbeet along with a big squeeze of lemon and cook, stirring regularly until it has wilted and most of the liquid has evaporated. When it has cooled, squeeze out any remaining liquid.
Into the large bowl containing the onion mixture, add the silverbeet, nutmeg, beaten eggs, ricotta, feta, chopped herbs, lemon zest, salt and a few big grinds of black pepper, as much as you fancy. (I am not the pepper police!)
Mix well, taste and check for seasoning.
Smooth this mixture into a large oiled baking dish, I use a 3 litre rectangular Pyrex dish.
Preheat the oven to 180 C if you are cooking the dish immediately.
Polenta Crust
For the polenta. Heat the water in a medium saucepan until it just starts to boil. Using a whisk, slowly pour in the polenta, continuing to whisk. This is important as it avoids lumpy polenta.
Change to a wooden spoon, turn the heat to low and continue to cook the polenta, stirring constantly for 4-5 minutes. Add the butter and 1/4 cup of the kefalograviera, it should be of a spreadable consistency.
Remove the polenta from the heat and immediately, spread it over the silverbeet, herb and egg mixture.
Let cool for ten minutes. Sprinkle the remaining kefalograviera cheese on top, and bake for 45-50 minutes until golden brown on top. (You can also place the pie in the fridge if you are cooking the next day.)
Let the pie rest for about 15-20 minutes until it has set a little bit.
Serve with a green salad, or roasted veggies.
Cooking Notes: silverbeet is also know as chard. If you cannot find Kefalograviera, use Pecorino, Parmesan or Gruyere.

A Cheergerm creation

http://www.dianekochilas.com/when-greeks-do-corn/

http://en.m.wikipedia.org/wiki/Kefalograviera


Eggy bread and cooking with Kid 1

The only tenuous connection between this post and Easter is the use of the word ‘egg.’ Of course, one cannot live on chocolate alone (although Kid 1 would give it a good try.) At some point during the Easter celebrations, it is good to put something else apart from chocolate into your gob.

Kid 1 had been requesting a cooking lesson on what we call in our family ‘eggy bread.’ The naming of this bready treat harks from the Yaks’s British heritage. It is more commonly known as French Toast or in Frenchy speak ‘Pain Perdue.’ Whatever you call it, the process of soaking an enriched egg and butter bread in a creamy sweet egg wash and frying it up, makes a wonderful breakfast or in this case ‘breakfast for dinner’.

Enriched bread such as brioche or challah, will give you the best result. An even better result is achieved if the bread is one day old. You are looking for a crispy golden exterior and creamy soft interior. Kid 1 and I had a lovely time in the kitchen and both munchkins greatly enjoyed the puffy golden sweet, finished product. Next time, Kid 1 wants to make the brioche himself, grow chickens to make the eggs and farm our own cows for the milk and cream. Maybe we can just start with the brioche?

EGGY BREAD/FRENCH TOAST/PAIN PERDU

WHAT YOU NEED
3 thick (3cm or so) slices of brioche (or a similar bread such as challah, it is better if the bread is a day old.)
3 eggs
1/4 cup cream
1/4 cup milk
1 tbl caster sugar
1/4 tsp vanilla bean powder or 1/2 tsp vanilla bean paste or vanilla essence
2 tbl butter
2 tbl oil
Maple syrup to serve

HOW YOU DO IT
Beat the eggs, cream, milk, sugar and vanilla in a large jug or medium size bowl.
Pour the egg mixture into a dish that will fit the brioche slices in side by side.
Place the bread in the dish and soak in the egg mixture for 5 minutes.
Turn the bread over onto the other side and soak for another for 5 minutes. Preheat the large non-stick frypan to a medium heat whilst the bread is soaking.
Add the butter and oil to the frypan and once the butter has melted, cook the bread for about 6 minutes each side until puffy and golden brown.
It can be kept in a warm oven for ten minutes or so until ready to eat.
Before serving you can dust the eggy bread in icing sugar but as this was for my kids and they go nuts with maple syrup, I didn’t.
Drizzle generously with maple syrup.
Serves 2 people.

Cooking Notes: To serve 4, simply double the recipe. If you would like to make a savoury version, leave out the sugar and vanilla. It is delicious served with crispy bacon and a sauce of some kind. (A relish, tomato sauce or hot sauce, whatever takes your fancy.)

A Cheergerm creation


Roasted baby carrots with cumin for Easter

Upon smelling a new perfume I was given for my birthday, Kid 1 made the following comment.

Kid 1: It smells like melted Easter eggs.

I am not sure whether to be displeased or not. I envisage myself swanning around attracting small chocolate-loving children and perhaps even the E.B. (Easter Bunny) himself. Not sure if that’s what the perfumier was aiming for when creating this parfum. ‘Eau de Chocolate Easter Egg.’ Give it a whirl, it’s all the rage in the Easter circles.

If you are looking for side dishes to accompany your Easter feast this coming weekend, please consider this wee recipe idea. Calling anything ‘baby’ that you are about to devour and consume has always creeped me out a bit. However, there is no escaping the fact that young veggies are usually the most tender and sweet. Let alone, super cute. Just like a real life human baby! Rest assured, only vegetable babies were harmed in the making of this dish. (That’s OK, right? Told you the whole thing is just, well, odd.)

These carrots were sweet with lovely undertones of the earthy cumin. Tender and juicy, I am positive that all, including the Easter Bunny, will love them.

ROASTED BABY CARROTS WITH CUMIN

WHAT YOU NEED
1 bunch baby carrots
1 tsp ground cumin
1 tbl butter, unsalted
Salt
Pepper
2 tbl white wine

WHAT YOU DO
Preheat oven to 180C.
Scrub or lightly peel the carrots.
Place in a foil package, add the cumin, salt and pepper to taste. Dob the butter over the carrots, add the wine and close the foil package.
Roast in the oven for 30 minutes or until tender.
Try it with https://cheergerm.com/2015/03/08/a-cheergerm-gluten-free-roasted-vegetable-lasagna/ or https://cheergerm.com/2015/01/02/millefeuilles-aux-tomates-et-lentilles-and-a-lady-crush/ or https://cheergerm.com/2014/11/09/a-side-of-herb-polenta-bake-and-an-aside/

A Cheergerm Creation


Gluten free lime yoghurt cake and awash in tears

Our house was awash in tears on the morning I made this cake. Our mostly calm before school routine was offset by self-disappointment, childlike hurt and a more grown-up, deeper sadness.

All surfaces seemed awash with liquid. Bench tops, faces, cupboards and eyes reflected a watery glow. We were in fear of drowning. Even in the car, tears continued to flow and school drop off was a sombre and quiet occasion.

Upon returning home, I was relieved to see our house had not been swept into the valley and that Noah and his Ark were not loading our dogger friend, cockatoos and other assorted wildlife on board.

From the fruit basket these gem like, green, freely given, home grown organic limes greeted me. They went a little way to soothing my aching head and worn out from weeping eyes. They spoke to me in limey voices (‘hello guv’nor!’) of a sweet something, that would greet my citrus loving progeny upon their return from school.

There is nothing like the smell of lime to put some pep in your step and allow a breath to be taken. This lovely cake is tangy from the citrus and Greek yoghurt with an extra fruity hit from the olive oil. The first recipe trial was fine, the second tweaked version you find here, is damned fine. And not a salty tear in sight.

Note to self, never leave a cake and the camera alone with The Yak, not even for a moment.

GLUTEN FREE LIME, YOGHURT AND OLIVE OIL CAKE

WHAT YOU NEED
1 cup full fat Greek yoghurt
2 eggs
1/3 cup olive oil
1/4 cup lime juice (this is roughly the juice of one lime)
Zest of one lime
1/4 tsp vanilla bean paste, vanilla bean powder or 1/2 tsp vanilla essence
210g gluten free flour (1 cup/140g gf plain flour, 1/4 cup/40g almond meal, 1/4 cup/40g brown rice flour)
3/4 cup raw caster sugar (or white caster sugar)
1/2 tsp salt
2 tsps baking powder

Topping
1 tbl brown sugar (I used raw caster sugar)
1 tbl extra lime zest (I used the zest of one lime)

HOW YOU DO IT
Preheat oven to 180C and grease and line a 22cm springform tin with baking paper.
Mix all the wet ingredients including the lime zest in one bowl until well combined. (If using vanilla essence or paste add it here.)
Sift all the dry ingredients into a large bowl. (If using vanilla powder, add here.)
Pour the combined wet ingredients into the dry ingredients bowl and using a wooden spoon, mix until just combined.
Pour into the prepared baking tin and cook for approx 40-45 minutes. The cake is ready when it has browned on top and a skewer inserted into the centre comes out clean.
Cool in the tin for ten minutes, then turn out and cool on a wire rack.
When the cake is completely cool sprinkle with the topping mixture. This is delicious served with a big dollop of yoghurt on the side.
Feel free to use lemons if you can’t find limes.

A Cheergerm adaptation of a recipe from the blog Souvlaki for the Soul which was in turn adapted from a Smitten Kitchen recipe.

http://souvlakiforthesoul.com/2011/05/lime-yoghurt-and-olive-oil-cake


Parenting and cauliflower curry

Ten years later, I do not have this parenting thing down pat.

Kid 1: Mum, I am scared that an axe murderer is going to kill me.
Me: That is highly unlikely darling. Good night.
5 minutes later
Kid 1: Mum, can you come here please?
Me: Yes?
Kid 1: You telling me that ‘it’s highly unlikely’ does NOT make me feel better.
Me: Oh, all right then, it will never happen, how’s that?
Kid 1: OK, now I feel better.

Thanks for the parenting tip Kid 1.

Kid 1 will probably never eat this curry, he hates anything spicy. We don’t care, more for us. This curry benefits from a hit of bright, pungent mustard seeds; I love the little buggers. After a spot of googlebumbling research I discovered these wee dudes are high in a variety of B vitamins, minerals, anti-oxidants and phytyo-nutrients. (Phyto what?) Phyto-nutrients are intrinsically natural chemicals found in plant matter that may help prevent disease and keep your body working properly. Mustard seeds and their oils have traditionally been used to relieve muscle pain, arthritis and rheumatism pain.

Whatever a mustard seeds health benefit, this curry has good depth of flavour along with a punch of heat from the chilli. Add more chilli if you like but we enjoy the balance of flavours. If you aren’t a chilli fan, reduce the amount back to 1/4 of a teaspoon or you could leave it out. (No judgement from this Cheergerm….really, you don’t like chilli? What’s wrong with you??)

CAULIFLOWER CURRY

WHAT YOU NEED
2 tbl oil , rice bran or grapeseed oil
1 onion, finely chopped
A 3cm piece of peeled and grated fresh ginger
2 cloves crushed or grated garlic
1 tsp brown mustard seeds
1 tsp ground cumin
1 tsp ground coriander
1 tsp ground turmeric
1/2 tsp ground paprika
1/2 tsp chilli powder (the hot stuff)
1 tsp salt
Dry curry leaves about 10 (I only had 4)
1 cauliflower head, cored and cut into small florets , about 2-3 cm large
1/2 cup water to start with, you will need more
1 handful fresh chopped coriander

HOW YOU DO IT
Sauté onion in oil in a large frypan over medium heat for about 3-5 minutes until soft.
Add the ginger and garlic, cook for 1 minute.
Add all the spices, salt, curry leaves and cook for 2 minutes to release their flavour, stirring gently.
Add the cauliflower, stir well to coat the cauliflower in the spices.
Add 1/2 cup water and simmer on a low to medium heat for about about 50 minutes. If the curry starts to get dry, add a bit more water. I added just over a cup throughout the entire cooking process. By the end, the curry should be mostly dry with a small bit of liquid but soft and beginning to fall apart.
Take the curry off the heat, taste and see if it needs extra salt then stir through the chopped coriander.
Serve with rice, quinoa or whatever takes your fancy. We had it with brown basmati rice.

A Cheergerm creation