Crackers about gluten free Parmesan crackers

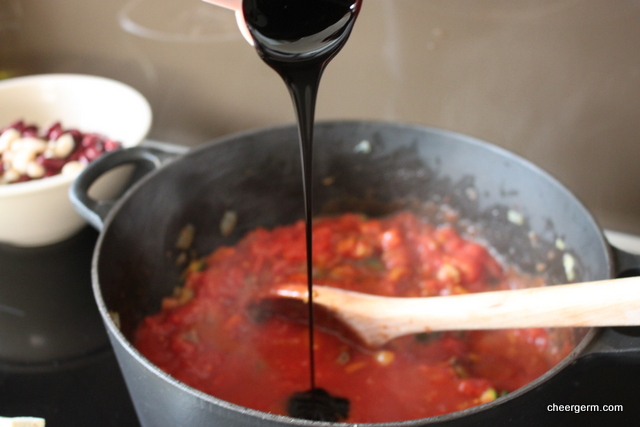
Personally, this Cheergerm has always thought you must be crackers to make your own crackers. No, not really, it’s just that writing that sentence was too good an opportunity to pass up. Upon reading the savoury biscuit blog posts of far less lazy cooks than myself, my admiration and envy has only grown. Many is the time I have murmured in a soft and sibilant whisper, ‘one day I will get off my behind and attempt to scale the lofty heights of cracker cooking.’ (The family no longer looks askance at such utterings, they are used to it by now.)

Just because I enjoy a challenge, it had to be a crisp biscuit that provided a punch of flavour and was also free of gluten. These are made with almond meal so sorry to say, out of the question for those with nut allergies.

Fortuitously, in attempting to dip my toe into these treacherous waters, I perchanced upon an easy (highly important) recipe from the marvellous SBS food website. Get Ye Splendid Selves Over to Thee Magnificent SBS Foodie Website and Ye Shall Be Richly Rewarded. (But if you don’t mind, please finish reading this blog post first, thanks, thanks kindly.)

These lightly bronzed tidbits were sharply piquant, nutty and went wonderfully with a gin and tonic. A few days later, I reheated the remainder in a low oven and they crisped up beautifully. I may have come late to the foray of savoury bikky baking but I am here to stay.

GLUTEN FREE PARMESAN CRACKERS

WHAT YOU NEED
200g (2 cups) almond meal
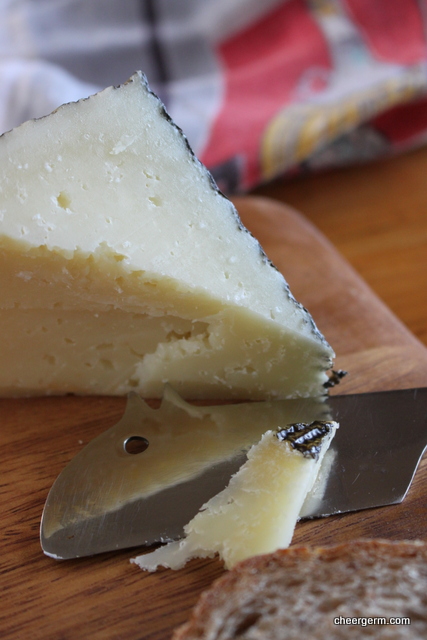
150g (1 1/4 cup) Parmesan cheese finely grated, do use the good stuff and you will be highly rewarded in the flavour stakes plus extra finely shredded to sprinkle
1/4 tsp cayenne pepper (I used 1/8 tsp of super hot chilli powder)
1 egg
2 tbsp olive oil and extra to brush on the biscuits

HOW YOU DO IT
Preheat oven to 200C (180C fan forced) and line two trays with baking paper.
Combine the almond meal, Parmesan and cayenne pepper in a medium size bowl.
Whisk the egg and olive oil together then add to the almond meal mixture, use your hands to mix into a soft dough.
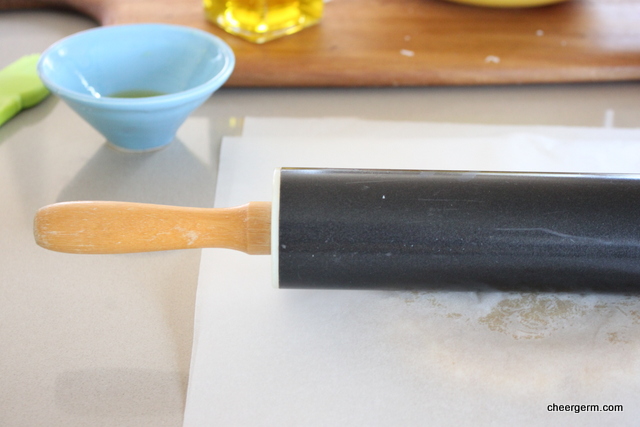
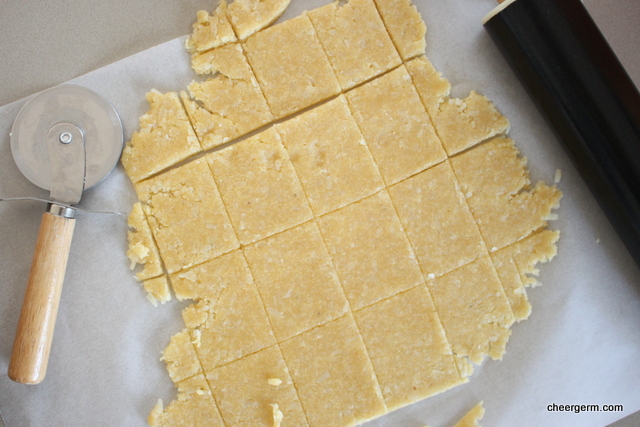
Divide the mixture in half, place one portion in between two sheets of non-stick baking paper and roll to a 5mm thickness. Use a sharp knife or pizza cutter (I used a pizza cutter) to cut into 5cm squares (mine were not exact) and place on the baking paper. I used a nonstick spatula to do this.
Repeat with the remaining portion of the dough and re-roll the cut offs. (If you so desire, I did and you get a lot more bikkies.)
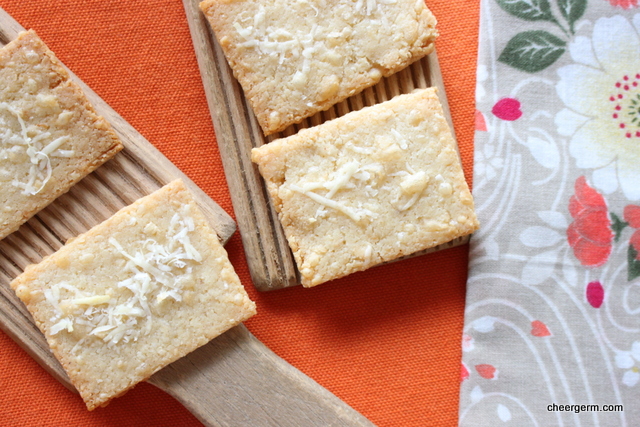
Lightly brush the biscuits with a little extra olive oil and sprinkle with a little finely shredded Parmesan.
Bake for 10-15 minutes swapping the trays halfway through or until the biscuits are crisp and golden. Cool on the trays.
Store in an airtight container. I made about 40 crackers, by using all of the scraps.

Cooking Notes:
The crispier and golden they are, the better they are. After a few days, they do soften just a tad so I like to crisp them up in the oven for five minutes or so on 160C. Let them cool and they willmbe super nice and crunchy again.

Find the original recipe here:
http://www.sbs.com.au/food/recipes/gluten-free-parmesan-crackers

https://stonepinedistillery.com.au


Amaranth and nut crunch, gluten free

This crunch is a healthy-err version of a peanut brittle or muesli bar. Don’t feel tied down by the nuts in your pantry. (And certainly, never let a nut tie you down in the pantry.) Whilst the recipe called for cashews, there was nary a one to be seen in my household. I used what nuts I had, almonds and pecans. Walnuts or hazelnuts would also be totally ace.

Generally speaking, eating a handful of nuts a day is not a bad thing. They are chock full of healthy fats and can assist in lowering cholesterol. Anyone with nut allergy issues may like to try substituting the nuts with a combination of pumpkin seeds, sunflower seeds, flaxseeds and hempseeds.

Alongside all of this nutty goodness, there is the addition of the quite excellent gluten-free crazy perfectly sphere shaped grain, amaranth. This grain can be traced back to ancient Aztec times. (Nothing like a spot of cereal when you have just finished sacrificing someone.) In the gluten-free grain stable, it is a winner. High in protein, iron, the amino acid lysine, magnesium calcium and fibre. Amaranth is also low in carboyhydrates.

This super poppy, crispy snack is akin to a light rice bubble bar and is a little bit sweet, a little bit savoury. It is the perfect crunchy tidbit to quell those afternoon hunger cravings.

Thanks to my dear friend N, who passed on this recipe. This post is dedicated to all the nuts in my life. Including myself.

AMARANTH AND NUT CRUNCH

WHAT YOU NEED
2 cups popped amaranth
1 cup roasted unsalted cashews (I used pecans), roughly chopped
1 cup almonds, roughly chopped
25g butter, melted
2 tbl rice malt syrup
1 tbl honey
A drizzle of vanilla essence (or 1/4 tsp vanilla bean powder)
Big pinch sea salt

HOW YOU DO IT
Preheat an oven to 150C and line a large baking tray with non-stick baking paper.
Place all of the ingredients in a large bowl and stir until they are well mixed and wet. They won’t really stick together.
Pat the mixture onto the tray.
Place in the oven and cook for 20-25 minutes until golden.
Let the mixture cool on the tray then snap into shards.
You will have trouble stopping yourself from eating it all.
Store in an airtight container.

Recipe given by a friend, no idea where it came from before that.


Blueberry sauce and a baking competition

So, the opportunity arose to partake in a baking competition. The event was being held to raise money for a sensory room at the school where the Mothership teaches. The idea being that your baking would be adjudicated by a panel of expert judges (in other words, people who liked food). The entered goodies were then to be sold at a big bake stall. How could I turn down the opportunity to raise money for a great cause? To me, it’s never been about the winning, it’s always been about the participating. It’s about ‘the taking part’, ‘giving it your best shot’ and all that guff important stuff.

Who am I kidding? I wanted to win. Big time.

The things that this Cheergerm has won in life (if you don’t count the esoteric crap such as true love, two great kids, friendship, good looks, talent) are few and far between. I do remember winning a puzzle once. It wasn’t even a particularly good puzzle.

What to bake, what to bake. It had to be my never fail flourless chocolate cake recipe. But it needed to be elevated and given an extra touch that could really wow them. Basically, it had to be something that could be placed into my new German jars (that I am currently obsessed with). That way, if my cake sucked, the judges would be so blinded by my quality glassware they would hand me the win.

With a few fresh blueberries left and some good quality (as in they won’t poison anyone) frozen ones in the freezer, the idea of a blueberry sauce popped into my mind. A recipe was found, a few adjustments made and Bob was my uncle. Sweet, tart and wonderfully gloopy, this fruit sauce was the perfect accompaniment to the rich, dark cake. We ate the leftovers as jam.

Wonderfully, a decent amount of dosh was raised. Did I win? Sadly not but the runner-up sash and smaller, far less sparkly tiara were mine. My cake and sauce were pipped to the post by mini cheesecakes. Damn those tiny rounds of baked cheesy goodness. Damn them.

BLUEBERRY SAUCE

WHAT YOU NEED
2 cups blueberries (I had 1/2 cup fresh and 1 1/2 cups frozen)
1/3 cup sugar
1/2 cup water
1 tbl lemon juice
1/4 tsp vanilla bean powder or 1/2 tsp vanilla bean essence
1 tsp cornstarch mixed with 1 tbl water
Zest of one lemon (about 1 tbl)

HOW YOU DO IT
Place the blueberries, sugar, water, lemon juice and vanilla into a medium saucepan,
Over a medium heat, bring the mixture to a low boil, stirring regularly.
Add the cornflour (that has been dissolved in water) to the saucepan slowly. Be careful not to squish the blueberries.
Simmer the sauce until it reaches the consistency where it coats the back of a spoon, this takes about 5-10 minutes.
Stir in the lemon zest. Taste it, you may want to add another dash of lemon juice. I did.
Put the sauce into a pretty jar and serve with flourless chocolate cake, with lemon muffins, ice-cream, spread on toast or just eat it with a spoon. You may just win a prize.

Recipe slightly adapted from My Baking Addiction blog. See link below.

http://www.mybakingaddiction.com/homemade-blueberry-sauce-recipe/


The last meal and a gluten free rhubarb frangipane tart

Nigh on an eon ago, whilst undertaking my food studies course, we made frangipane for the first time. Frangipane is a filling for a cake or tart made with, or flavoured by almonds. In this day and age, it is normally made of ground almonds, butter, egg and sugar. The manner in which this mixture puffed up and surrounded the fruit placed on top, seemed magical to me back then and still does today.

It appears that this fluffy almond concoction could also have been a favourite of a saint. Some googly research unearthed the charming story of Jacoba dei Settesoli, an Italian woman who married into the Frangipani family in 1210. After meeting Saint Frances of Assisi, she became a friend and follower of his, devoting her life to good works. The story goes that upon his death bed, Francis called for ‘Brother Jacoba’ (as he had named her due to her fortitude), to bring him some of his favourite almond treats. Much to the consternation of the other monks, she was allowed in to the monastery with a basket of almond pastries and stayed until the revered man took his last breath.

This tale of a woman before her time, feeding a saint the food he wished for on his death bed, led me to ponder what my last meal on earth would be. Before making this momentous decision, I asked The Yak what he would choose. He replied that it would have to be his ‘once favourite dish’ from his ‘once favourite’ Italian restaurant Buon Ricordo. The legendary cream and Parmesan fettuccine topped with a truffled egg. He would also feast on a basket of the finest gluten laden breads.

For myself at the time of writing (I am nothing if not fickle), it would probably include half a dozen Sydney rock oysters ‘au naturale’, a bowl of buttery garlic prawns, a slice of good sourdough bread to mop up the prawny juices, steamed asparagus spears drizzled with lemon, a splodge of the creamy French soft cheese Buche d’Affinois and an icy cold glass of champagne. (Well, maybe more than one.) For dessert, this pretty and delicate cake would certainly be a contender. The piquant rhubarb offsets the buttery, nutty, sweetness of the frangipane perfectly.

A tart worthy of a saint or a Cheergerm’s last meal.

RHUBARB FRANGIPANE TART, GLUTEN FREE

WHAT YOU NEED
150g unsalted butter, softened
150g caster sugar
2 large eggs
1/4 tsp vanilla bean powder (1/2 tsp vanilla extract)
1 lemon rind finely grated
150g almond meal
35g (1/4 cup) gluten free plain flour
150g rhubarb, trimmed and cut into 5cm lengths

HOW YOU DO IT
Preheat oven to 180C.
Grease a 34 cm x 12 loose based tart tin rectangular tin or a 23cm loose based flan tin.
Beat the butter and sugar in an electric mixer until they are light and fluffy.
Add the eggs one at a time, beating well after each addition.
Add the vanilla and lemon rind and beat well.
Add almond meal and flour and fold to combine.
Spoon the mixture into the tin and smooth the top with a spatula.
Arrange the rhubarb over the top of the mixture in a pleasing pattern.
Put in the oven and bake for 25 to 30 minutes until the top is golden and a skewer inserted into the middle comes out clean.
Remove from the oven and allow to cool.
If you want to serve it warm, give it 15 minutes before trying to take it out of the tin. Otherwise, cool completely then gently loosen the edges before removing carefully and placing onto a plate for presentation.
Dust with icing sugar and serve with cream or without. That’s really up to you.

Slightly adapted from the SBS food recipe website. Link follows the photos.

http://www.sbs.com.au/food/recipes/rhubarb-pistachio-and-orange-blossom-frangipane-tart-rhubarb-syrup

http://ncronline.org/blogs/ncr-today/feb-8-bl-jacoba-de-settesoli

https://en.m.wikipedia.org/wiki/Jacoba_of_Settesoli

Buon Ricordo Sydney Italian Restaurant – Paddington

http://www.aoap.com.au/content_common/pr-white-mould-cheese_guilloteau-buche-daffinois.seo


Chia pudding pots and granola, gluten free

There was a stirring in my workday breakfast soul, a yearning for something a little different than my usual banana, spelt sourdough toast with smashed avocado and a cup of tea. Something free of gluten that that The Yak could also scoff, before the trek to work was made. Something that could be made the night before, which for this ‘Non-Morning Person,’ is perfect.

When I first started experimenting with this pudding, doubt ruled supreme as to whether it would be delicious. Currently, these kind of chia concoctions are hipper than hip, too cool for school and this Cheergerm has never enjoyed the textural journey that is sago or tapioca. However, we have become chia pudding converts. Sigh, what followers. After some experimenting with liquid and chia quantities , I found a balance that works for my taste. The gluten free granola is a marvellous combination of crispy, sweet and nutty goodness. It is rather fabulous when strewn on all manners of breakfast foods. Combined with the pudding, it is simultaneously creamy, squishy and crunchy. The blueberries add a lovely fresh tartness that cuts through any richness.

Little black pearls of chia seeds
I appreciate popping you into a biscuit batter
Or this nice little breakfast pudding
Even though
You get stuck between my teeth
I kind of like you
But I kind of don’t
I have read that you are a powerhouse of
Fibre, protein, antioxidants and all that good stuff
You are also free of gluten
Which is greatly appreciated in these here parts
But you are also a little bit weird
And whilst I don’t want to be cruel
I am not quite sure I would say
We are the best of friends quite yet

BLUEBERRY CHIA BREAKFAST PUDDINGS

WHAT YOU NEED
1 1/2 cup yoghurt (I used a thick greek style vanilla bean yoghurt.)
1/2 cup light coconut cream (an oxymoron if I ever heard one)
1/3 cup chia seeds
1/8 tsp Vanilla bean powder or 1/4 tsp vanilla bean essence
2 tbl maple syrup
125g blueberries (reserve 12 for garnishing) (I have used raspberries as well which are also delicious)

HOW YOU DO IT
You will need 4 cups or jars to put this mixture into. Whaever takes your fancy. These wee jars were from Wheel and Barrow (no sponsoring or anything tricksy going on here) and I am a little bit in love with them.
Divide the blueberries amongst the jars or cups, leave about 12 for garnishing the top.
Whisk the chia seeds, yoghurt, milk, maple syrup and vanilla in a large bowl.
Divide equally amongst the four containers, pouring the mixture over the berries.
Use the remaining berries to garnish the puddings.
Cover and place in fridge overnight.
If the pudding is too thick for your liking, add a dash of milk or coconut milk to loosen it.
Serve topped with a hearty sprinkling of the granola (recipe follows) and tuck in.

A Cheergerm creation

GLUTEN FREE GRANOLA

WHAT YOU NEED
1 cup walnuts, roughly chopped
1 cup pecans, roughly chopped
1/4 cup sunflower seeds
1/4 cup pumpkin seeds
1 tbl chia seeds
1 tbl flaxseeds
1 tsp cinnamon powder
1/4 tsp vanilla bean powder or 1/2 tsp vanilla bean essence
1/2 tsp sea salt
2 tbls maple syrup
2 tbl grapeseed oil
1/2 cup coconut (I only had desiccated, shredded or flaked would be good too)
1/2 cup chopped dried cranberries (I used whole unsweetened)
1/4 cup sultanas

HOW YOU DO IT
Preheat oven to 160C.
Line a large baking tray with baking paper.
Spread the walnuts, pecans, sunflower seeds, pumpkin seeds, chia, flaxseeds, cinnamon, vanilla and sea salt onto the tray and mix well.
Pour the maple syrup and oil over the granola mixture and mix very well.
Place in the oven for ten minutes, remove tray and add the coconut, cranberries, sultannas and stir. This ensures the fruit doesn’t harden too much and the coconut doesn’t burn. Put the tray back in the oven.
After another ten minutes, remove the tray again and stir.
At this point, you will have to decide if it needs another five minutes or not. It will depend, sometimes I give it a few minutes more. You will have to watch it carefully as you want crunchy golden brown granola, not burnt.
Once cooled, place a hearty spoonful on top of your chia puddings. It is also great on yoghurt and other breakfast cereals. Store in an airtight container.

Cooking Notes: Sometimes I add a half cup each of puffed amaranth and puffed millet along with the nuts and seeds at the start. Also delicious. I have also used dried unsweetened cherries instead of cranberries which are fantastic.

A Cheergerm creation


Thanks Mum and Moosewood, bean and tofu casserole

Growing up in the seventies, our Mum was part of a health-food co-operative. She purchased natural food in bulk that wasn’t your average store bought fare. Standout memories from those days include bags of wholemeal flour, copious legumes, lecithin (crazy stuff that), tins of molasses and brown sugar. (To emphasise this was the seventies, I remember Mum wearing a much coveted white peasant blouse embellished with red embroidery.) An orchardist’s daughter, she always stocked a cornucopia of fresh fruit and vegetables in the house.

Mum baked her own bread, made her own tomato sauce, bottled delicious preserves and for a time, a yoghurt maker graced the benches. Out of her kitchen rolled wonderful soups and heartily savoury casseroles. There was always a container holding tempting baked slices and biscuits made using recipes she had memorised from her own Mums wonderful baking. Our mum is not one to toot her own horn but we all feel lucky to have had such a solid grounding in eating and cooking good food.

One of the cookbooks that graced Mums shelves was The Moosewood Cookbook, one of the most iconic and revolutionary cookbooks of that time. This vegetarian recipe book was written by Mollie Katzen, who at the time was a member of The Moosewood Collective. (A natural foods restaurant founded in 1973 in Ithaca, New York.) My copy seems to have gone missing but recent reviews of updated editions state that many recipes are now ‘lighter’ than in the past. I imagine the author cut back on some of the larger quantities of cheese and sour cream. (Ingredients which were possibly the reason why the Moosewood food was so darned delicious!)

I took the inspiration for this dish from memories of the Moosewood Cookbook and the fact that I was housebound and needed to use whatever my pantry and refrigerator had to offer. It is great to soak your own beans but if you can’t, tinned beans are fine. These sort of casseroles are forgiving, so use what you have and experiment to your hearts content. The Yak and I happily scoffed our portions whilst the sproglets did a double take at the tofu. Kid 2 asked ‘what was that white spongy stuff?’ I said tofu. He said he thought it was chicken. (See, everything really does taste like chicken!) There is a good contrast between the crunchy munchy topping and the piquant, Mexican style sauce underneath. If you like your food really spicy, just bump up the chilli.

Peace out and enjoy.

Thanks Mum and Moosewood, bean and tofu casserole

WHAT YOU DO
3 tbl Olive oil
1 onion, diced
1/2 large yellow or red capsicum, diced (or 1 small)
2 carrots, diced
3 small zucchini, diced
200g Mushrooms, diced
1 garlic clove, crushed
1/2 tsp dried chilli flakes
1 tbl ground cumin
1 tbl ground paprika
2 tsps salt
Black pepper to taste
2 tins chopped tomatoes
1 tin red kidney beans, drained
1 tin cannelinni beans, drained
1 tbl molasses
250 hard block tofu cut into 2cm cubes (don’t like the curd of beans? Don’t put it in!)
50g Parmesan, grated
1 cup gluten free breadcrumbs (or regular, try and use wholemeal or wholegrain)
Extra olive oil

HOW YOU DO IT
Preheat oven to 180C.
Oil a casserole dish or if you have an ovenproof casserole dish that you can cook everything in and then transfer directly to the oven, use that. I used my sturdy Le Crueset cast iron pot.
In a large saucepan saute the onions and carrots in the olive oil for a few minutes until they start to soften.
Add the capsicum and zucchini and cook for another few minutes, stirring regularly.
Add the mushrooms and sauté for a few more minutes.
Add garlic cook and for 30 seconds or so then add chilli flakes, cumin, paprika, salt and black pepper. Cook for 1-2 minutes, stirring constantly.
Add the tomato and molasses and stir to combine.
Add the beans and tofu. Bring to the boil.
Adjust the seasoning. If using another baking dish, pour the mixture into it. If you are using the same casserole dish, make sure you wipe the rim so it doesn’t look too messy.
Combine the breadcrumbs, grated Parmesan and a few glugs of olive oil. Season with salt and pepper.
Place the breadcrumb mixture over the bean mixture.
Bake in the oven for 45 minutes until the crust is golden brown and the mixture beneath is bubbling. (Turn the dish half way through cooking to ensure even browning of the crust.)
Serve with a green salad or steamed veggies.

A Cheergerm creation

http://www.moosewoodcooks.com/about/cookbooks/

http://www.molliekatzen.com

http://www.moosewoodcooks.com/about/cookbooks/

http://www.molliekatzen.com


Gluten free dark Jamaican Gingerbread and the bird

Children are a veritable wealth of knowledge.

Kid 1: Did you know that years ago, that angry tennis man John McEnroe flipped the bird at the queen?

Me: Are you sure?

Kid 1: Yes, and the Queen flipped the bird back at him.

Me: Now I know that part didn’t happen.

Kid 1: It did, it did. The Queen flipped the bird.

Me: She did not!

And so it went, did, didn’t, did, didn’t. It turns out he had seen an advertisement for a television ‘mockumentary’ on tennis and at the time, believed it to be a true historical fact.

I for one, imagine that during her illustrious reign, Her Royal Highness must have wanted to flip the bird at least once. (Gesticulating in this manner has certainly crossed my mind once or twice when arguing with Kid 1). This spot of baking hails from the iconic British baker, Delia Smith. This no-nonsense doyenne of English cookery is accredited for teaching two generations of loyal British fans how to cook. Her recipes are reliable and are also easily converted into gluten free options.

In her cookbook Delia’s Cakes, she tells us that this cake was ‘originally from the sugar-and-spice island of Jamaica.’ Darkly treacly, spicy, sticky and chewy. This is almost like a real loaf of bread. It is truly better when wrapped and left for a day and even better (like so many things), when smeared with butter.

Now I just know that Delia would never flip anyone the bird.

GLUTEN FREE DARK JAMAICAN GINGERBREAD

WHAT YOU NEED
180g gf plain flour (130g plain gf flour and 50g sorghum)
1 tbl ground ginger
1 1/2 tsp ground cinnamon
1/8 tsp ground nutmeg (1/4 nutmeg, grated)
1/2 tsp bicarbonate of soda
2 tbl milk
75g black treacle or molasses
75g golden syrup
75g dark brown sugar (I used coconut sugar)
75g butter
75ml water
1 large egg, lightly beaten

WHAT YOU DO
Getting Ready: Preheat the oven to 170C and line a standard loaf tin with baking paper. Delia suggests using a ready made loaf tin liner (which I did not have.) Place the tin of treacle or molasses and golden syrup bottle in hot water to warm them and make it easier to measure them.
Sift the flours and spices into a large bowl.
Mix the bicarbonate of soda into the milk and set it to one side.
Measure the treacle/molasses, golden syrup, sugar and butter into a saucepan with 75ml of water. Heat over a low heat and stir gently until thoroughly melted and blended. Don’t let it come anywhere near the boil and don’t go off and leave it.
Next add the syrup mixture to the flour and spices, beating vigorously with a wooden spoon.
When the mixture is smooth, beat the egg in a little at a time, followed by the bicarbonate of soda and milk.
Now pour the mixture into the prepared tin and bake on a lower shelf, align the the tin with the centre of the oven for 50 minutes to 1 hour until it’s well-risen and firm to the touch.
Remove the cake from the oven and allow it to cool in the tin for 5 minutes before turning out.
If possible, store it in a cake tin in the liner (if you used one) or wrapped in clingfilm for 24 hours before eating. It is delicious smeared with butter.

A Cheergerm adaptation from Delia’s Cakes published by Hodder and Stoughton 2013


For you, a gluten free passionfruit cake

This is for you my friend since we were fifteen year old ingénues
We would share our hopes and dreams in sleepovers silly from lack of sleep
The world spread out before us juicy, ripe and full of hope
Kept apart by distance for many years now
This was baked with Kid 1, in the pretence that it would be placed lovingly into a lemon coloured Tupperware container, tucked into the car, then driven over to your house
To make you a cuppa
To cut us a slice of cake
It’s possible it may have sat there untouched for quite a bit
Whilst we talked it out
This cake is for all the times I wasn’t there to hold your hand or for you to hold mine
To dry your tears
To tell you it was would be ok
Even when it really wasn’t
To kick each other’s arses if it was required
Or to not say much of anything at all
This cake is so you know
You are in my heart if no longer in my neighbourhood

Kid 1 and I baked this tropical fruity delight slowly and happily. The day stretched out immeasurably before us. Carefully learning to crack eggs, he wrapped his small hands around the ovoid object as if it were a Faberge antiquity.

This cake has a light soft crumb with soft vanilla undertones and is best eaten on the day it is made. (Or the day after, but it loses something by the third day. Not sure what, just trust me.) The thin passionfruit glaze with its scattering of dark seeds is just the right balance of sweet and tang. In lieu of sharing a slice of this cake with my friend, we had it for afternoon tea.

GLUTEN FREE PASSIONFRUIT CAKE

WHAT YOU NEED
125g butter, room temperature
2/3 cup raw caster sugar (or white caster sugar)
200g gluten free self raising flour
50 sorghum flour
30g almond meal
1 1/2 tsps baking powder
1/4 tsp salt
1/4 tsp vanilla bean powder or vanilla essence
2 eggs, lightly beaten
1/2 cup milk (room temperature)
4 small passionfruit pulps, (or 2 large.) If you don’t want too many pips in your cake batter, you can sieve the pulp then add some of the pips back into the sieved mixture to add to the cake.

Passionfruit glaze
1/2 cup icing sugar
1/2 tsp butter, melted
1/2 tsp boiling water
passionfruit pulp of 1 small or 1/2 of a large

HOW YOU DO IT
Preheat oven to 180C and line a 22cm springform tin with baking paper.
Cream the butter and sugar together in a mixmaster, with hand beaters or by hand. Make sure it’s light and fluffy and almost white in colour. (Add the vanilla essence if you are using it at this step.)
Whilst the butter and sugar is mixing, sift the self-raising flour, sorghum flour, almond meal, baking powder, salt and vanilla bean powder. Place aside.
Add the eggs to the creamed butter and sugar, mix well.
Starting with the flour, add the sifted flour and milk alternately, one third at a time.
Add the passionfruit and mix well.
Pour the mixture into the tin.
Cook for approximately 40 minutes or until a skewer comes out clean.
Let cool for ten minutes then take out of the tin and cool on a wire rack.
Once completely cool, drizzle with the glaze. (Recipe below.)

Passionfruit glaze
Sift the icing, add the butter, boiling water and passionfruit pulp to the icing.
Mix well, you want a fairly runny consistency, add a dash more hot water if needed.

A Cheergerm adaptation from the Best Recipes website, link below.

http://www.bestrecipes.com.au/recipe/golden-passionfruit-cake-L8274.html


Where did the words go green bean curry

Sometimes adjectives run towards my outstretched hands like small greedy children to a fairground stall laden with fairy floss. Other days, I reach desperately into the hollow of a darkened cave where all the worthy words in the world are wedged into tiny crevices. Begging for them to come forward into the light, they refuse and cling mollusc-like to their safe rocky comfort. Leaving me berefit and wordless.

Ornery little buggers.

That is why I give you a brief description. Aromatic, spicy, zingy, beany. This curry was bloody good and adds a vegetable freshness to an Indian banquet.

GREEN BEAN CURRY

WHAT YOU NEED

1 tbl vegetable oil
1 small onion, diced
1 garlic clove, crushed
15 small dried curry leaves or 5 fresh
1 tbl curry powder (use a good quality one, I used a Herbies Spices blend)
1/2 tsp brown mustard seeds
1/4 tsp chilli powder
1 tsp salt
500g green beans, topped and tailed
1/2 cup coconut milk (I used low fat)
2 tbl lime juice

WHAT YOU DO

Heat the oil in a medium size frypan over a medium heat then fry the onions until they start to turn golden brown.
Add the garlic and curry leaves and cook for 2 minutes, stirring constantly.
Add all the spices and salt and cook for one to two minutes.
Add the green beans, stir to coat in the spices then turn to a low to medium heat and cook until the beans are just al dente. (Meaning they have a bit of resistance when you bite into them.)
Add the coconut milk and cook for five minutes. Check the seasoning.
Remove from the heat and stir in the lime juice.
Serve as part of an Indian banquet.

A Cheergerm adaptation of the recipe listed below.


http://allrecipes.com/recipe/green-bean-curry/


Long walks in the rain and restorative vegetable soup

Hi, my name is Cheergerm, I like long walks in the rain. (This sounds like the introduction to a personal ad on a dating website.) Actually, I was under the impression I liked long walks in the rain.

After a lovely and filling lunch at Mum’s house, a forty minute walk home seemed like a good idea. The offer of an umbrella was denied. ‘No thanks, I have my rain coat, that will do thanks.’ The first five minutes of light drizzle were delightful. I felt alive, exuberant, all English-like and Mary Poppinsy. Trip trapping down the road like one of the Three Billy Goats Gruff, cool mist enveloping me.

Then the rain got heavier. Rain coat zipped up, hood on. This wasn’t going to dampen my spirits, so to speak. Did the intrepid explorer Sir Edmund Hilary turn back when things got a bit hairy climbing Mt Everest? Never! With nothing to protect my face and glasses, large drops began to drip down, obscuring my vision. A pair of teeny tiny windscreen wipers would have been great. This genteel walk was becoming somewhat unpleasant.

The rain deepened, as did my mood. I would not call for help. Captain Scott didn’t call his mummy for help in the Antarctic, did he? (Unfortunately, I had left my mobile phone at home.) The wind started to blow the rain sideways. By now my track suit pants were hugging my legs wetly, not unlike a clingy three year old with a soggy nappy. The odd drip or two was making it way slowly down my back, creeping towards undergarments that one would prefer to keep dry.

I saw a car, my heart lifted, it was the same make and colour as ours. Had the Yak come to rescue me from this foolhardy adventure? Nope, it wasn’t him. Resolutely, I put my head down. Rain was now pouring over the hood of my rain coat and down my nose like a miniature waterfall. Home was only ten minutes away.

My name is Cheergerm, I do not like long walks in the rain.

But I do like this. A marvellous restorative vegetable soup based on the kind of soup that Mum would make on wintery Sunday’s. It is perfect for when you feel wet, poorly, sad, or just in need of a big bowl of soup love. It makes a huge pot but I always freeze some for a rainy day. Mum always used barley but sadly, it is not gluten free. I threw in some lovely red Persian lentils which do not need soaking and keep their shape once cooked. The celery is essential.

RESTORATIVE VEGETABLE SOUP

2 tbl olive oil or grapeseed oil
1 onion, diced
2 large carrots, diced
1 yellow or red capsicum, diced
4 sticks celery, 300g, diced
1 Swede (the vegetable not someone from Sweden), diced
4 cups veggie stock
7 cups of water
1 cup Persian red lentils (or green lentils, or barley if it doesn’t need to be GF), make sure you wash them
Big handful of green beans, chopped
2 medium zucchini, diced
1 tsp Salt and as much black pepper as you desire
1 large handful celery leaves, roughly chopped
(Optional: vegetable stock powder.)

Heat oil in large stockpan and sweat off onion, carrots, pepper, celery and swede for about ten minutes. Do not colour the vegetables.
Add the veggie stock, water, lentils and a few big grinds of black pepper. Bring to the boil then reduce to a simmer.
Cook for about 40 minutes until the carrots are just tender, then add the beans, zucchini and salt and cook for a further 10-15 minutes or until they are just tender. You want to keep some vibrancy in them.
Check for seasoning, add more salt, pepper and a teaspoon of veggie stock powder if needed.
Add the celery leaves and cook for five more minutes. Let the soup sit off the heat for five minutes, scoop off any lentil scum that has come to surface.
Eaten with a slice of spelt sourdough and some manchego cheese.

A Cheergerm recipe

Cooking Notes: I used a store bought veggie stock. I have made my own before (a few years ago now) but I really fancy making the wonderful sounding roast vegetarian stock from the lovely Almost Italian blog. She roasted the vegetables first to obtain some umami depth. I haven’t made it yet but I will. Or maybe you will first. Bless and damn you if that is the case.

https://almostitalian.wordpress.com/2015/06/01/french-onion-soup-with-vegetable-stock-voila/