The last meal and a gluten free rhubarb frangipane tart

Nigh on an eon ago, whilst undertaking my food studies course, we made frangipane for the first time. Frangipane is a filling for a cake or tart made with, or flavoured by almonds. In this day and age, it is normally made of ground almonds, butter, egg and sugar. The manner in which this mixture puffed up and surrounded the fruit placed on top, seemed magical to me back then and still does today.

It appears that this fluffy almond concoction could also have been a favourite of a saint. Some googly research unearthed the charming story of Jacoba dei Settesoli, an Italian woman who married into the Frangipani family in 1210. After meeting Saint Frances of Assisi, she became a friend and follower of his, devoting her life to good works. The story goes that upon his death bed, Francis called for ‘Brother Jacoba’ (as he had named her due to her fortitude), to bring him some of his favourite almond treats. Much to the consternation of the other monks, she was allowed in to the monastery with a basket of almond pastries and stayed until the revered man took his last breath.

This tale of a woman before her time, feeding a saint the food he wished for on his death bed, led me to ponder what my last meal on earth would be. Before making this momentous decision, I asked The Yak what he would choose. He replied that it would have to be his ‘once favourite dish’ from his ‘once favourite’ Italian restaurant Buon Ricordo. The legendary cream and Parmesan fettuccine topped with a truffled egg. He would also feast on a basket of the finest gluten laden breads.

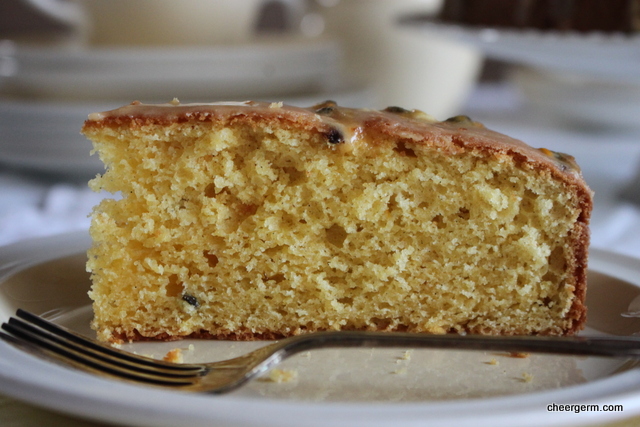
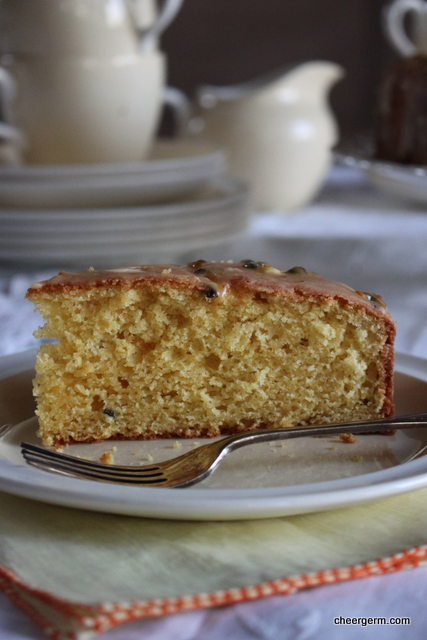
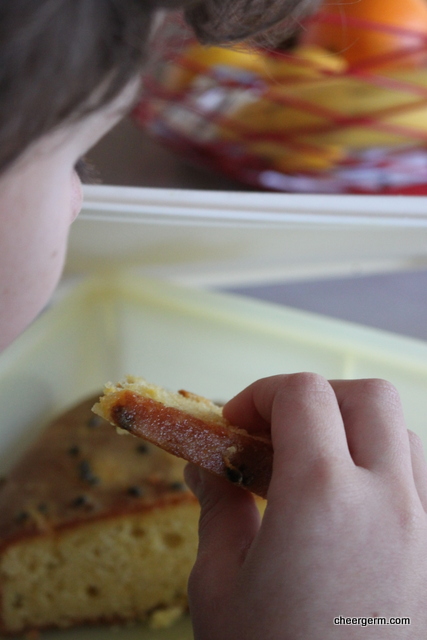
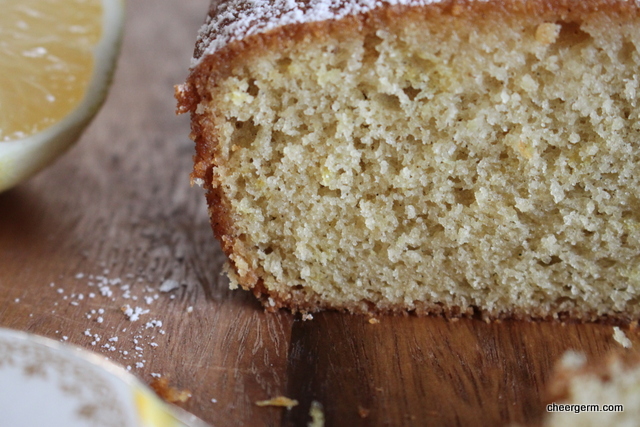
For myself at the time of writing (I am nothing if not fickle), it would probably include half a dozen Sydney rock oysters ‘au naturale’, a bowl of buttery garlic prawns, a slice of good sourdough bread to mop up the prawny juices, steamed asparagus spears drizzled with lemon, a splodge of the creamy French soft cheese Buche d’Affinois and an icy cold glass of champagne. (Well, maybe more than one.) For dessert, this pretty and delicate cake would certainly be a contender. The piquant rhubarb offsets the buttery, nutty, sweetness of the frangipane perfectly.

A tart worthy of a saint or a Cheergerm’s last meal.

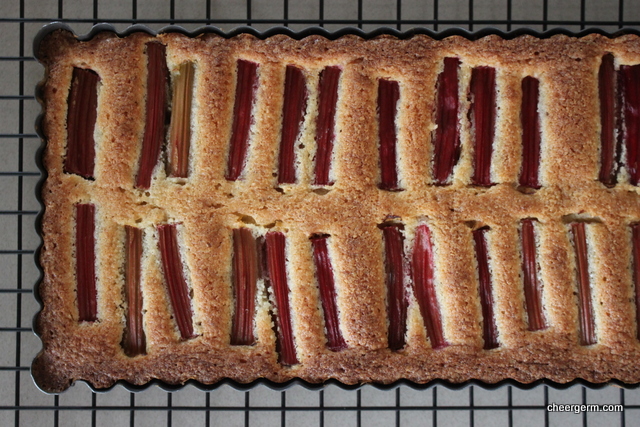
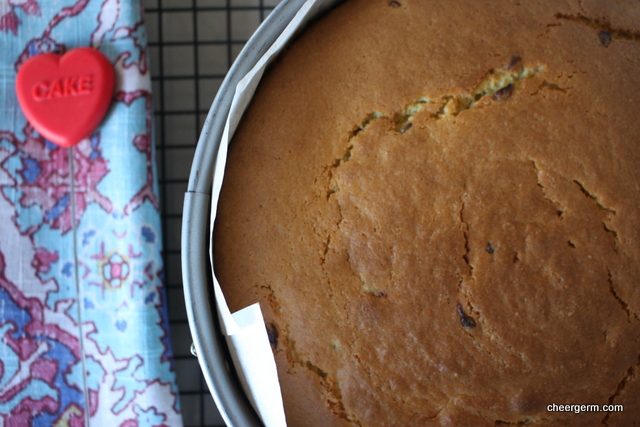
RHUBARB FRANGIPANE TART, GLUTEN FREE
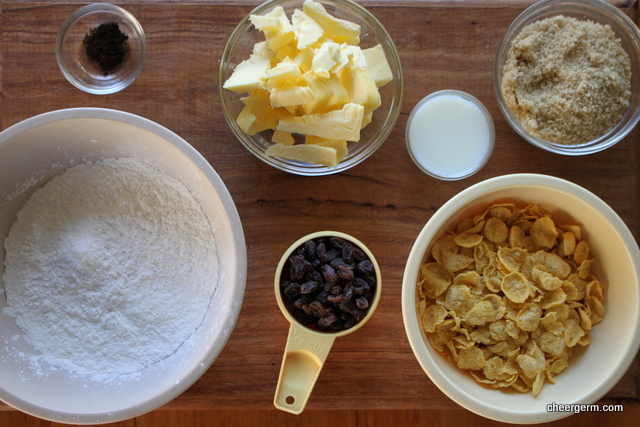
WHAT YOU NEED
150g unsalted butter, softened
150g caster sugar
2 large eggs
1/4 tsp vanilla bean powder (1/2 tsp vanilla extract)
1 lemon rind finely grated
150g almond meal
35g (1/4 cup) gluten free plain flour
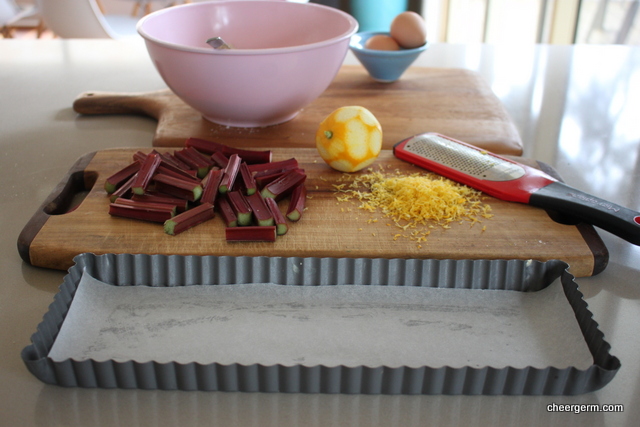
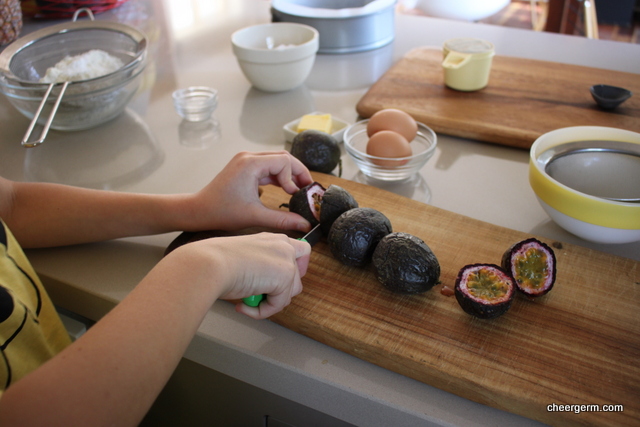
150g rhubarb, trimmed and cut into 5cm lengths

HOW YOU DO IT
Preheat oven to 180C.
Grease a 34 cm x 12 loose based tart tin rectangular tin or a 23cm loose based flan tin.
Beat the butter and sugar in an electric mixer until they are light and fluffy.
Add the eggs one at a time, beating well after each addition.
Add the vanilla and lemon rind and beat well.
Add almond meal and flour and fold to combine.
Spoon the mixture into the tin and smooth the top with a spatula.
Arrange the rhubarb over the top of the mixture in a pleasing pattern.
Put in the oven and bake for 25 to 30 minutes until the top is golden and a skewer inserted into the middle comes out clean.
Remove from the oven and allow to cool.
If you want to serve it warm, give it 15 minutes before trying to take it out of the tin. Otherwise, cool completely then gently loosen the edges before removing carefully and placing onto a plate for presentation.
Dust with icing sugar and serve with cream or without. That’s really up to you.

Slightly adapted from the SBS food recipe website. Link follows the photos.

http://www.sbs.com.au/food/recipes/rhubarb-pistachio-and-orange-blossom-frangipane-tart-rhubarb-syrup

http://ncronline.org/blogs/ncr-today/feb-8-bl-jacoba-de-settesoli

https://en.m.wikipedia.org/wiki/Jacoba_of_Settesoli

Buon Ricordo Sydney Italian Restaurant – Paddington

http://www.aoap.com.au/content_common/pr-white-mould-cheese_guilloteau-buche-daffinois.seo


Chia pudding pots and granola, gluten free

There was a stirring in my workday breakfast soul, a yearning for something a little different than my usual banana, spelt sourdough toast with smashed avocado and a cup of tea. Something free of gluten that that The Yak could also scoff, before the trek to work was made. Something that could be made the night before, which for this ‘Non-Morning Person,’ is perfect.

When I first started experimenting with this pudding, doubt ruled supreme as to whether it would be delicious. Currently, these kind of chia concoctions are hipper than hip, too cool for school and this Cheergerm has never enjoyed the textural journey that is sago or tapioca. However, we have become chia pudding converts. Sigh, what followers. After some experimenting with liquid and chia quantities , I found a balance that works for my taste. The gluten free granola is a marvellous combination of crispy, sweet and nutty goodness. It is rather fabulous when strewn on all manners of breakfast foods. Combined with the pudding, it is simultaneously creamy, squishy and crunchy. The blueberries add a lovely fresh tartness that cuts through any richness.

Little black pearls of chia seeds
I appreciate popping you into a biscuit batter
Or this nice little breakfast pudding
Even though
You get stuck between my teeth
I kind of like you
But I kind of don’t
I have read that you are a powerhouse of
Fibre, protein, antioxidants and all that good stuff
You are also free of gluten
Which is greatly appreciated in these here parts
But you are also a little bit weird
And whilst I don’t want to be cruel
I am not quite sure I would say
We are the best of friends quite yet

BLUEBERRY CHIA BREAKFAST PUDDINGS

WHAT YOU NEED
1 1/2 cup yoghurt (I used a thick greek style vanilla bean yoghurt.)
1/2 cup light coconut cream (an oxymoron if I ever heard one)
1/3 cup chia seeds
1/8 tsp Vanilla bean powder or 1/4 tsp vanilla bean essence
2 tbl maple syrup
125g blueberries (reserve 12 for garnishing) (I have used raspberries as well which are also delicious)

HOW YOU DO IT
You will need 4 cups or jars to put this mixture into. Whaever takes your fancy. These wee jars were from Wheel and Barrow (no sponsoring or anything tricksy going on here) and I am a little bit in love with them.
Divide the blueberries amongst the jars or cups, leave about 12 for garnishing the top.
Whisk the chia seeds, yoghurt, milk, maple syrup and vanilla in a large bowl.
Divide equally amongst the four containers, pouring the mixture over the berries.
Use the remaining berries to garnish the puddings.
Cover and place in fridge overnight.
If the pudding is too thick for your liking, add a dash of milk or coconut milk to loosen it.
Serve topped with a hearty sprinkling of the granola (recipe follows) and tuck in.

A Cheergerm creation

GLUTEN FREE GRANOLA

WHAT YOU NEED
1 cup walnuts, roughly chopped
1 cup pecans, roughly chopped
1/4 cup sunflower seeds
1/4 cup pumpkin seeds
1 tbl chia seeds
1 tbl flaxseeds
1 tsp cinnamon powder
1/4 tsp vanilla bean powder or 1/2 tsp vanilla bean essence
1/2 tsp sea salt
2 tbls maple syrup
2 tbl grapeseed oil
1/2 cup coconut (I only had desiccated, shredded or flaked would be good too)
1/2 cup chopped dried cranberries (I used whole unsweetened)
1/4 cup sultanas

HOW YOU DO IT
Preheat oven to 160C.
Line a large baking tray with baking paper.
Spread the walnuts, pecans, sunflower seeds, pumpkin seeds, chia, flaxseeds, cinnamon, vanilla and sea salt onto the tray and mix well.
Pour the maple syrup and oil over the granola mixture and mix very well.
Place in the oven for ten minutes, remove tray and add the coconut, cranberries, sultannas and stir. This ensures the fruit doesn’t harden too much and the coconut doesn’t burn. Put the tray back in the oven.
After another ten minutes, remove the tray again and stir.
At this point, you will have to decide if it needs another five minutes or not. It will depend, sometimes I give it a few minutes more. You will have to watch it carefully as you want crunchy golden brown granola, not burnt.
Once cooled, place a hearty spoonful on top of your chia puddings. It is also great on yoghurt and other breakfast cereals. Store in an airtight container.

Cooking Notes: Sometimes I add a half cup each of puffed amaranth and puffed millet along with the nuts and seeds at the start. Also delicious. I have also used dried unsweetened cherries instead of cranberries which are fantastic.

A Cheergerm creation


Gluten free dark Jamaican Gingerbread and the bird

Children are a veritable wealth of knowledge.

Kid 1: Did you know that years ago, that angry tennis man John McEnroe flipped the bird at the queen?

Me: Are you sure?

Kid 1: Yes, and the Queen flipped the bird back at him.

Me: Now I know that part didn’t happen.

Kid 1: It did, it did. The Queen flipped the bird.

Me: She did not!

And so it went, did, didn’t, did, didn’t. It turns out he had seen an advertisement for a television ‘mockumentary’ on tennis and at the time, believed it to be a true historical fact.

I for one, imagine that during her illustrious reign, Her Royal Highness must have wanted to flip the bird at least once. (Gesticulating in this manner has certainly crossed my mind once or twice when arguing with Kid 1). This spot of baking hails from the iconic British baker, Delia Smith. This no-nonsense doyenne of English cookery is accredited for teaching two generations of loyal British fans how to cook. Her recipes are reliable and are also easily converted into gluten free options.

In her cookbook Delia’s Cakes, she tells us that this cake was ‘originally from the sugar-and-spice island of Jamaica.’ Darkly treacly, spicy, sticky and chewy. This is almost like a real loaf of bread. It is truly better when wrapped and left for a day and even better (like so many things), when smeared with butter.

Now I just know that Delia would never flip anyone the bird.

GLUTEN FREE DARK JAMAICAN GINGERBREAD

WHAT YOU NEED
180g gf plain flour (130g plain gf flour and 50g sorghum)
1 tbl ground ginger
1 1/2 tsp ground cinnamon
1/8 tsp ground nutmeg (1/4 nutmeg, grated)
1/2 tsp bicarbonate of soda
2 tbl milk
75g black treacle or molasses
75g golden syrup
75g dark brown sugar (I used coconut sugar)
75g butter
75ml water
1 large egg, lightly beaten

WHAT YOU DO
Getting Ready: Preheat the oven to 170C and line a standard loaf tin with baking paper. Delia suggests using a ready made loaf tin liner (which I did not have.) Place the tin of treacle or molasses and golden syrup bottle in hot water to warm them and make it easier to measure them.
Sift the flours and spices into a large bowl.
Mix the bicarbonate of soda into the milk and set it to one side.
Measure the treacle/molasses, golden syrup, sugar and butter into a saucepan with 75ml of water. Heat over a low heat and stir gently until thoroughly melted and blended. Don’t let it come anywhere near the boil and don’t go off and leave it.
Next add the syrup mixture to the flour and spices, beating vigorously with a wooden spoon.
When the mixture is smooth, beat the egg in a little at a time, followed by the bicarbonate of soda and milk.
Now pour the mixture into the prepared tin and bake on a lower shelf, align the the tin with the centre of the oven for 50 minutes to 1 hour until it’s well-risen and firm to the touch.
Remove the cake from the oven and allow it to cool in the tin for 5 minutes before turning out.
If possible, store it in a cake tin in the liner (if you used one) or wrapped in clingfilm for 24 hours before eating. It is delicious smeared with butter.

A Cheergerm adaptation from Delia’s Cakes published by Hodder and Stoughton 2013


For you, a gluten free passionfruit cake

This is for you my friend since we were fifteen year old ingénues
We would share our hopes and dreams in sleepovers silly from lack of sleep
The world spread out before us juicy, ripe and full of hope
Kept apart by distance for many years now
This was baked with Kid 1, in the pretence that it would be placed lovingly into a lemon coloured Tupperware container, tucked into the car, then driven over to your house
To make you a cuppa
To cut us a slice of cake
It’s possible it may have sat there untouched for quite a bit
Whilst we talked it out
This cake is for all the times I wasn’t there to hold your hand or for you to hold mine
To dry your tears
To tell you it was would be ok
Even when it really wasn’t
To kick each other’s arses if it was required
Or to not say much of anything at all
This cake is so you know
You are in my heart if no longer in my neighbourhood

Kid 1 and I baked this tropical fruity delight slowly and happily. The day stretched out immeasurably before us. Carefully learning to crack eggs, he wrapped his small hands around the ovoid object as if it were a Faberge antiquity.

This cake has a light soft crumb with soft vanilla undertones and is best eaten on the day it is made. (Or the day after, but it loses something by the third day. Not sure what, just trust me.) The thin passionfruit glaze with its scattering of dark seeds is just the right balance of sweet and tang. In lieu of sharing a slice of this cake with my friend, we had it for afternoon tea.

GLUTEN FREE PASSIONFRUIT CAKE

WHAT YOU NEED
125g butter, room temperature
2/3 cup raw caster sugar (or white caster sugar)
200g gluten free self raising flour
50 sorghum flour
30g almond meal
1 1/2 tsps baking powder
1/4 tsp salt
1/4 tsp vanilla bean powder or vanilla essence
2 eggs, lightly beaten
1/2 cup milk (room temperature)
4 small passionfruit pulps, (or 2 large.) If you don’t want too many pips in your cake batter, you can sieve the pulp then add some of the pips back into the sieved mixture to add to the cake.

Passionfruit glaze
1/2 cup icing sugar
1/2 tsp butter, melted
1/2 tsp boiling water
passionfruit pulp of 1 small or 1/2 of a large

HOW YOU DO IT
Preheat oven to 180C and line a 22cm springform tin with baking paper.
Cream the butter and sugar together in a mixmaster, with hand beaters or by hand. Make sure it’s light and fluffy and almost white in colour. (Add the vanilla essence if you are using it at this step.)
Whilst the butter and sugar is mixing, sift the self-raising flour, sorghum flour, almond meal, baking powder, salt and vanilla bean powder. Place aside.
Add the eggs to the creamed butter and sugar, mix well.
Starting with the flour, add the sifted flour and milk alternately, one third at a time.
Add the passionfruit and mix well.
Pour the mixture into the tin.
Cook for approximately 40 minutes or until a skewer comes out clean.
Let cool for ten minutes then take out of the tin and cool on a wire rack.
Once completely cool, drizzle with the glaze. (Recipe below.)

Passionfruit glaze
Sift the icing, add the butter, boiling water and passionfruit pulp to the icing.
Mix well, you want a fairly runny consistency, add a dash more hot water if needed.

A Cheergerm adaptation from the Best Recipes website, link below.

http://www.bestrecipes.com.au/recipe/golden-passionfruit-cake-L8274.html


Gluten free date and ginger slice, minus three points

Kid 1 to our dog: Elvis I love you so much but I minus three points of love because you have no butt cheeks.

Kid 1 is a hard taskmaster. After being begged asked to try this slice, he had a tiny nibble. Letting me down as gently as he was able to, the sproglet informed me that ‘it was not to his taste and he didn’t like the ginger and chocolate together.’ Well, that left a large amount of slice for the taller people in our household. (Kid 2 saw the cornflakes and ran a mile.) Leftover gluten free cornflakes needed to be used up so this recipe was on my ‘to do’ list. The Yak and myself were big fans, as were the other friends that I palmed it off on shared it lovingly with. It is a bit like a poorer cousin of a fancy florentine, but no less delicious.

With a chewy unctuousness, this slice isn’t as sweet as you would imagine and the ginger is a welcome spicy surprise. It would be a wonderful addition to a Christmas celebration or packaged prettily as a festive gift. Containing dates, this concoction must be good for you and being doused in dark chocolate (which science has proven to be rich in important nutrients), it is doubly so.

Kid 1, I love you so much but I minus three points of love for you being such a fussy bugger.

GLUTEN FREE DATE AND GINGER SLICE

WHAT YOU NEED
1 1/2 cups (180g) chopped dates
170g butter
85g sugar
2 tsp ground ginger
3 cups (80g) gluten free cornflakes
170g dark chocolate

HOW YOU DO IT
Put the chopped dates, butter, sugar and ginger into a medium sized saucepan. Place over a low heat and stir with a wooden spoon until the mixture is thoroughly amalgamated. This takes about 5 minutes.
Remove from the heat and mix in the cornflakes.
When everything is well combined, press into a 30 X 21 cm shallow tin until it’s about 1cm thick. My slice was about 26cm long, it depends how thick you make it.
Once the mixture has cooled, put it in the fridge until it is quite firm. This took about 45 minutes.

Finishing
Melt the chocolate carefully and pour it over the chilled slice.
Spread out evenly with a knife or spatula, then score the surface of the chocolate with a fork.
Set aside to cool and cut into small fingers or squares.
Store in the fridge in an airtight container, separating the layers with baking or waxed paper. Makes about 20-25 squares, depending on the size.
Cooking Note: you can use regular cornflakes if you don’t require a gluten free slice.

Recipe from Ladies, A Plate by Alexa Johnston

http://www.theguardian.com/science/2015/jun/16/more-evidence-that-chocolate-may-be-good-for-the-heart-say-researchers#img-1


Minecraft and a gluten free lemon drizzle cake

When my two lads talk to me about Minecraft, the computer game, this is what I hear:

Minecraft blah blah blah

Enderman blah blah blah

Diamonds, pigs, blah blah blah

Villagers blah blah blah

Me: Oh really, That’s great!

I could feel really bad but then I remember that this is what they hear when I speak to them:

What did you do today blah blah blah

Homework blah blah blah

Shut the door blah blah blah

Wash your hands blah blah blah

Tidy your room blah blah blah

So we are even.

Parenting can be a battlefield but we all need to eat. Every living creature in our house loves this cake. I mean, they really love it. Gluten is not missed and every bite is moist, sweet, tangy and tender. Just like life itself.

GLUTEN FREE LEMON DRIZZLE CAKE

WHAT YOU NEED
125g butter, room temperature
130g caster sugar
Zest of one large or two small lemons
2 large eggs
65 ml milk
1/4 tsp vanilla bean powder (or 1/4 tsp vanilla bean paste or essence)
100g gluten free self-raising flour
50g sorghum flour
30g almond meal
2 tsps gf baking powder
1/4 tsp salt

Lemon Syrup
2 tbl sugar
Juice of the zested lemon

HOW YOU DO IT
Preheat the oven 180 degrees or 170 fan forced, then prepare and line a loaf tin.
Cream the butter and sugar in the food processor.
Add the lemon rind and pulse.
Add the rest of the ingredients and blend until nice and smooth.
(If you do not have a food processor, use a stand mixer, electric hand beater or go old school and use a hand whisk!)
Bake the cake for about 40 minutes or until a skewer comes out clean.
For the lemon syrup, whilst the cake is baking, heat the sugar and juice of the lemon until the sugar has dissolved. Set it aside until you need it.
Whilst the cake is still in the tin, place it on a cooling rack.
Pierce the cake all over with a skewer then spoon over the lemon syrup. Use it all, the cake will soak up the syrup as it cools.
Let the cake cool completely in the tin before serving.
Slice and eat it. We did.

A Cheergerm adaptation from the UK Telegraph website. The link is provided below.


http://www.telegraph.co.uk/foodanddrink/recipes/8059974/Classic-lemon-drizzle-cake-recipe.html

A wee thanks for the ‘Sunshine’ blog award nomination to Windy Mama who blogs at Wuthering Bites. Go and have a read of her clever award acceptance post.

https://wutherornot.wordpress.com/2015/05/28/the-plays-the-thing/comment-page-1/#comment-575


Gluten free chocolate fudge biscuits and bringing glad back

Yes, it may be a bit Pollyanna of me (for those of you who remember the book and movie) but I am single-handedly bringing back the word ‘glad’.

Somewhere along the way, the word ‘grateful’ has become incredibly popular. Leaving it’s less glamorous cousin ‘glad’ sitting sadly against the wall, not unlike an unwanted wallflower at a school dance.

Considering myself a champion for the unpopular, daggy and less than glamorous; I have popped ‘glad ‘ into my handbag of current and favourite words. It somehow speaks of a more refined time. It is not effusive, nor is it ‘in yo face’.

Intrinsically, both words have similar dictionary meanings.

glad: feeling pleasure or happiness, grateful, willing
grateful: thankful, feeling or showing appreciation

To be grateful or show gratitude is a little bit Hollywood. To be glad sounds more London Westend musical. The understated vibe of the word ‘glad’ brings to mind adorable pastel coloured 1950’s hats adorned with fake flowers. It harks back to a time when lads and lasses dressed impeccably in pinstriped boating attire and daintily nibbled on teensy weensy cucumber sandwiches. I will leave ‘grateful’ to the gushing vocabulary of actors swathed in sequinned gowns and pretending to chow down on miniature sushi handrolls topped with beluga caviar.

All in all, I am glad that I found this lovely biscuit recipe on the web. (Not a spiders web but the world wide version.) It didn’t turn out as I had thought. In my minds eye, I envisaged that these cookies would be crunchy but then I went and changed the recipe. (Only because I lacked some of the necessary ingredients.) Ordinarily, I would not post a recipe that could be deemed a failure but to us they were chewy, richly chocolate and unctuous. Less biscuit, more like a brownie or cake.

Strangely enough, our cornflake biscuit eschewing lads, adored these. Go figure.

GLUTEN FREE CHOCOLATE FUDGE BISCUITS

WHAT YOU NEED
2 tbl grapeseed oil
1/2 cup maple syrup
1 egg
1/2 tsp vanilla extract (I used vanilla bean powder and added it in with the dry ingredients.)
2 tbl golden syrup
1 1/2 cups almond meal
1/4 cup plus 1 tbl Cocoa powder
1 1/2 tsps baking powder
3 tbl cornflour
A pinch of salt
1 tbl milk

HOW YOU DO IT
Place all the wet ingredients except for the milk into a food processor or blender and mix until combined.
Add in all the dry ingredients and mix until combined.
Add the milk and pulse until mixed through.
Place the mixture into a bowl and place into the fridge for a minimum of 30 minutes. (Mine was in there for 2 hours.)
Preheat the oven to 170C/350F and line two trays with baking paper.
Place large tablespoons of the mixture onto the trays leaving a gap of at least 3 cm /1 inch as they will spread. Place the trays back in the fridge for 15 minutes.
Remove the trays and place in the oven for 16-18 minutes, they will be slightly cracked on top. (Just like me…)
Cool on the tray for 5 minutes then remove to a wire rack for cooling. They will harden up a little as they cool.
Made 19 biscuits.

Very lightly adapted from a recipe from the Mummy Made blog. The link to the original recipe is provided after the photos.

http://mummymade.it/2014/01/chocolate-ripple-bisuits.html


Gluten free cornflake biscuits and Box Boy

Here in New South Wales, Australia, we have been recovering from devastating storms and torrential rain. Outside play has been at a minimum. Finally, the sun was shining and I screamed at politely asked my children to go outside and play. They ignored me. During my rant soliloquy on the benefits of outdoor playing Kid 2 came up to me, wearing a cardboard box. He had become Box Boy, reminiscent of The Boy in the Bubble but less circular.

Kid 2: Hug me.

Not particularly wanting to hug him at that moment, I decided to take this as an opportunity to think outside the box. I wrapped my arms around my cardboard enclosed child and squeezed. For the record, it was odd and rather scratchy.

The gluten free cornflakes used in the recipe also came out of a box. Having known and adored similar styles of biscuits in my cheery childhood, I assumed the sproglets would devour them immediately. Incorrect. The little buggers sweethearts wouldn’t even try them. ‘Go on, eat one,’ said I. ‘No’, said they, resolutely and determinedly.

The adults who got a look in loved every one of these crunchy, vanilla studded, buttery biscuits. To say they pair well with a good cup of cha (tea) is an understatement. For fans of secondhand goodness, please note the adorable Swedish mug rescued from an op shop for the ripe price of a dollar. Got to love a bargain.

GLUTEN FREE CORNFLAKE BISCUITS

WHAT YOU NEED
125g butter
1/2 cup caster sugar (I used raw)
1/4 tsp vanilla bean powder, or 1/2 tsp vanilla bean paste or vanilla essence
180g gluten free self-raising flour, sifted
1 tbl milk
1 1/2 cups gluten free cornflakes
1/2 cup sultanas

HOW YOU DO IT
Preheat oven to 180C and line two baking trays with baking paper.
Cream the butter, sugar and vanilla in a mixing bowl until light and creamy. I usually scrape the bowl down using a spatula at least once during this process.
Add the flour and mix on a low speed to incorporate.
Add the milk and mix until the dough comes together.
Use a wooden spoon to mix the cornflakes and sultanas in, stir until well combined.
Use a heaped teaspoon per biscuit and roll into a ball. Place onto the trays, allowing room for spreading, slightly flatten each biscuit with a spatula.
Cook for 12-15 minutes or until lightly golden. I often turn the trays halfway through cooking to allow for even cooking.
Remove trays from oven and let cool for five minutes before transferring to a wire rack.
Made 22 biscuits.

A Cheergerm adaptation of a recipe from the Taste website. The link to the original recipe is provided below the photos.

</a

http://www.taste.com.au/recipes/13559/sultana+cornflake+cookies


Gluten free lime yoghurt cake and awash in tears

Our house was awash in tears on the morning I made this cake. Our mostly calm before school routine was offset by self-disappointment, childlike hurt and a more grown-up, deeper sadness.

All surfaces seemed awash with liquid. Bench tops, faces, cupboards and eyes reflected a watery glow. We were in fear of drowning. Even in the car, tears continued to flow and school drop off was a sombre and quiet occasion.

Upon returning home, I was relieved to see our house had not been swept into the valley and that Noah and his Ark were not loading our dogger friend, cockatoos and other assorted wildlife on board.

From the fruit basket these gem like, green, freely given, home grown organic limes greeted me. They went a little way to soothing my aching head and worn out from weeping eyes. They spoke to me in limey voices (‘hello guv’nor!’) of a sweet something, that would greet my citrus loving progeny upon their return from school.

There is nothing like the smell of lime to put some pep in your step and allow a breath to be taken. This lovely cake is tangy from the citrus and Greek yoghurt with an extra fruity hit from the olive oil. The first recipe trial was fine, the second tweaked version you find here, is damned fine. And not a salty tear in sight.

Note to self, never leave a cake and the camera alone with The Yak, not even for a moment.

GLUTEN FREE LIME, YOGHURT AND OLIVE OIL CAKE

WHAT YOU NEED
1 cup full fat Greek yoghurt
2 eggs
1/3 cup olive oil
1/4 cup lime juice (this is roughly the juice of one lime)
Zest of one lime
1/4 tsp vanilla bean paste, vanilla bean powder or 1/2 tsp vanilla essence
210g gluten free flour (1 cup/140g gf plain flour, 1/4 cup/40g almond meal, 1/4 cup/40g brown rice flour)
3/4 cup raw caster sugar (or white caster sugar)
1/2 tsp salt
2 tsps baking powder

Topping
1 tbl brown sugar (I used raw caster sugar)
1 tbl extra lime zest (I used the zest of one lime)

HOW YOU DO IT
Preheat oven to 180C and grease and line a 22cm springform tin with baking paper.
Mix all the wet ingredients including the lime zest in one bowl until well combined. (If using vanilla essence or paste add it here.)
Sift all the dry ingredients into a large bowl. (If using vanilla powder, add here.)
Pour the combined wet ingredients into the dry ingredients bowl and using a wooden spoon, mix until just combined.
Pour into the prepared baking tin and cook for approx 40-45 minutes. The cake is ready when it has browned on top and a skewer inserted into the centre comes out clean.
Cool in the tin for ten minutes, then turn out and cool on a wire rack.
When the cake is completely cool sprinkle with the topping mixture. This is delicious served with a big dollop of yoghurt on the side.
Feel free to use lemons if you can’t find limes.

A Cheergerm adaptation of a recipe from the blog Souvlaki for the Soul which was in turn adapted from a Smitten Kitchen recipe.

http://souvlakiforthesoul.com/2011/05/lime-yoghurt-and-olive-oil-cake


A little bit of what you fancy and gluten free banana bread

A particular comment on a television show we were watching recently has stuck in my mind. It was made by a British woman who had reached the magnificent age of 101. She was in remarkable good nick and during the interview had said ‘People always ask me, what is the secret to your longevity? And I always say, a little bit of what you fancy does you good but don’t make a pig of yourself.’

In this age of don’t eat this, eat more of that, eat less of that, eat only that; her view resonated with my food philosophy. Which would probably be ‘a little bit of this and a little bit of that, just don’t go nuts’. I will clarify this by saying that I do sometimes go overboard, being the happily imperfect human being I am.

Fanaticism and radicalism have never sat well with me. Sometimes it feels that my attempt at viewing food in a well balanced manner is under attack, albeit, by a well meaning barrage of good intentions. (It’s ok, no paranoia here, it is completely understood that it’s not directed purely at me.)

The issue is, as a devourer of new food information and being an open minded wee Cheergerm, it floats my boat to learn new things and experiment with different ingredients and recipes. It’s all about keeping it in perspective. Continuing to still enjoy what is loved as well as opening my mind up to new ideas. So the mantra of ‘a little bit of what you fancy’ is compelling in whatever direction that may take me.

Teresa Cutter, aka ‘The Healthy Chef’ has some great recipes. What I love about her is the many alternatives she provides in her recipes and so far, they have all worked. Three out of four CheergermYakatarians adore her nutritious (read low fat, low refined sugar) version of banana bread. I made a little adjustment and replaced some of the almond meal with sorghum flour to attain a lighter texture. Try using a stick blender to zshoosh the mixture as it really keeps the texture nice and light. The ground flaxseed acts as a fantastic natural binder in lieu of gluten.

This loaf is subtly bananaish, light and moist without too much squelchy almond meal texture. A hint of vanilla and cinnamon. Not sweet, at all…I mean, really not sweet but quite delicious with a smear of the good stuff, yeah, we are talking about butter. Give it a try, you might just fancy it.

GLUTEN FREE BANANA BREAD

WHAT YOU NEED
300g ripe, smashed banana (I only had 240g but it turned out fine)
3 eggs
60g/2 tbl maple syrup or honey
1/4 tsp vanilla powder or 1 tsp vanilla
60g or 1/4 cup grapeseed oil, macadamia nut oil or cold pressed olive oil
1/2 tsp cinnamon
1/2 tsp bicarb soda/baking soda and 1 tbsp lemon juice
1 cup almond meal (120g)
3/4 cup sorghum flour (80g)
1/4 cup ground flaxseed

HOW YOU DO IT
Preheat oven to 160C.
Oil a loaf tin and line the bottom with baking paper. The size I used was 13cm x 22cm. The original recipe used 10 1/2 cm wide by 26cm long.
Combine smashed banana, eggs, honey, vanilla, oil, cinnamon, bicarb soda and lemon juice (the lemon juice activates the bicarb) into a large bowl and mix by hand or better still, use a stick blender or big blender of some kind.
Add the almond meal, sorghum flour and flaxseed and mix thoroughly.
Spoon batter into the tin and bake for 45 minutes to 1 hour or until a skewer inserted into the centre comes out clean.
Cover the top with foil if it starts to overbrown. I covered my loaf at 40 minutes and it was ready at 55 minutes.
Remove from the oven and allow to cool before turning out.
Slice and serve with a creamy smear of butter.

A slight adaptation from Teresa Cutter
https://www.thehealthychef.com/2013/01/gluten-free-banana-bread/