Pecan pesto sauce

A traditional Italian pesto from Genoa contains pine nuts so in a way, this is a charlatans version of a much beloved Italian sauce. My recipe, through misadventure, contains pecans. The pecan derives from a species of the hickory tree, a deciduous tree native to Mexico and parts of southern USA. It is technically not a nut but a ‘drupe’ which is actually a fruit containing a single stone or pit and an outer husk. Pecans are high in monounsaturated fats and are buttery, rich and sweet.

It was another overtly hot Sydney day and we were on the verge of ‘hanger’. My kitchen possessed the majority of the requisite pesto ingredients. A massive bunch of basil that needed to be used, a wedge of Parmesan cheese, garlic, a bottle of olive oil but not a darned pine nut in sight. My kingdom for a pine nut! All that could be found were two big bags of pecans doing time in my pantry. (A pretty darned tough place to hang out, well, so all the other nuts out on parole tell me). In the past, walnuts, coriander and mint have been tossed into pesto sauces whereas pecans have been used for granolas and sweet baked goodies. Popping them into my pesto felt strangely wrong.

However, wilting and weakened and in the spirit of the Deep South from whence the pecan originated, I declared in my best southern accent, that I just didn’t give a damn. (In other words, there would be no running to the shops in a last minute manner.) Pecans were thrown in and all was well. We stirred the pesto through pasta and it was herbaceous, nutty, vibrant and just the ticket for a quick simple meal.
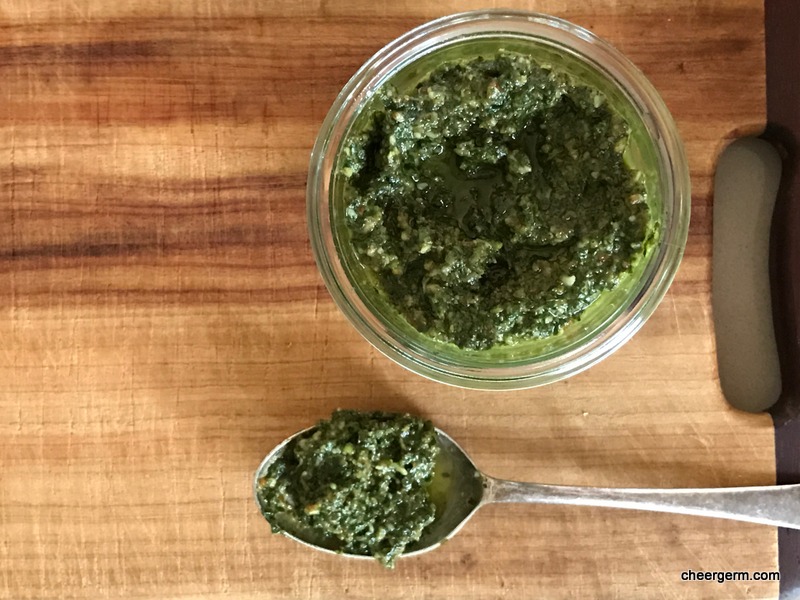
PECAN PESTO SAUCE

WHAT YOU NEED
1 big bunch basil (this was 3 cups of basil leaves, I know because I picked them, packed them and I measured them, so there.)
1/2 cup lightly toasted pecans
1/3 cup grated Parmesan
2 cloves garlic, crushed
2/3 cup extra virgin olive oil
Salt
Pepper

HOW YOU DO IT
Pick the basil leaves and wash and dry them.
Add the basil, pecans, Parmesan and garlic to a food processor and process until finely chopped.
Slowly add the oil whilst the blender is going until all the ingredients are well combined.
Taste then season with salt and pepper to your liking.
This sauce is delicious when stirred through pasta, liven up a veggie soup and dollop a blob on top or serve alongside grilled and roasted meats or tofu.
Leftover sauce can be stored in a jar in the fridge for a few days, cover the top with olive oil to stop it spoiling.

A Cheergerm Recipe


This little figgy went to market

Oh summer, summer. How do I love thee? Let me count the fruits….nectarines, peaches, mangoes, strawberries and more rarely, fresh figs.

These figs were procured from our local Growers Market. (Hard to reign yourself in whilst perusing all the fantastic produce that abounds). They sat in the fridge, shouting things like ‘eat us now’, and ‘stuff us with Gorgonzola, wrap in prosciutto and bake us!’ Little did they know, I had other plans for those plump little purple beauties.

One of my fave lazy dinner party desserts perchances to be baked figs. Peaches and nectarines are also delicious when given this same treatment.

It’s a lovely light ending to a dinner party and one that can be prepared earlier in the day. Just refrigerate until you are ready to bake.

When it comes to the liqueur, go wild. My usual choice is a liqueur muscat or tokay. In lieu of that tonight, I chose a cheeky Smoked Malt Whisky Tawny. An amazing port made in the same barrel that once housed a famous malt whiskey. If you choose to go alcohol free, you can drizzle some freshly squeezed orange juice over the figs.

No dinner party guests in the Cheergerm and Yak household tonight, just a greedy mama and papa chowing down on a Saturday night dessert that feels slightly decadent. There was a slight ‘peatyness’ from the port which went beautifully with the natural woody sweetness of the figs.

Now, if I was a food stylist or something more than a very amateur photographer, I am sure I could have made the final baked fig dish look gorgeous. All I can say is, they taste bloody beautiful. In real life they look earthy and delicious, despite the average photo below that scarily resembles something from John Wyndham’s The Triffids.

BAKED FIGGY FIGS

8 – 10 fresh figs (usually 4 – 5 figs per person)
50g butter
1-2 tsps coconut sugar or brown sugar
A dram of your fave liqueur

Place enough foil on a tray to hold and enclose the figs.
Slice a cross vertically into each fig without cutting through the whole fig.
Divide the butter into small pieces, pop a piece into the cut in each fig.
Sprinkle the sugar on top of each fig.
Pour a wee bit of liqueur over each fig, not too much, just a dribble.
Close the foil into a parcel around the figs.
Bake at 180C for 20 minutes until the figs are soft and starting to collapse.
Serve the figs, sharing out any leftover juices over the figs.
I served this with Greek breakfast yoghurt, it’s equally delish with honeyed marscarpone or double cream.

Note: don’t ever leave foil parcels on an induction cooking top when you are using it. Just saying is all…..


Gluten free lime slice and what the heck is teff flour?

MORNING
It’s Saturday morning, I am lying abed…reading, sipping tea and pondering the real meaning of life. (In other words, procrastinating the inevitable getting up and starting the day.) I have a vanilla soy candle burning and all is quiet and still….until…two small boys come bounding into the bedroom like Labrador puppies. Arms and legs flailing, falling over one another. ‘What’s that delicious smell?’ they cry. ‘We can smell it through out the whole house,’ ‘Is it something good to eat?’

‘Fraid not me laddies. It’s just the delightful scent of the candle you gave me for Chrissy, smells great hey?’ Disappointment radiates from every inch of their wiry beings. The sproglets gallop around the room once or twice. Any sadness at the lack of good things to eat is somewhat tempered by Kid 1 snarfling the TV remotes and taking off downstairs, I presume to watch something enlightening and educational on the Cartoon Network. 

Thoughts of this day now encroach. Yes, vanilla pervades my senses but I remember the big bag of luminous limes in the fridge. Lime slice with a hint of vanilla methinks. Gluten free, with buckwheat, teff flour…butter, now you are talking.

WHAT THE HECK IS TEFF FLOUR?
A brief ramble regarding teff flour, if I may. This gluten free ancient grain is teeny tiny but chock full of nutrition. Native to Ethiopia, it is believed that teff originated between 4000 BC and 1000 BC. I have used brown teff flour which is higher in protein than wheat and has a high concentration of nutrients such as calcium, thiamin and iron. Research has shown that the iron from teff is easily absorbed into the body. It is high in fibre and can help control blood sugar levels.

The only downer is that here in Australia, it hasn’t been easy to get. My last bag was Bob’s Red Mill Teff Flour from a local health food store and they have been out of stock for a few months now. Only a tiny bit remains, so this great hunter will soon set off once again to track down the teff. Will keep you posted on it’s whereabouts.

Overridingly this slice is all about the lime, with a touch of vanilla. (This post may give a small insight into the intricate, um, cough, workings of a Cheergerm mind.) The Yak says it has a caramel flavour, possibly from the coconut sugar. The slice is a little crunchy on the outer edge but more tender in the middle. Being a citrus lover, it’s my cup of tea. And that is exactly how it was enjoyed by The Yak and myself, alongside a cup of good, strong brew.

YOU NEED
Slice Base
150g buckwheat flour
50 g teff flour (or brown rice flour, millet flour or plain GF flour)
1 tsp baking powder
100g coconut sugar (feel free to use rapadura or raw caster sugar)
115 g butter
1 heaped tbl lime zest (3 small limes lost their zest to aid this recipe)
1/2 tsp vanilla paste

Icing
40 g butter
2 tbl lime juice
60g pure icing sugar, sifted

METHOD
Preheat the oven to 180 C and line a shallow 30cm x 21cm tin with baking paper.
Put the dry ingredients into a food processor and pulse briefly to combine.
Pop in the butter, lime zest and vanilla paste, process until the mixture resembles fine sand.
Tip the mixture into the tin, spreading out evenly and pressing down firmly with your fingers. It may seem crumbly but don’t freak out. It will all stick together once it’s baked.
Bake for 20-25 minutes until the mixture is golden brown.
Whilst the slice is in the oven, put the butter and lime juice into a saucepan and stir over low heat. Once the mixture is melted, add the icing sugar and mix. It will be a runny consistency.
When the base is removed from the oven, pour the icing over and spread it out evenly. Let it sit for a few minutes.
Cut the mixture into squares and leave to cool. You can break it apart once it has cooled completely and store in an airtight container. Makes 12 largish square pieces.

A Cheergerm recipe


Gluten free rhubarb and berry bumble

Kid 1 is a crumble maniac, it all started at an early age. Back when he was a wee lad, he was unable to say ‘crumble’, instead it came out as ‘bumble’. His fave combo’s are rhubarb and apple or rhubarb and pear. However, he won’t say nay to the odd berry mix either. Usually I make two different crumble topping mixtures. One containing oats for Kid 1 and myself and a gluten free topping for the Yak.

Gluten free bumble toppings in the past have contained various combinations of buckwheat flour, brown rice flour, tapioca flour, almond meal, quinoa flour (gag) and teff flour (yum but hard to get.) It’s always a bit of ‘let’s see what happens this time’ scenario.

Anyhoo, today was a day of ‘I can’t be, ummmm…bothered with two different toppings’. So I went hardcore on just the one gluten free bumble. I was curious to see if Kid 1 missed the texture that the oats provide.

Turned out to be a happy experiment, yes indeedy. This tart rhubarb and raspberry bumble, combined with the earthy buckwheat and almond flours, the crunch of the nuts and the warmth of the spices is bloody delicious.

The only sound heard from Kid 1’s direction was that of a 9 year old boy eating with his mouth open. Chomp, chomp, gobble, swallow. ‘More please Mum?’. This mean old mumma said ‘No sorry, not tonight’. The kid replied with ‘Go on, its not gluten free, so only you and I can eat it anyway.’

Oh, you poor misinformed and cheated wee bairn. Mission accomplished, sorry kiddo but it is GF and the Yak will probably fight you to the death for the leftovers.

We take our bumble seriously in this household.

YOU NEED

1 bunch rhubarb, chopped into 2cm lengths
2 tbls coconut sugar
1/4 tsp vanilla bean paste
1 cup raspberries (frozen or fresh, blueberries are yummy too)
Crumble topping:
100g buckwheat flour
50g almond meal/flour
60g cold butter, chopped into small pieces
1/3 cup coconut sugar
1 tsp baking powder
1 tsp cinnamon
1/2 tsp ginger
1/2 tsp mixed spice
1/4 cup walnuts or pecans, finely chopped

METHOD
Preheat the oven to 180 C.
Place the rhubarb, coconut sugar and vanilla paste in a medium size saucepan, add a few splashes of water. Cook on low to medium heat for about 20 minutes, until the rhubarb starts to collapse. Stir regularly to avoid the rhubarb sticking. Add a bit more water if needed.
Once the rhubarb is cooked, stir in the raspberries and place into a buttered 1 litre ovenproof dish.
Mix the buckwheat flour and almond meal in a medium size bowl.
Rub the butter through the flour mixture with your fingertips until the mixture resembles pea sized chunks.
Mix the coconut sugar, baking powder, spices and walnuts in a small bowl.
Add the sugar mixture to the flour mixture, stir and sprinkle over the fruit.
Bake for 25-30 minutes until golden brown.
Serve with a big dollop of yoghurt, ice-cream or cream. This also makes a great breakfast dish served with yoghurt.

An original Cheergerm recipe


Nuts about coconut flour cupcakes

I’ve got a luvverly bunch of coconuts…..ahh, coconut flour. A great gluten free flour and a healthy alternative to wheat flour for those of you who aren’t in the GF Camp. (Not a camp many would visit willingly to begin with. But it’s better than the alternative.)

Coconut flour comes from the dried meat of coconuts, which is then ground into flour. Health benefits abound for this super little flour. To list a few:
Gluten free (thanks said the Yak).
High in fibre, gives you that full feeling for longer and aids digestion. Due to its fibrous nature, coconut flour does suck up a lot of liquid so it behaves quite differently to other flours you may have used.
High in protein. (Gotta love that).
High in manganese (is that a dog breed?) and lauric acid. Whoopee you cry! In cheergerm terms, these help to promote a healthy immune system and assist in thyroid function.

These little light and bouncy chocolate cupcakes are one of my regular ‘go to’ recipes. Snarfled from a fab blog called Elana’s Pantry, they are great for little and big kids lunchboxes and are also nut free. They are not overly sweet, yet Kid 1 and 2 still devour them like the bottomless pits they are.

Before you go to the recipe, here are a few cheergerm adjustments:
For this batch I used natural cocoa powder not cacao powder. (The difference between the two is too detailed to go into here.) A good quality Dutch cocoa will also be fine.
I used organic raw honey instead of agave in this batch, maple syrup works as well.
I always double this recipe to make 12 cupcakes.
Added 1/4 tsp vanilla bean paste.
I had no grapeseed oil so I substituted rice bran oil and have also used macadamia nut oil in the past. (I don’t use nut oil when sending them to school).
Sometimes, to add a bit of mummy kiddy excitement, I add a large handful of dark chocolate chips.
I have iced/frosted them for special occasions as well.

Go here for this neat wee recipe:

http://www.elanaspantry.com/chocolate-cupcakes/


Frozen cheesecake anyone?

Two weeks ago, whilst searching for a gluten free cheesecake recipe, I came across this little beauty on a great blog, The Gluten Free Scallywag. Now, being immensely fond of the word scallywag, it just had to be tried.

Too much citrus is never enough for this cheergerm, so I added a tad more lemon juice than the recipe said. As a result, when the springform pan was undone, it was a bit too melty to serve. To the freezer I cried! After an hour of nervous nail biting (or completely forgetting it was there due to the odd champers or two) we discovered, a frozen cheesecake! A delicious accident.

Kid 1 and The Yak loved it so much, I churned out another one for a Christmas get together the other night. Frozen cheesecake, that’s how we roll now baby. Before serving, I tumbled some blueberries atop in a very Nigella type manner.

My wee changes:
Grated the zest of one lemon and lime, halved it, added half to the base mixture and half to the cheese mixture.
Not having baked The Gluten Free Scallywags GF graham crackers, I used half GF arrowroot and half GF rice coconut biscuits.
I added 2 tablespoons of lime juice in the cheese mixture and sneaked in 1/4 teaspoon of vanilla paste as well.
Big cheesecake tip,always bring the cheese to room temperature before mixing.
I put the cheesecake in the fridge overnight then popped it in the freezer a few hours befor serving. Make sure you pull it out for about 15 minutes or so to ensure you can cut it.

Go here for the fantastic recipe!

http://www.glutenfreescallywag.com/2010/02/no-bake-cheesecake-gluten-free.html


Christmas Ginger Muffins

It’s 10.30 am and the temperature outside has already hit 32 degrees celsius. Perfect baking weather. The smell of ginger and spice wafts through the kitchen. Little boys wander in on a break from the continual games of Trouble, chess and various Trash Pack and Lego scenarios.

‘What’s for morning tea Mum?’ Yup, school holidays have begun. ‘Christmas muffins,’ is my inspired response. ‘Fantastic!’ they cry. Add the word ‘Christmas’ and anything sounds good. Christmas spinach and brussel sprout pie anyone?

I adpated these wee beauties from an old muffin recipe book, giving them a bit of a ‘health makeover’. They exude a warm ginger glow and are not overly sweet. It’s worth baking them just for the smell of the spices alone. (Although perhaps on a cooler day than this.) Today I used wholemeal flour, they are equally as good using 1 cup of wholemeal and 1 cup of wholemeal spelt flour.

Speaking of spices, my very favourite to use are Herbie’s. You do pay a little more but the quality is worth it. On saying that, this cheergerm is not a food elitist and will happily use the cheap and cheerful supermarket brand as well.

Get these down ya my lads, then bugger off! I mean, go and play dear sweet children of mine. It’s mumma muffin and coffee time.

YOU NEED
2 cups wholemeal plain flour
1 1/2 tsp baking soda
3/4 cup coconut sugar (or rapadura, or brown or caster)
2 tsp ground ginger
1 tsp mixed spice

2 tablespoons golden syrup
80ml rice bran oil (or grapeseed oil)
2 eggs
1 cup milk (I use low-fat milk)

METHOD
Preheat oven to 200C. Line a 12 hole muffin pan with paper cases.
Sift dry ingredients into a large bowl.
In a microwave dish or saucepan, gently warm the oil and golden syrup. Remove from heat and cool slightly.
Add eggs and milk to oil mixture and beat well.
Add the liquid to the dry ingredients and mix lightly.
Bake for about 15 minutes or until the centres spring back when pressed.

Adapted from Marvellous Muffins by Alison Holst

Some magnficient muffin tips: I always use paper cases because I am lazy and it lessens the washing up. Try to get your ingredients to room temperature before baking. Sieve your dry ingredients. Add all the liquid and extra ingredients at once. Fold the dry and wet ingredients together with as little mixing as possible.

IMG_5915


Shortbread for a hungry Silly Yak

IMG_5832

‘It’s not fair!’, cried The Yak, stamping his coeliac foot and crossing his coeliac arms. ‘Everybody except me gets to eat your shortbread at Christmas.’ Pouting doesn’t normally work in this household but I am nothing if not kind. Also, I had previously set myself a challenge and it was time to woman up.

Gluten free shortbread has arrived and the Yak is once again a happy man.

The experiment started with golden butter from New Zealand that glittered like Smaug’s treasure. Then basically, I just substituted the plain flour in my regular recipe with a quality brand of plain gluten free flour.

Methinks the key is to only knead the mixture for a minute or two, just enough to bring it together. It also requires a bit longer baking than my usual shortbread.

A batch was sent along to the Yak’s place of employment….although he is a begrudging sharer. The feedback was glowing. (At least that’s what The Yak told me.) They are delicate and moreish, and the Yak thinks every bit as delicious as the gluten laden version.

I concur Sir Yak, I concur.

The big test? Neither Kid 1 or Kid 2 clocked that they were GF…..a pretty good test in my books.

Sure, you can find store bought gluten free shortbread these days but I challenge you to accept the challenge that I challenged myself to. (You still there?). The enjoyment that this therapeutic bake provides, let alone the scrummy eating, far outweighs any convenience from buying it pre-made.

And as a very famous French woman was once reputed to have said ‘Let them eat shortbread’. (Well, she would have if she’d tasted this shortbread).

YOU NEED
250g butter, unsalted
1/2 cup caster sugar
2 3/4 cup gluten free plain flour
1/4 cup rice flour

METHOD
Preheat oven to 180C.
Line 2 baking trays with baking paper and sift the flours together into a bowl.
Cream the butter and add the sugar gradually, beating until the mixture is light and fluffy. (I use a mixer for this.)
Work in the flour gradually and with a very light hand, knead to form a dough. (I do this in the bowl.)
Divide the dough in half, roll each half out to a 3-4 cm log. Wrap in clingwrap and refrigerate for half an hour.
Slice the logs into 1-2 cm thickness, depending on your fancy, place 10mm apart on a baking tray and prick each piece all over with a fork.
Bake for 20-25 minutes until crisp and straw-coloured.
Cool down on wire racks.
Makes about 20-25 pieces.
adapted from The Margaret Fulton Cookbook

IMG_5806


Shortbread for Christmas

To me, Christmas is shortbread and shortbread is Christmas.

It’s the only time I make it. Batch after batch is baked, packed in various ways and given as a tasty holiday treat. This gives me the opportunity to delve into my collection of vintage kitchenware and present it on quaint china plates or quirky glass bowls. (A great way of justifying my hoarding tendencies).

I never try new recipes for my Christmas giveaway. After years of perfecting this recipe, I would hate to disappoint the yearly recipients. I assure you it’s not due to laziness. Or is it?

In my extended family, we could start Shortbread Wars (like Star Wars but more delicious.) Our family is full of shortbread bakers. Nana Dorothy used to bake shortbread, my mum bakes it, as do two of my sisters. (The baby of the family has gone renegade and has so far resisted this hereditary primal urge..I give her another year…).

This shortbread is short (like myself), light, with a hint of crispness and not overly sweet. I have used the iconic Margaret Fulton’s recipe for the past few years and find that adding the 1/4 cup of rice flour adds that textural bite and lightness that makes me want to sing.

A piece of this shortbread with a cup of tea is ambrosia.

The smell makes little lads salivate and hang round the oven door.

In our house, its mandatory for Santa to be left a piece with the obligatory glass of milk.

This recipe is not gluten free which makes The Yak very sad. My mission (if I so choose to accept it) for the next few days, is to perfect a gluten free version. Fingers crossed.

Shortbread hints and tips: Knead the dough with a lightness of hand for about 3-5 minutes until its smooth and buttery. Do not attempt this on a very hot day unless you have airconditioning or you will end up with buttery mush! I use my trusty KitchenAid mixmaster but I have also used a handbeater. Or use your a wooden spoon and arm power if you feel like a workout!

YOU NEED
250g butter, unsalted
1/2 cup caster sugar
2 3/4 cup plain flour
1/4 cup rice flour

METHOD
Preheat oven to 180C.
Line 2 baking trays with baking paper and sift the flours into a bowl.
Cream the butter and add the sugar gradually, beating until the mixture is light and fluffy. (I used a mixer for this.)
Work in the flour gradually and with a light hand, knead to form a dough. (I do this in the bowl.)
Divide the dough in half, roll each half out to a 3-4 cm log. Wrap in clingwrap and refrigerate for half an hour.
Slice the logs into 1-2 cm thickness, depending on your fancy, place 10mm apart on a baking tray and prick each piece all over with a fork.
Bake for 10-15 minutes until crisp and straw-coloured.
Makes about 20-25 pieces.
The Margaret Fulton Cookbook