Blackheath babes and Vesta

A certain girl, who shall go unnamed (let’s face it, everyone goes unnamed in this blog), recently celebrated a birthday of significance. Maybe this blog should be called The Birthday Blog?

The partying did not stop I tell you. Next on the birthday agenda (far more exciting than a political or meeting agenda) was a girly trip for six, away to the Blue Mountains, just west of Sydney. The funky wee village of Blackheath to be specific. This mountain town is one of my very favourite to visit. (Go on now, I love them all.)

The adorable Blackheath Getaway Cottage is a homey wooden cottage with quaint touches and a stone fireplace. This would have been my fourth stay here. (Shh, don’t tell anyone. I would hate it to become popular.) Cherry blossoms lined the streets and the well known rhodedendron gardens were coming into bloom. This weekend spoke of open fires, champagne and Cuban sandwiches. Fish river coffee and secondhand shops up the wazoo.

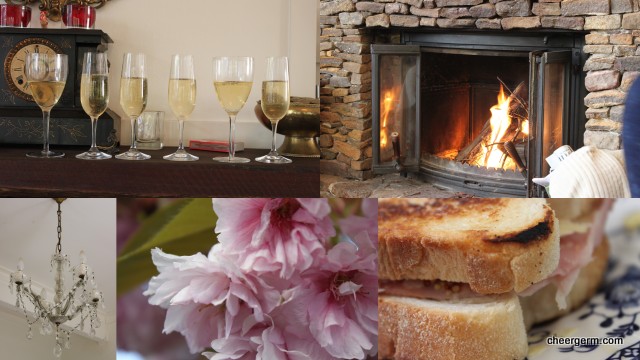
Wide greened streets and cookie cutter cottages that you want to shrink, pop in your pocket and take home. A dog show and waratah’s so red, lush and unreal, you think you could have fallen down a rabbit hole into a psychedelic wonderland.

Serious conversation, happy birthday toasts and the kind of ribbing that only a loved one can get away with.

Mountain appropriate glad rags were put on and we trailed out to a celebatory birthday dinner. Our destination was a restaurant that was once the iconic Vulcans and has now morphed into Vesta. Having never eaten at Vulcans, I had no preconceived notion of what this space should be or feel like. It was once the Blackheath Bakery, built in the nineteenth century and was made famous by Philip Searle and Barry Ross in the 1990’s who produced iconic food in the woodfired scotch oven.

Vesta is an intimate, rustic and charming space. The woodfired oven sits at the back of the open kitchen for all to see. This oven is a magical kingdom within itself; producing plates of seasonal, slow cooked food tinged with the smokiness that only real fire can produce.

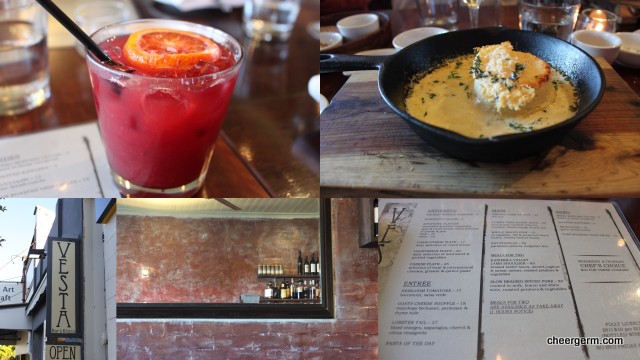
A ruby red blood orange and Campari cocktail was enjoyed by two of our number and a cracking bottle of Provenance Pinot Gris from Victoria was ordered and promptly consumed. Woodfired walnut bread was dipped in olive oil and dukkah and we nibbled on smoked paprika almonds and marinated olives.

My standout dish was a silky light and rich, twice cooked Manchego goats cheese soufflé. I would walk to the Blue Mountains on burning hot tar just to get this down my gob again. The experience of mopping up that cheese sauce with bread requires a sonnet to be written in its honour and bards to sing to its glory. I appreciated my next dish, lobster tail with a blood orange and chervil dressing with asparagus. It was light and spoke of spring, the perfect dish after the rich soufflé.

I managed to grab a mouthful of the delicately smoky and unctuous Persian lamb ragout with dill rice and the very good ratatouille with polenta and Bulgarian feta. These dishes were also served in the black cast iron pans they were cooked in. What’s not to love about food served right from the belly of the oven? Even the sides were grand. Broccolini with garlic breadcrumbs and crispy oven roasted kipfler potatoes.

Because this was a birthday celebration, one candle holding, embarrassment causing ice-cream bombe comprising of a strawberry sorbet and honeycomb ice cream was ordered. We stuffed a gorgeous tasting spoonful into our straining stomachs. Just another wafer thin slice? I think not. Thank goodness we had the walk back to the cottage.

As we left, Vesta was heaving with a mixed crowd of the older well heeled set and uber-cool young, bearded hipsters. (Well, the blokes were bearded, I didn’t notice any moustachioed chicks.) The only question left to ask is, whose birthday is it next?

http://www.blackheathgetaway.com.au/default.asp

http://www.vestablackheath.com.au

http://www.provenancewine.com.au/get-wines-direct-buy-online/


Pavlova zen and my hive

With a trio of family birthdays to celebrate, the house was packed to the rafters. Fizzy wine bottles were popping and we all talked over each other (nothing new there). We began the evening by chowing down on a selection of Bruny Island Cheese Co cheeses and some fat, salty olives.

At one point I was in another room in the house, collecting something or other.
I managed to stop and still myself (not an easy task) and listen to the hubbub. It was a loud and happy buzz, which made me think. This is my hive, my source of happiness. It’s not always harmonious (we ain’t a cult for goodness sakes) but even when our voices are raised in gleeful disagreement, there is no better sound.

To help celebrate three birthdays there were fittingly, three desserts. The pavlova, Sister 2’s amazeballs baked cheesecake and some decadently iced chocolate cupcakes.

The Yak adores pavlova and it is a super gluten free dessert. This rather large version is as light as a unicorns tinkle and as fluffy as a fairy tutu. It has a crisp outer shell and a marshmallow interior that is synonymous with a good pavlova. (Well, that’s how we like them here, feel free to disagree.) My very favourite fruit to accompany this dessert is that somewhat saucy, acidic passionfruit. This crazy fruit brings a wonderful acidic zing that perfectly counterbalances the sugary hit of the pav.

I pride myself on my meringue skill. (This is up there with my other useful talent of attracting the attention of random crazy strangers in the street.) You may have heard this all before but for what it’s worth, here are my top meringue tips.

1. Don’t use new eggs, older egg white works better.
2. Bring the eggs to room temperature.
3. Make sure your bowl (stainless steel or glass) is very clean and totally dry. Water is your enemy at this point.
4. No egg yolk in your whites.
5. Beat your eggs to a stiff peak before adding the sugar, always add that pinch of salt first.
6. Add your sugar slowly, then beat until the sugar is dissolved and no longer gritty. Do not rush this process. You will not regret this, this is the Zen of Pavlova. Patience is a virtue when it comes to meringue. This is not a job you can rush if you want to achieve that stiff, white glossy goop that is synonymous with this much beloved dessert.

PAVLOVA

WHAT YOU NEED
6 egg whites, room temperature
Pinch of salt
2 cups caster sugar, sifted
1/4 tsp vanilla bean powder or 1/2 tsp vanilla paste or essence
1 tbl cornflour
2 tsp vinegar

HOW YOU DO IT
Heat the oven to 180C.
Place baking paper on a large tray and draw a 22 cm circle for a flatter pavlova or a 20cm circle for a taller version. (It will spread a little.) Turn the paper pencil side down on the baking tray.
Beat the egg whites and pinch of salt with an electric beater on low until they stand in firm peaks.
Keep beating the egg white on low adding the sugar a tablespoon at a time.
Once all of the sugar is added, continue beating on a medium speed until the meringue is no longer gritty to the touch. This takes about 5 minutes or so.
Fold through the vanilla, cornflour and vinegar.
Spread the mixture with a large spoon onto the prepared tray and place in the oven. Drop temperature down to 130 (120 fan forced) and bake for one hour. Rotate every 20 minutes to ensure even baking and colouring.
Turn off the oven, leave the door ajar and let the pavlova cool down in the oven.
Expect cracks on the surface and the pavlova may collapse a little as it cools, don’t panic, this is all ok.
Topped with whipped cream and your favourite fruit. Think passionfruit, strawberries, mangoes, nectarines, peaches and kiwi fruit. Use one fruit or make it a fruity salad.

A Cheergerm adaptation based on a crazy New Zealand teatowel recipe, a Margaret Fulton recipe and an online Annabel Langbein recipe

IMG_4816


http://www.annabel-langbein.com/recipes/fantasy-pavlova/62/

http://www.brunyislandcheese.com.au/


A side of herb polenta bake and an aside

Yak: You are a good lad, will you look after me when I am old?
Kid 2: Probably, but I might be somewhere else.
Me: Kid 2, if I were you, I would start running now. Unfortunately, I have nowhere left to run.

This hearty side of polenta is magnificent Yak food. It helps trick convince The Yak into feeling like he is not ‘missing out’. There is very little that this side dish doesn’t go with. We have scoffed it down with a ratatouille like vegetarian sauce as well as a creamy braised mushroom dish. It goes beautifully with a myriad of casseroles or good piece of meat or fish. Breakfast for dinner? Try it with a fried or poached egg and some steamed asparagus.

Chuck in whatever herb combination tickles your fancy. No fresh herbs? Then throw in a teaspoon of dried Italian herbs and let them steep in the stock whilst it comes to the boil. This version has parsley, thyme and a smidgen of sage. In the time it took me to prepare the thyme (boom tish) for this dish, my lads had gone to high school, got degrees, travelled the world and started families. Picking the leaves off thyme is one of the worst kitchen jobs. I would love to say I find it meditative but I don’t.

Take note if you will, of the beautiful wooden board that this polenta sits upon. Uncle R, a veritable goldmine of funny and punny one liners and the master of the ‘aside’ made this for me back in 1993. Whilst staying in Christchurch, NZ, with the always hospitable Uncle R and Aunty L, we took a day trip to Akaroa and stopped in at French Farm winery for a snack with flavour. Some of the food was served upon divine wooden boards that were labelled ‘French Farm Vineyards’. I admired them greatly and Uncle R, a collector of bits of wood (as well as of puns) said ‘Don’t worry niece, I shall make you a board just as nice as this one.’ (He would have said this in a silly voice, cause that’s how he rolls.)

Back at their house, he whipped up a piece of kauri (wood) into this gorgeous wee board, copying the details from the one back at the vineyard. It is exactly the same as the original version I had coveted. Bar one thing. It’s made with the love, care and thoughtful detail of my uncle, and it is far better than anything I could have ever purchased for myself. And that my friends, is something that you just don’t get bored of.

GARLIC AND HERB POLENTA BAKE

WHAT YOU NEED
1 cup gluten free veggie stock and 2 cups water (the original recipe calls for 3 cups of stock but I find it too salty for my taste.)
1 cup instant polenta
2 cloves garlic, crushed
1 cup chopped fresh herbs (such as parsley, sage, thyme, oregano) this is a bit flexible I have also used 1-2 to 1 cup with great results.
3 tbl grated Parmesan
30g butter
Salt to taste
3 tbl grated Parmesan extra for topping

HOW YOU DO IT
Preheat the oven to 180C and line a 15cm x 15cm baking dish with baking paper. I use a larger one and it makes a wedge of polenta that is about 22cm x 18cm and 3cm high.)
Bring the stock and water to the boil in a medium saucepan.
Pour in the polenta and cook over a medium heat for 3-5 minutes, stirring constantly, the mixture should be very thick.
Stir in the garlic, chopped herbs, parmesan and butter and taste for seasoning.
Pour/spread the mixture into the baking dish. Smooth the surface and sprinkle with the extra Parmesan.
Bake for 20-30 minutes until the cheese is melted and golden brown.
Cut into triangles, squares or into whatever damn crazy shape you wish.
Serves 8 with one piece each.

Recipe from The Gluten-free Kitchen by Sue Shepherd

http://frenchfarm.co.nz/wordpress/


Hungry Games and Scott’s Farewell Square

As of late, I have been immersed in what is known as YA (Young Adult) fiction. It happens to involve a lot of ‘end of the world’ type scenarios. It is here we usually read of a hapless teenager who has found him or herself in a dystopian society where survival of the fittest is the order of the day. They fall chastely in love with another luckless adolescent or mayhaps a vampire, all whilst changing the course of history.

I have come to the conclusion that if I were to be suddenly transported into such a scenario, I would not last long. I would simply poop my pants and suffer a major heart attack whilst being shot at/hunted by mutated animals/jumping from train to train/taking part in a battle to the death or wearing a shimmering on fire mockingjay type outfit. I would be the sad loser who lay down and just died of fright.

With that, I give you this old school Weet-Bix slice. In my own adolescence there was often a version of this wheaty bake waiting at home. Made by mum in an attempt to ward off any ‘Hunger Games’ type scenarios that may have occurred between myself and my three sisters. In turn, it is now one of my lads fave morning or afternoon tea delights.

My mum usually baked a melt and mix version but I have provided here a creamed butter and sugar version from my fave NZ baking cookbook, ‘Ladies: A Plate’. This slice is named Scott’s Farewell Square due to the fact that the famous explorer Captain Scott’s last expedition, sailed from Port Chalmers New Zealand, in November 1910. Alexa Johnston, the author of this cookbook, tells us that the recipe appears in a 1960’s Dunedin church recipe book. She imagines that a plate of this moreish slice may have been given to the ill fated Scott and his team before they sailed away to the South Pole.

This is the kind of hearty baking that will sustain hungry adventurers of all ages. (I have decided to enrol my lads in a survivalist course, just to maximise their chance of staying alive if things go bottoms up in the future. At the very least, they need to know how to shoot a bow and arrow or stake an evil vampire if needs be.)

SCOTT’S FAREWELL SQUARE

WHAT YOU NEED
115g butter
1 cup/140g brown sugar, coconut or rapadura sugar
1 egg
2 tsps golden syrup
1 1/3 cups/170g wholemeal flour
1 pinch salt
1 tsp baking powder
1 tbl Cocoa powder
4 Weet-Bix finely crumbled
1 cup/85g desiccated coconut
3/4 cup/100g chopped dates

Icing
3/4 cup icing sugar
2 tbl Cocoa powder
1 tsp butter, melted
Extra coconut for sprinkling

WHAT YOU DO
Preheat oven to 180C and line a shallow tin with baking paper. (The slice is roughly 22 x 22cm so I used a bigger tray but not all of it.)
Cream butter and sugar together in a mixing bowl (I used a mixer) until light and fluffy.
Add the egg and golden syrup and mix until it comes together.
Sit in the flour, salt, baking powder and cocoa powder.
Mix in the Weet-Bix, coconut and dates and stir thoroughly to combine.
Spread evenly (about 1.5cm – 2cm thick) into a baking tin and bake for 15-20 minutes.
Remove from the oven, let cool in the tin for about 15 minutes then put on a wire rack to cool.

Icing
Sift the icing sugar and cocoa together into a bowl.
Make a thin chocolate icing by adding the melted butter and a little hot water to mix to a spreading consistency.
Spread over the cooled slice, sprinkle with the extra coconut and cut into squares when the icing has set.
Makes 16 squares.

Cooking Notes: the original recipe also calls for 55g each of raisins and chopped walnuts. I leave them out due to sproglets preferences but feel free to chuck them in. I have knocked back the amount of sugar and icing sugar from the original recipe and used wholemeal flour.

A Slightly Cheergerm adaptation from ‘Ladies A Plate’ by Alexa Johnston.

A gluten free Weetbix made from sorghum was recently released in Australia so a GF version slice will be posted in the near future, as well as a melt and mix chocolate Weetbix slice recipe.


Teeny weeny gluten free blinis and a fancypants morning tea

Sometimes when there is a significant birthday, (you know, we all just turned 21 recently), our mothers group have been known to celebrate by putting on a fancypants morning tea.

We figure we can do a bloody nice job without forking out the big bucks elsewhere. It’s also a great excuse to use some of the lubbly jubbly old plateware that this Cheergerm voraciously crazily sensibly collects.

My food contribution to this delectable spread was a gaggle of gluten free blinis topped with silky smoked salmon, a burble of sour cream and and a dash of dill.

Other goodies included squares of a moreish gluten free chocolate cake, a beautiful Tasmanian squodge of Brie and chockie dipped strawberries. One of our number has discovered a gluten intolerance, hence we rolled ‘mostly GF’ so she could enjoy this slap-up feast.

A traditional Russian blini is a yeast raised buckwheat pancake that symbolised the sun. They had pride of place in a festival called ‘maslenitsa’ that marked the end of winter and the start of spring. How totally appropriate I thought (in complete research hindsight).

These nutty tasting, light gluten free beauties do not contain yeast, instead, I separated the egg whites and beat them into peaks before folding through the batter. They are best eaten on the day you make them. If that isn’t possible, I suggest warming them slightly before devouring them with whatever topping you so desire. On saying that, I have had them without being heated the next day and they were still delicious.

GLUTEN FREE BLINIS

WHAT YOU NEED
1 cup plain gf flour
1 cup buckwheat flour
1 tsp baking powder
1/2 tsp baking soda
1/4 tsp salt
1 tsp sugar
2 eggs, separated
1 cup of milk
1/2 tsp white vinegar
1 tbl neutral oil
Extra pinch of salt
Little bit of butter or oil for the non-stick pan frying pan.

HOW YOU DO IT
Sift flours, baking powder, baking soda, salt and sugar into a large bowl.
In a jug or small bowl, beat the milk, egg yolks, vinegar and oil together.
Pour the milk mixture into the flour mixture and stir to combine.
In a separate clean bowl, whisk the egg whites with the extra pinch of salt iuntil stiff peaks are formed.
Fold the egg white mixture into the combined flour and milk mixture.
Let the batter rest for about 30 minutes.
Heat the non stick pan to a medium heat, brush with a little butter or oil. Place teaspoons sizes if you want really weeny blinis or a dessertpoon full for a small blini, into the pan. Cook for around 2 minutes until bubbles start to form on the surface of the blini. Flip and cook for another 45 seconds or so on the second size. (My first batch is never the best, as the pan heats up the blinis tend to cook faster. )
Remove to a teatowel and cover. This keeps the blinis soft and nice like a snuggly blanket.
Keep cooking until all the batter is used up.
Makes about 30 small blinis. In this case I topped them with finely diced smoked salmon tossed in a big squeeze of lemon juice, a wee blob of sour cream and a sprig of dill. They are lovely with jam and cream as well.

Cooking note: variations in this batter may occur due to the size of the eggs used and the type of GF flour blend. Add a bit of extra buckwheat flour if the mixture isn’t as thick as a pikelet batter should be or a dash of milk if it’s too thick. The batter should be almost spongy, the photo below may give you an indication of the required texture.

A Cheergerm adaptation of a recipe from The Weiser Kitchen website. Link follows after photos.

http://theweiserkitchen.com/recipe/gluten-free-buckwheat-blini/


Titanic and a gluten free date slice

I swore I would never watch the movie, Titanic.

Managed to avoid it for years. Then, one stormy night, it came upon the TV and I did.

Lord, I loved it. Lord, I was surprised.

Leonardo Di Caprio, what a wee spunk. And the luminous Kate WInslet.

That kiss at the stern bow (I ain’t no freakin sailor) of the boat is the stuff that Mills and Boon is made of, on steroids. A sweaty palm on a fogged up window, the boat was heating up on the inside whilst the outside temperature dropped ominously.

All along, you know what is going to happen. Making this love story seem more heightened and intense.

Yeah, the ending sucked. Like really sucked. And mayhaps, you think the movie really sucks.

But this slice doesn’t.

If Kate and Leonardo had made it to a desert island (geographically unlikely I know) they could have made this slice with its tropical coconut and dates. Bummer.

The zippy lemon icing is the perfect foil (such a strange saying) to the sweetness of the dates and rich coconut. It’s like a bunch of hula dancing Hawaiian hotties jumped into your mouth and had a party.

DATE, COCONUT AND LEMON SLICE, GLUTEN FREE

WHAT YOU NEED
1/2 cup sorghum flour (60g)
1/4 cup brown rice flour (40g)
1/4 cup tapioca flour (40g)
1 1/2 tsp baking powder
1/4 tsp Xanthum gum
1 big pinch salt
1 cup desiccated or shredded coconut
1 cup dates, chopped
1/2 cup rapadura, coconut or brown sugar
Zest of a small lemon
125g butter
1 egg, lightly beaten

Lemon Icing
1/2 cup icing sugar
1 tbl lemon juice
15g butter, melted
1/4 cup extra coconut for sprinkling on top of slice

HOW YOU DO IT
Preheat oven to 180C.
Line an 18cm x 28cm slice tin with baking paper.
Sift the flours, baking powder, xanthum gum and salt into a large bowl.
Stir in the coconut, dates, sugar and lemon zest.
Add the melted butter and beaten egg and mix well.
Spread into the baking tray and bake for 30-35 minutes until golden brown and firm. Cool in the tray.
Lemon Icing. Whilst the slice is cooling, add all the ingredients in a bowl and combine until smooth. Spread over the slice and sprinkle with the coconut. Cut into 12 squares and serve in an airtight container. This slice is a bit crumbly when you cut it but the rest of the slice holds together well.

Cooking Notes:
If you don’t have all of these flours you can use 140g of your preferred self raising gf flour blend.
This icing is thin but I knocked back the amount of icing sugar to try and minimise the sugar content a tad.

A Cheergerm adaptation from a recipe from the Womans Day website. See below for the link to the original recipe.

http://www.womansday.com.au/food/recipes/readers-recipes/2008/7/date-and-lemon-slice/


Gluten free zucchini fritters and a hankering

Kid 2: ‘I am a tiny bit weakened by winter and I think I am allergic to it, kind of like Kid 1 is allergic to spring.’

Kid, I hear you. Winter has weakened me, I hanker for stone fruit, light salad greens, vibrant vegetables, pretty frocks and fizzy wine. I long for sunshine on my pillow and swims in the pool on long, endless summer days.

My Cheergerm soul pines for the high pitched deafening buzz of cicadas and I yearn to be strong armed by sproglets into buying ice-cream at inappropriate times of the day.

Summer is now in sight and this is the kind of food that we will be eating.

Soft goats cheese marinated in olive oil and herbs makes another stunning appearance in these little beauties. The cheese provides the salty tang and works a treat with the pop of peas, zing of lemon, aromatic mint and springy zucchini. These fritters were light, like a summer sky. Don’t be a hater, just get it down you alligator.

GLUTEN FREE ZUCCHINI AND GOATS CHEESE FRITTERS

WHAT YOU NEED
3 eggs, beaten
1/2 red onion, finely chopped
120g besan flour (chickpea flour)
2 large or 3 small zucchinis grated and squeezed well to get rid of excess liquid
1 cup frozen peas
Zest of one lemon
1 large handful of mint, roughly chopped
1 tsp salt
Black pepper, a few generous grinds
100g marinated goats cheese
3 tbl olive oil

HOW YOU DO IT
Preheat oven to 180C.
Beat the eggs in a large bowl. Add all the ingredients except the goats cheese and mix well.
Crumble the goats cheese into the batter and stir to combine.
Heat the oil in a medium to large saucepan over medium heat.
Add two large tablespoons of batter per fritter to the pan.
Cook for 3-4 minutes until a light golden brown then turn over and cook for 2-3 minutes on the other side. Remove to an oven tray lined with baking paper.
Repeat this process until all the fritters are cooked.
Place tray of fritters in the oven for 10-15 minutes to cook through, this also turns them a tad more golden and crunchy.
Serve with a dipping sauce of either sour cream and sweet chilli, plain yoghurt and sweet chilli, salsa, or a tomato chutney. Great with a green salad, coleslaw, steamed beans or broccoli.
Makes around 10- 12 fritters, depending on how big you make them.

Cooking note: sometimes chickpea flour gets watery in a batter, if this happens, add an extra spoonful or two into the batter halfway through cooking.

A cheergerm adaptation of a recipe from the Taste website, link follows the recipe.

http://www.taste.com.au/recipes/31267/zucchini+pea+and+mint+fritters


Gluten free raspberry blondies; call me

Call me, (call me) on the line, call me, call me, any anytime. Ah, Debbie Harry, singer of that iconic seventies new wave punk band, Blondie. You were the epitome of cool with your husky tones and mad two toned hair.

This is not that kind of Blondie. The other day, Kid 1 said to Kid 2 in a disappointed parent tone of voice ‘You are such an excluder’.

Dark chocolate is my bestie, milk chocolate is a good friend but thus far, white chocolate has always been excluded from the party.

White Chocolate: Go on…be my friend, go on, like me.
Cheergerm: White Chocolate, you are just too needy for me and well, I don’t want to hurt your feelings but you are too damn sweet.

Not wanting to be accused of being ‘An Excluder’, I got me a block of fancy pants white chocolate. In high hopes that the greater cocoa mass (30% as opposed to well, nothing in some other brands) might make it less tooth achingly sweet. Having always adored a brownie, it seemed only fair to try baking a gluten free blondie.

This recipe took two attempts, and was more successful the second time around. A flour change (like an underwear change) made a textural difference and I adjusted the baking time. There is no denying that this is a sweet baked goodie but it had that smooth, good chocolate mouth feel. The tangy raspberries cut the white chocolate richness perfectly and the crackle ackle meringue like exterior contrasted with a beautifully moist centre. It was taken to a family shindig and was gobbled up quickly. My hesistancy was assuaged by the rave reviews. This blondie goes really well with a good cup of coffee.

Will white chocolate be invited to the party more often? Yes, but only every now and then. (I would so invite Debbie Harry to the party if I thought she would rock up.)

GLUTEN FREE RASPBERRY BLONDIES

WHAT YOU NEED
125g unsalted butter, chopped
220g Callebaut white chocolate, chopped (or any good quality white chocolate)
1/2 tsp vanilla bean paste
2/3 cup caster sugar
2 eggs, whisked
130g gluten free flour. I used 100g (3/4 cup) GF plain flour and 35g (1/4 cup) almond meal, sifted together.
2/3 cup frozen raspberries

HOW YOU DO IT
Preheat oven to 160C (150 fan forced). Line a 20cm square cake tin with baking paper on bottom and sides.
Melt the chocolate and butter in a small saucepan over low heat, stirring continuously until the mixture is melted and smooth. Remove saucepan from heat.
Stir vanilla and sugar into the chocolate mixture and set aside to cool for 5 minutes. (The mixture will look a little odd but don’t worry, it all comes together in the end.)
Add eggs and mix until combined.
Fold in flour and stir until combined.
Add raspberries and fold gently through the mixture until combined.
Pour into the tin and bake for 50-55 minutes until set. Rotate pan in oven halfway through cooking.
Allow to cool completely in the tin.
Cut into 20-25 small squares (it is rich).

This has a longer slower cooking time to keep it as ‘blonde’ as possible. If you find it is too soft in the middle for your personal preference once you cut it, you can pop it back in the oven on 150C for about 15 minutes just to make it a little less squidgy. I know that brownies are meant to be super squidgy but I think this white chocolate version is better if cooked a little more. Again, maybe that’s just my weirdness about white chocolate coming through…


A Cheergerm adaptation of a Woolworths online recipe. See below photos for link to original recipe.

http://www2.woolworthsonline.com.au/Shop/Recipe/1169?name=raspberry-blondies


Spring has sprung and a gluten free asparagus and goats cheese tart

Spring has sprung, the grass has ris
I wonder where the boidies is?
They say the boidies are on the wing
That’s funny, I thought the wing was on the boidies.

Yes, spring has arrived in this Southern Hemisphere, slipping in and out admidst torrential rain and coolish days. Teasing us, then leaving us. With the tantalising promise that summer, in all it’s glory will soon be here.

Nothing says spring like an asparagus spear or two. Back in the good old gluten laden days, the Yak and I devoured many an asparagus tart made with puff pastry. Now the GF dust has settled, I am once again venturing into the whimsical world of pastry. GF styling it baby.

Thanks to the lovely ‘gf and me’ blog for their sour cream pastry recipe. I have provided a link to their original recipe below. This is purely a replica of theirs but I needed to add a dash of iced water, probably due to the difference in gluten free flour blends used. The sour cream in this pastry is banging. Having used it in my non GF pastry blends, it’s great to see it working here.

The pastry was light and crispy and The Yak has given this tart the big coeliac thumbs up. He is annoyingly endearingly asking me to make it again soon. Of course, you can use this filling in any regular gluten laden crust you desire.

This Meredith goats cheese was on special the other day and a free cheese cookbook was thrown in. Bonus! I have been loving on this cheese for quite a few years now. (It’s not illegal to love on a cheese, surely?) The experience of tasting this wee beauty at a farmers market years ago was surprising. It wasn’t all My Highland Goaty Oaty Oaty in your face but sweet, mellow and delicious.

This cheese is awash in golden fruity extra virgin olive oil with the herbaceous notes of thyme and garlic. Great in tarts, frittatas, fabulous tossed into a salad, thrown into a fritter batter or shmeared on a cracker or slice of fresh bread.

ASPARAGUS AND GOATS CHEESE TART

PASTRY
1 cup plain gluten free flour
1 tsp xanthum gum
1/2 tsp salt
113g (1/2 cup) unsalted butter, chilled and cut into small pieces
1/4 cup sour cream
1 tbl chilled water

HOW YOU DO IT
Put flour, xanthum gum and salt into a food processor and pulse to combine.
Add the butter and pulse until the mixture comes together and forms pea sized balls.
Add the sour cream and pulse until the dough starts to hold together. You may or may not need to add the chilled water. I did.
Roll into a ball, cover with plastic and let rest in the refrigerator for at least 4 hours.
Preheat oven to 200C. Remove dough from fridge, let it sit for 10 minutes then place between two floured pieces of baking paper and roll out to the correct size to fit your tin. I used a 24cm loose bottom fluted tart tin. A rectangular one would be great. (I have misplaced mine.) Gluten free pastry can be very soft, don’t be surprised if you need to patch a few places.
Blind bake for 15 minutes. (This means lining the pastry with baking paper and placing beans or weights on it.)
Remove tart shell from oven, take out the baking beans then put back in the oven for another ten minutes.
The tart shell is then ready to fill.

FILLING
2 tbl olive oil
1 onion, sliced
2 garlic cloves, crushed
2 eggs
100ml cream
2 bunches asparagus, washed and trimmed
6 cherry tomatoes, sliced
100g marinated goats cheese
Pepper and salt for seasoning

HOW YOU DO IT
Sauté onions until soft for about ten minutes.
Add garlic and cook for 1 minute.
Let cool.
Beat eggs and cream, season with pepper and a wee bit of salt.
Place onions on bottom of blind baked tart and pour the egg and cream mixture over the onions gently.
Place the asparagus and tomatoes in an artistic (not so in my case) fashion. I did find it hard to squeeze the tomatoes in.
Break up the goats cheese and place on top. I dribbled a wee bit of the olive oil from the goats cheese jar over the asparagus. Season with black pepper and salt. (Remember the goats cheese is salty.)
Bake 20-30 minutes at 190C until egg is set and puffy and golden.
Serve with a salad, steamed green beans or whatever you fancy.

Pastry by gf and me, filling by Cheergerm

Mary’s Pie Crust: no one will know it’s gluten free

http://www.meredithdairy.com/allproducts.html

Just to note, there is no affiliation with Meredith Dairy, I just love their cheese.


Mad men and gluten free gingernuts

A lot of expensive property has been sold, mortgaged and bartered for in our household as of late.

The words ‘jammy little fella’ has been uttered out of the Yaks mouth more than once.

Other phrases also often heard are:

‘I’m buying it.’
‘You cheated.’
‘I can’t believe you landed on my property.’

Along with a few sentences I hope to never hear out of the mouths of my angelic babes when they are all growed up.

‘I am in jail.’
‘I can’t get out of jail.’
‘I owe you $500,000.’
‘Hey! We’re in jail together!’

Yes, I am living in a household of Mad Monopoly Men. It’s not a game this Cheergerm adores (however, offer me a game of charades or Cluedo and I will trounce you sir, wipe the floor with you, annihalate…..well, you get my drift) but it’s a game I love to hear my mad monopoly men play. The shouts of joy, groans of disappointment and the clickety clack of the dice rolling on our kitchen table.

Kid 2 has landed on Mayfair ten times in a row. Someone should conduct a study on chance, based on this child’s uncanny ability. Kid 1 has stated that next time he shouldn’t be allowed to buy it, as all that power is going to his head.

This treat is for all you mad monopoly lovers.

My kids didn’t have a hope in hell of not loving ginger baked goodies. This New Zealand born, Aussie raised Cheergerm suckled on ginger kisses (a biscuit) and gingernuts as a babe. No such thing as breast milk in those days. Here you go little six month old baby, suck on this gingernut and while you are at it, we will put you in the back of a dodgy European car in an untethered woven bassinet covered by a piece of flimsy netting. In case of an accident, the netting was really going to save me. Thank-you zealous safety people of the world who realised that netting was not a deterrent from being thrown through the front window of a questionable European car.

These biscuits were pretty moreish, ginger zingy and bicarby zangy. Hard on the outside, slightly softer in the middle. Not quite the same as it’s gluten laden kissing cousin but pretty bloody decent. Next time I will double the recipe as it makes 16 smallish bikkies. Barely touched the sides.

GLUTEN FREE GINGERNUTS

WHAT YOU NEED
110g gluten free self raising flour
1 slightly rounded teaspoon ground ginger
1 level tsp bicarbonate of soda
40 g raw caster sugar
50g unsalted butter room temperature
50g (or 2 tbl golden syrup)

HOW YOU DO IT
Line a baking tray with non-stick paper and preheat the oven to 180C.
Sift the flour, ground ginger and bicarbonate of soda together into a mixing bowl.
Add the sugar and lightly rub in the butter till crumbly.
Add the golden syrup and mix everything into a stiff paste. No liquid is needed as the syrup is enough to get the mixture to the right consistency.
Divide the mixture into quarters, as evenly as possible, then each quarter into four and roll these pieces into little balls. (They are quite little.)
Place on baking sheet, leaving room between them as they spread out a bit.
Flatten slightly (to 1.5cm) and bake in centre of oven for 10-12 minutes.
They will spread out and gain a lovely cracked appearance.
Cool on baking tray for 10 minutes then transfer to a wire rack to finish cooling and store in an airtight container.
Makes 16 bikkies.

Thanks Delia Smith for the original recipe, from Delia’s Cakes revised edition 2013, Hodder and Stoughton. I just changed the flour to a gluten free blend. You are a goddess of baking and good sense.

http://www.deliaonline.com

http://www.griffins.co.nz/by-name/gingernuts