Gluten free rhubarb and berry bumble

Kid 1 is a crumble maniac, it all started at an early age. Back when he was a wee lad, he was unable to say ‘crumble’, instead it came out as ‘bumble’. His fave combo’s are rhubarb and apple or rhubarb and pear. However, he won’t say nay to the odd berry mix either. Usually I make two different crumble topping mixtures. One containing oats for Kid 1 and myself and a gluten free topping for the Yak.

Gluten free bumble toppings in the past have contained various combinations of buckwheat flour, brown rice flour, tapioca flour, almond meal, quinoa flour (gag) and teff flour (yum but hard to get.) It’s always a bit of ‘let’s see what happens this time’ scenario.

Anyhoo, today was a day of ‘I can’t be, ummmm…bothered with two different toppings’. So I went hardcore on just the one gluten free bumble. I was curious to see if Kid 1 missed the texture that the oats provide.

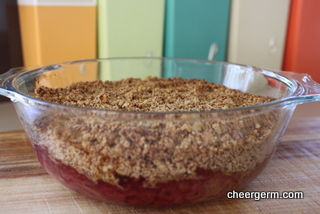
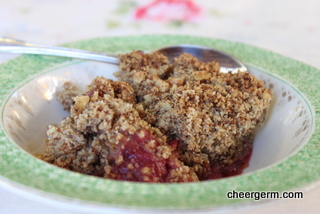
Turned out to be a happy experiment, yes indeedy. This tart rhubarb and raspberry bumble, combined with the earthy buckwheat and almond flours, the crunch of the nuts and the warmth of the spices is bloody delicious.

The only sound heard from Kid 1’s direction was that of a 9 year old boy eating with his mouth open. Chomp, chomp, gobble, swallow. ‘More please Mum?’. This mean old mumma said ‘No sorry, not tonight’. The kid replied with ‘Go on, its not gluten free, so only you and I can eat it anyway.’

Oh, you poor misinformed and cheated wee bairn. Mission accomplished, sorry kiddo but it is GF and the Yak will probably fight you to the death for the leftovers.

We take our bumble seriously in this household.

YOU NEED

1 bunch rhubarb, chopped into 2cm lengths
2 tbls coconut sugar
1/4 tsp vanilla bean paste
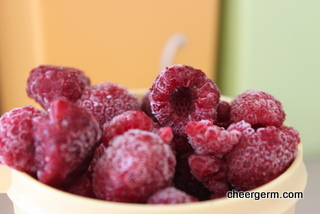
1 cup raspberries (frozen or fresh, blueberries are yummy too)
Crumble topping:
100g buckwheat flour
50g almond meal/flour
60g cold butter, chopped into small pieces
1/3 cup coconut sugar
1 tsp baking powder
1 tsp cinnamon
1/2 tsp ginger
1/2 tsp mixed spice
1/4 cup walnuts or pecans, finely chopped

METHOD
Preheat the oven to 180 C.
Place the rhubarb, coconut sugar and vanilla paste in a medium size saucepan, add a few splashes of water. Cook on low to medium heat for about 20 minutes, until the rhubarb starts to collapse. Stir regularly to avoid the rhubarb sticking. Add a bit more water if needed.
Once the rhubarb is cooked, stir in the raspberries and place into a buttered 1 litre ovenproof dish.
Mix the buckwheat flour and almond meal in a medium size bowl.
Rub the butter through the flour mixture with your fingertips until the mixture resembles pea sized chunks.
Mix the coconut sugar, baking powder, spices and walnuts in a small bowl.
Add the sugar mixture to the flour mixture, stir and sprinkle over the fruit.
Bake for 25-30 minutes until golden brown.
Serve with a big dollop of yoghurt, ice-cream or cream. This also makes a great breakfast dish served with yoghurt.

An original Cheergerm recipe


Nuts about coconut flour cupcakes

I’ve got a luvverly bunch of coconuts…..ahh, coconut flour. A great gluten free flour and a healthy alternative to wheat flour for those of you who aren’t in the GF Camp. (Not a camp many would visit willingly to begin with. But it’s better than the alternative.)

Coconut flour comes from the dried meat of coconuts, which is then ground into flour. Health benefits abound for this super little flour. To list a few:
Gluten free (thanks said the Yak).
High in fibre, gives you that full feeling for longer and aids digestion. Due to its fibrous nature, coconut flour does suck up a lot of liquid so it behaves quite differently to other flours you may have used.
High in protein. (Gotta love that).
High in manganese (is that a dog breed?) and lauric acid. Whoopee you cry! In cheergerm terms, these help to promote a healthy immune system and assist in thyroid function.

These little light and bouncy chocolate cupcakes are one of my regular ‘go to’ recipes. Snarfled from a fab blog called Elana’s Pantry, they are great for little and big kids lunchboxes and are also nut free. They are not overly sweet, yet Kid 1 and 2 still devour them like the bottomless pits they are.

Before you go to the recipe, here are a few cheergerm adjustments:
For this batch I used natural cocoa powder not cacao powder. (The difference between the two is too detailed to go into here.) A good quality Dutch cocoa will also be fine.
I used organic raw honey instead of agave in this batch, maple syrup works as well.
I always double this recipe to make 12 cupcakes.
Added 1/4 tsp vanilla bean paste.
I had no grapeseed oil so I substituted rice bran oil and have also used macadamia nut oil in the past. (I don’t use nut oil when sending them to school).
Sometimes, to add a bit of mummy kiddy excitement, I add a large handful of dark chocolate chips.
I have iced/frosted them for special occasions as well.

Go here for this neat wee recipe:

Chocolate Cupcakes


Frozen cheesecake anyone?

Two weeks ago, whilst searching for a gluten free cheesecake recipe, I came across this little beauty on a great blog, The Gluten Free Scallywag. Now, being immensely fond of the word scallywag, it just had to be tried.

Too much citrus is never enough for this cheergerm, so I added a tad more lemon juice than the recipe said. As a result, when the springform pan was undone, it was a bit too melty to serve. To the freezer I cried! After an hour of nervous nail biting (or completely forgetting it was there due to the odd champers or two) we discovered, a frozen cheesecake! A delicious accident.

Kid 1 and The Yak loved it so much, I churned out another one for a Christmas get together the other night. Frozen cheesecake, that’s how we roll now baby. Before serving, I tumbled some blueberries atop in a very Nigella type manner.

My wee changes:
Grated the zest of one lemon and lime, halved it, added half to the base mixture and half to the cheese mixture.
Not having baked The Gluten Free Scallywags GF graham crackers, I used half GF arrowroot and half GF rice coconut biscuits.
I added 2 tablespoons of lime juice in the cheese mixture and sneaked in 1/4 teaspoon of vanilla paste as well.
Big cheesecake tip,always bring the cheese to room temperature before mixing.
I put the cheesecake in the fridge overnight then popped it in the freezer a few hours befor serving. Make sure you pull it out for about 15 minutes or so to ensure you can cut it.

Go here for the fantastic recipe!

http://www.glutenfreescallywag.com/2010/02/no-bake-cheesecake-gluten-free.html


Shortbread for a hungry Silly Yak

IMG_5832

‘It’s not fair!’, cried The Yak, stamping his coeliac foot and crossing his coeliac arms. ‘Everybody except me gets to eat your shortbread at Christmas.’ Pouting doesn’t normally work in this household but I am nothing if not kind. Also, I had previously set myself a challenge and it was time to woman up.

Gluten free shortbread has arrived and the Yak is once again a happy man.

The experiment started with golden butter from New Zealand that glittered like Smaug’s treasure. Then basically, I just substituted the plain flour in my regular recipe with a quality brand of plain gluten free flour.

Methinks the key is to only knead the mixture for a minute or two, just enough to bring it together. It also requires a bit longer baking than my usual shortbread.

A batch was sent along to the Yak’s place of employment….although he is a begrudging sharer. The feedback was glowing. (At least that’s what The Yak told me.) They are delicate and moreish, and the Yak thinks every bit as delicious as the gluten laden version.

I concur Sir Yak, I concur.

The big test? Neither Kid 1 or Kid 2 clocked that they were GF…..a pretty good test in my books.

Sure, you can find store bought gluten free shortbread these days but I challenge you to accept the challenge that I challenged myself to. (You still there?). The enjoyment that this therapeutic bake provides, let alone the scrummy eating, far outweighs any convenience from buying it pre-made.

And as a very famous French woman was once reputed to have said ‘Let them eat shortbread’. (Well, she would have if she’d tasted this shortbread).

YOU NEED
250g butter, unsalted
1/2 cup caster sugar
2 3/4 cup gluten free plain flour
1/4 cup rice flour

METHOD
Preheat oven to 180C.
Line 2 baking trays with baking paper and sift the flours together into a bowl.
Cream the butter and add the sugar gradually, beating until the mixture is light and fluffy. (I use a mixer for this.)
Work in the flour gradually and with a very light hand, knead to form a dough. (I do this in the bowl.)
Divide the dough in half, roll each half out to a 3-4 cm log. Wrap in clingwrap and refrigerate for half an hour.
Slice the logs into 1-2 cm thickness, depending on your fancy, place 10mm apart on a baking tray and prick each piece all over with a fork.
Bake for 20-25 minutes until crisp and straw-coloured.
Cool down on wire racks.
Makes about 20-25 pieces.
adapted from The Margaret Fulton Cookbook

IMG_5806


Gluten free chocolate date loaf

IMG_5447

In honour of my 6 year old (Kid 2) being given his first phone number by a girl….I present to you my low fat gluten free date loaf. (I trust it will be many years before my youngest progeny goes on an actual date…). I adapted this from a recipe called ‘Uncle Bill’s Date Loaf’ given by a friend a few years ago.

I like to experiment with different gluten free flours in a continual search for an enjoyable texture and for health purposes as well. The Yak can too easily get stuck chowing down on food containing too much starchy flour such as white rice flour or tapioca flour.

In this version, I have combined buckwheat flour and almond meal, mixed with store bought gluten free plain flour. What’s so great about buckwheat flour you ask? Glad you did….there are too many benefits to list here but in short, diets that contain buckwheat have been linked to a lowered risk of developing high cholesterol and high blood pressure. It is actually not a grain but is a fruit seed, related to rhubarb and sorrel.

I also bake a version of this recipe using wholemeal wheat and spelt flour. (I shall post this some time in the future). I add the cocoa powder to distract my 9 year old (Kid 1) from the dates, anything chocolatey keeps that kid happy.

Coconut sugar and I have been having a passionate love affair for some time now (shhh…please don’t tell The Yak). There are many health claims attached to this sugar, it is meant to contain nutrients that cane sugar doesn’t have and is said to be a low GI alternative to cane sugar as well.

Basically, I ain’t a scientist…just a humble home cook. I like the taste and the possibility of it’s potential health benefits. I guess that stuffing oneself with too much sugar, no matter what it’s origin,  may not be the healthiest choice. But everything in moderation I say! (If you don’t have any coconut sugar use soft brown sugar and Bob’s your uncle, or is that Bill?).

YOU NEED
1 cup boiling water
1 1/2 cups dates
1 teaspoon bi-carbonate soda
1 tablespoon butter or margarine
1/2 cup coconut sugar (or soft brown sugar)
1 egg
2 tbl cocoa powder
3/4 cup gluten free plain flour
1/4 cup buckwheat flour
1/2 cup almond meal
2 1/2 tsps gluten free baking powder
pinch salt

METHOD
Heat oven to 180 C
Grease a loaf tin and line the base with baking paper.
Chop dates finely and place in a bowl, pour boiling water over. Add bi-carbonate soda and stir. Set aside until cool.
Sift cocoa powder, plain flour, buckwheat, baking powder and salt together. Stir in almond meal.
Put butter and sugar into a bowl and beat until smooth.
Add egg and beat well.
Add date mixture and flour, stir until combined.
Preheat oven to 180 C.
Pour into tin and bake for 35- 40 minutes or until a skewer comes out clean.
Totally delicious when served hot and with butter or whatever your favourite spread is.